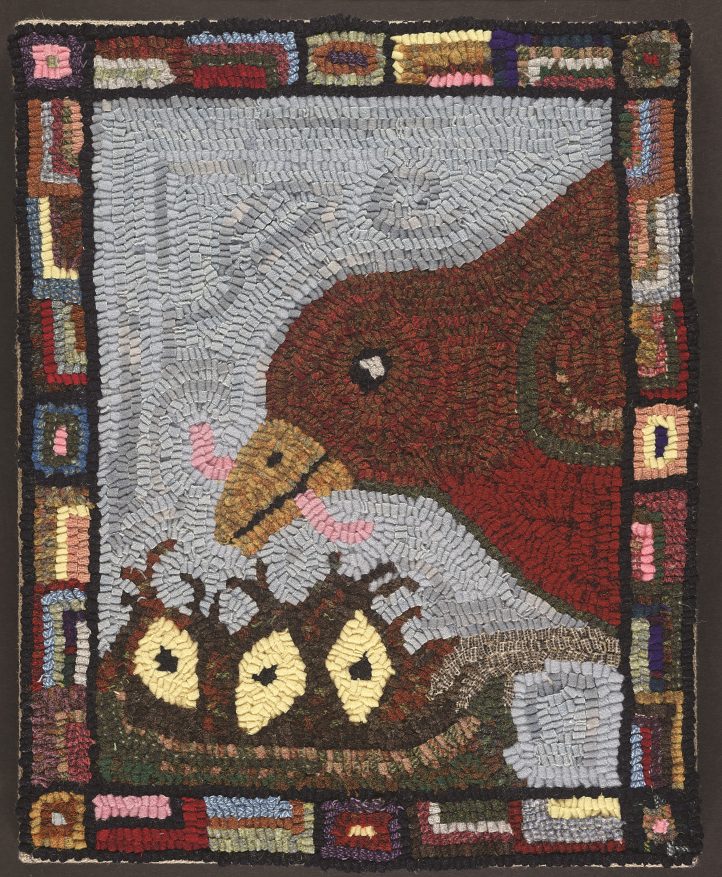
The Early Bird Gets the Worm, 16″ x 20″, #8-cut wool on primitive linen. Designed and hooked by Karen Larsen, Elliottsburg, Pennsylvania, 2011.
PHOTOGRAPHY BY IMPACT XPOZURE
After a long, cold winter, it’s a thrill to see the first robin of the season hopping in the grass, looking for worms. At this time of year, you may be itching to start on a small and colorful springtime project. This appealing design is a mother robin feeding a fat worm to her babies.
MATERIALS
- 25” x 31” primitive linen
- 1/2 yard blue wool, for background
- 1/4 yard dark plaid wool, for robin body
- 1/8 yard red wool, for robin breast
- Stash of worms
- 1 pair 16” wood stretchers
- 1 pair 20” wood stretchers
- 36 thumbtacks
- 4 upholstery thumbtacks
- 2 screw eyes
- Picture wire
Simple, colorful, and eye-catching was my goal. The close-up point of view creates an intimate connection between the viewer and the birds. It’s a fairly small project, 16″ x 20″, so a simple design and blocks of color work well. Too many small design elements would make the rug look busy and be difficult to hook in #8-cut wool.
The babies are represented by their huge, gaping beaks. I added a colorful border to create more visual interest—it’s a perfect way to use up some of your “worms,” those extra strips of wool leftover from the rugs we hook. (As hard as I try to not cut too much wool, I seem to add to my mountain of worms with each project.)
I started by hooking the inner line of the border, which keeps everything nicely contained. Then I hooked the mother robin with her bright red breast. I used a red wool with a subtle linear plaid to give it a bit of interest. Her brown feathers are a busier plaid of a medium brown with dark brown, dark red, and salmon. I love using plaids; they create texture, interest, and movement.
I hooked the mother’s eye before doing the rest of her head. Then, after hooking the area around the eye, I unhooked it, and hooked the eye again. This method keeps a small design feature from getting buried in the rest of the hooking.
The babies’ mouths came next. The bright yellow of their mouths triggers the mother to deliver the food she is carrying. I didn’t bother to represent the rest of the baby birds’ bodies. The open mouths say it all!
The nest is another area where a good stash of worms—the fabric type—comes in handy. I took some artistic license with the nest. The messy lines can be seen as the nest or as the babies’ downy feathers.
A bright, happy blue sky forms the background for the design. I kept the sky fairly simple, without a lot of variation in the blocks of color, so it wouldn’t compete with the rather wild border.
The border was the last part I hooked. Because I see my designs as illustrations, I like a border; it’s a frame for the picture, and the choices are just about endless. I chose to go a bit over the top with the many colors, although I did keep in mind the colors in the main design and made sure to incorporate them into the border. If this colorful border is not to your liking, you can get creative and design one of your own. Or do no border at all.
Finally, after all the hooking was completed, I decided to finish the project as a wall hanging because of its small size. I bought wood stretchers (the ones on which artists stretch oil painting canvas) the same dimensions as the project. They come in a variety of lengths and are mitered at the corners so they fit together without the need of any tools. I added a bit of white glue at the corners before fitting them together to give them more stability.
I steam-blocked my project, and while it was still quite damp, I attached it to the stretchers. I had about 4″ of unworked linen around the entire design, which I trimmed down to 3″. I pulled this excess linen around the stretchers, folding under the cut edges, and tacked it down. I began at the top and bottom, then worked on the two sides, folding the corners neatly. I used thumbtacks for all but the four corners, which had more layers of linen to tack down. On the corners I used upholstery thumbtacks, which have a longer shaft. You could also use a staple gun instead of tacks. I added two screw eyes and some picture wire to complete the project.
I was able to hook about one half of this project with my stash of worms. But, alas, my stash looks as big as ever. Those worms must be multiplying!
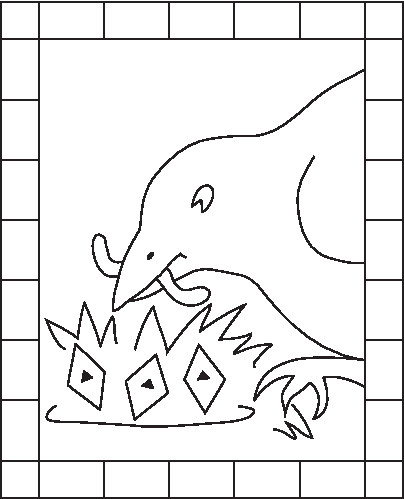
The Early Bird Gets the Worm by Karen Larson © 2011. To use stretcher bars of 16″ x 20″, enlarge this pattern 256%. Or enlarge to fit stretcher bars of other sizes as you wish. Pattern is for one-time use only.