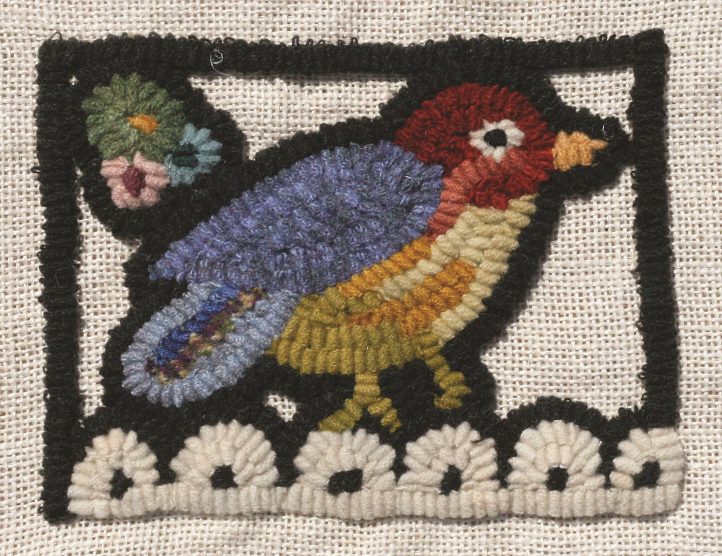
In this photo, the bird, flowers, and eyelet are hooked and outlined once and the border hooking is in place.
TEXT AND PHOTOGRAPHS BY NANCY SMITH
To understand the primitive style, think of children’s drawings: Picture an immense sun covering half the page. Think of little trees and big people. Imagine a huge butterfly, smallish birds, or a small person sitting on a large flower. Exaggerated scale or proportion, non-realistic or intuitive colors, and whimsical drawings can all work in primitive designs. Naïveté is the essence of primitive work.
The juxtaposition of eyelet, a common dressmaking trim, and animals is unlikely, but it fits the primitive point of view. Eyelet, a cotton fabric with small, bound holes, has nothing in common with animals, but why not think about both animals and eyelet in a new way—imagine these primitive, amorphous animals walking across eyelet. (I often steal the animals from larger works I have done and incorporate them in my small pieces. You can find these eyelet animals in my much larger piece, Animal Mélange.) Remember, primitive animals don’t have to be brown, black, or beige. A blue pig might be just jolly. Likewise, leaves don’t have to be green. And the eyelet serves as a repetitive color throughout. Being small and very portable, these projects are great for traveling; hook the subject at home, and hook the very simple background on a trip.
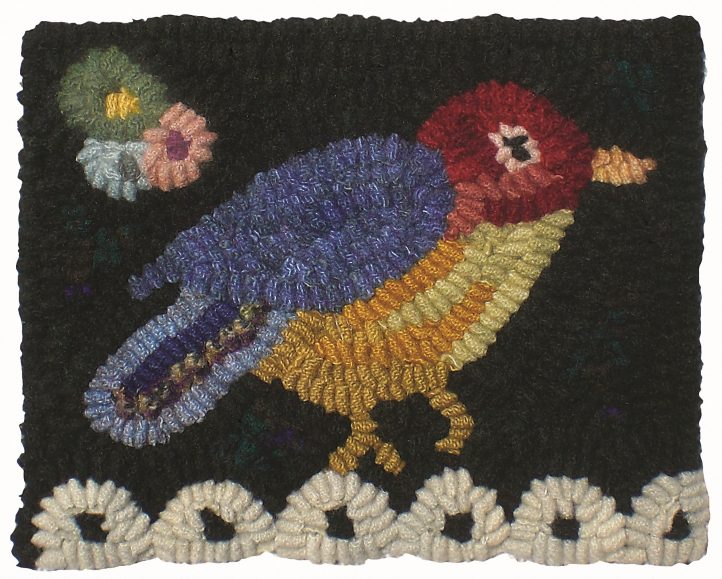
Eyelet Bird, 6 1/2″ x 5 1/4″, #8-cut wool on linen. Designed and hooked by Nancy Smith, Roca, Nebraska, 2010.
MATERIALS
- Primitive Eyelet Bird Pillow Pattern PDF download (see red button below)
- Wooden embroidery hoop with a wing-nut tightening screw
- #2 rug hook
- Pins
- Rug hooking bent scissors
- 12″ x 13″ hooking linen or other backing of your choice
- 7″ x 8″ piece of fabric for the pillow back
- Permanent marker
- 10 1/2″ black grosgrain ribbon
- Fiberfill for stuffing
- Needle and thread for final hand stitching
WOOL—#8 cut (1/4″) x 16″ long (cut parallel to the selvedge)
- Head: 2 strips red/orange
- Under eye and neck: 1 strip lighter red/orange
- Breast, feet, and beak: 5 strips of various yellow-golds
- Wing: 5 strips lavender blue
- Tail feathers: 3 strips in blue or purple, of which 1 is tweed
- Eye: iota each black and white
- Flowers: 1 strip each pinky salmon, light blue, and olive
- Flower centers: iota magenta, gold, and gray
- Eyelet: 9 strips off-white
- Background: 7″ x 16″ antique black
THE BASICS OF PRIMITIVE HOOKING
A project this size (5 1/2″ x 6 1/2″) is perfect for the beginning rug hooker. First, allow enough margin (about 3″ to 5″) on each of the four sides of the backing (usually linen) to allow the design to fit easily within your hoop and so that you can easily work the hook to the edge of the design. Zigzag or serge the linen backing to keep it from raveling and for a neat edge. Lay your pattern flat on a table, and put your linen on top. Pin the pattern and fabric together around the edges in several places, and secure a couple of pins within the pattern for stability. Using a lightbox or a day-lit window, trace your pattern onto the linen with a permanent ink marker. Remove the pins, and put the pattern aside.
Secure your traced linen piece tightly in the hoop, right side up. You will need your hook, a pair of bent scissors, and a collection of wool strips to hook the design. Rest the hoop in your lap or on a table. Hold your hook in your right hand (or dominant hand) on top of the linen. Hold a strip of wool between the thumb and forefinger of your other hand against the underside of the linen. Your right hand pushes the hook through the linen to hook, or grab, a portion of the wool strip and bring it to the top of the linen. The beginning of each strip should be pulled to the top of the linen; allow up to 1″ to be pulled to the top to start. This tail will be trimmed off later.
As you work, clip the cut ends with the bent scissors. The first stitch you pull up will be the cut end. The next and subsequent stitches are actually loops of the strip. Space the loops so they are just touching each other. Do not hook in every space of the backing as your stitches will be packed far too tightly. Just let the loops be “comfortable” with each other. As you create more rows of loops, they will press against each other and guarantee that the loops will stay in place.
When you finish hooking a strip, pull the end to the top of the linen too. This detail is very important. If the starting and ending tails are on the backside, an inadvertent pull could tear out the whole strip. Having both ends on the top locks the strip in place.

Eyelet Animal with Bird, 6 3/4″ x 6″, #8-cut wool on linen. Designed and hooked by Nancy Smith, Roca, Nebraska, 2010. This fanciful creature first appeared in Animal Melange, hooked in 1987.

Eyelet Animal, 6 3/4″ x 5 3/4″, #8-cut wool on linen. Designed and hooked by Nancy Smith, Roca, Nebraska, 2010.

Eyelet Bird with Moon, 6 3/4″ x 6″, #8-cut wool on linen. Designed and hooked by Nancy Smith, Roca, Nebraska, 2010.
HOOKING EYELET BIRD
Begin your hooking with the bird’s pupil. Use a black strip for the center of the pupil; the outline will be a white strip. I always start with the eye when hooking animals or people as the eye gives the character of the creature. Your wool will be cut in strips 1/4″ (#8 cut) or 1/8″ (#4 cut) wide. If you need to, trim the #8 cut to make it narrower for the eye. You might redo this eye two or three times until you are happy with it. Then outline the pupil in off-white.
Now outline the various body parts: the head, the wing, the tail feathers, and the breast. All these shapes have curved outlines. Work from the inside of the curved lines because this compacts the hooked loops better than working from the outside. Remember the direction of your bird’s feathers. The breast should be gently curved as well. Think of the direction of the tail feathers and the feathers in the wing. Keep the natural positioning of the feathers in mind as you fill in the various body parts, too. For instance, the tail feathers’ outline is curved, but the curve is actually an optical illusion created by a number of straight feathers that form the look of a curved tail. Hence, while the outline is curved, the interior lines (feathers) are hooked in straight lines as they truly are on the bird’s body. Do not just fill in willy-nilly.
Next, hook the clump of three flowers. Outline them first, and then fill them in with the flowers’ centers. Lastly, complete the eyelet. Begin with the off-white, outlining and creating the bottommost edge of your hooked piece. Then add the black dots.
After you have completed hooking the objects in the design, outline them with your strips in your background color. Next, outline the very outermost edge of your piece. Now you are ready to hook the background.
Because this piece is relatively small, one color for the background will suffice. Do try to avoid hooking in straight lines because that will make filling in the background much more difficult and restrictive.
FINISHING YOUR PILLOW
Trim your completed piece leaving an excess 3/4″ all around. Iron the piece on the back side using a slow and gentle circular motion. Lift the iron frequently. Cut a piece of ribbon to 10 1/2″. Pin the ends of the ribbon to the upper corners of your completed hooked design. Let the length of ribbon rest on the right side of your hooked bird for the moment.
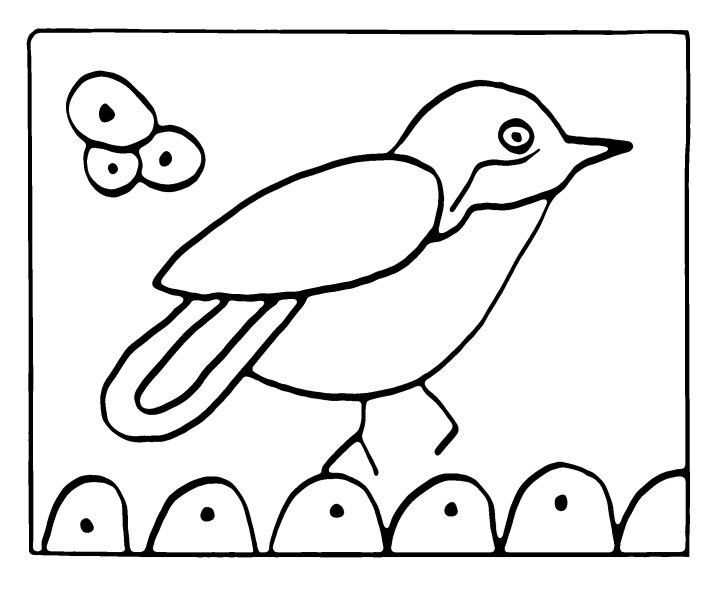
Eyelet Bird Pattern© Nancy Smith Collections 2009. Presented here for personal use only. The pattern may not be duplicated for mass use or sold, nor may rugs made from this pattern be sold. Actual size: 6 1/2″ x 5 1/4″. Additional patterns are available at www.nancy smithcollections.com.
Place the 7″ x 8″ fabric backing over the right side of your work (place the right side of your hooking against the right side of the fabric backing), and pin it in place, matching the outside edges. (The loop of ribbon should remain between the two fabrics.) Attach the zipper foot to your sewing machine. Do this stitching from the fabric backing side. You will be able to feel the ridge of the hooking and be able to get fairly snug against it. As you stitch, try to get your needle as close to your hooked edge as possible, adjusting your needle in the foot.
Starting on the lower edge of the design, about 2 1/2″ in from the corner, straight stitch through both the backing and the hooked fabric all the way around the edges of the hooked piece to about 2 1/2″ in from the other bottom corner. (The two fabrics should remain unsewn for about one third of the length of the lower edge to allow you to turn it inside out.) Be careful not to catch the ribbon except in the upper corners. Double stitch over the ends of the ribbon to secure it well. Clip the corners fairly close.
Remove the zipper foot, and replace it with your machine’s normal foot. Now zigzag the edges together where you straight stitched earlier. In separate passes, zigzag both the opening edge of the fabric backing and the edge of the hooked backing.
It’s time to turn your work inside out. Press it lightly from the back side only. Stuff it with a good quality fiberfill. (A Dritz Point Turner is handy for poking the Fiberfill into the corners.) When you are happy with the amount of filling, hand-sew the bottom opening closed. Project complete: you now have a bird in the hand!
COLOR PLANNING FOR YOUR FUTURE RUGS
One could say hooking is all about color. Human beings make an initial subconscious judgment about a design in terms of color. After we notice color, we respond to scale, balance, and line. The appeal of a color is related to its complexity. A color is considered complex if it requires more than two words to describe it. Sky blue is a simple color while “a sort of grayed sky blue with a hint of beige” is a complex color. Think of it this way: Are you using a tomato-soup red? Is that tomato soup made with milk or water?
Color can be considered a type of language. Almost 50 percent of the U.S. population prefers the color blue. Red is our second favorite color. Restaurants intentionally use the color red in their décor because it raises blood pressure and can make us salivate. (By contrast, the color white is used in packaging to connote fewer calories). Color can make you feel good or feel ill. Of all the hues discernable to the human eye, the widest range distinguishable is in the family of greens.
For primitive-style hooking, think in terms of color planes—planes in the sense of large flat areas of a color, instead of gradients of color. In these small pieces, the minimum number of colors in the project should be six. Too few colors and you have not interested the eye; too many colors and the subject can be confusing to the eye. Shy away from using analogous colors (neighbors in the color wheel, for example, blue and green or yellow and orange) next to each other because they blend into and negate each other. In Eyelet Bird, the bird features complementary colors (opposites in the color wheel). However, the three flowers are hooked in analogous colors. With this color trick, the bird will stand out more than the flowers.
Finally, the human eye likes repeating patterns and colors. Repeat your colors here and there even if only in a very small way.
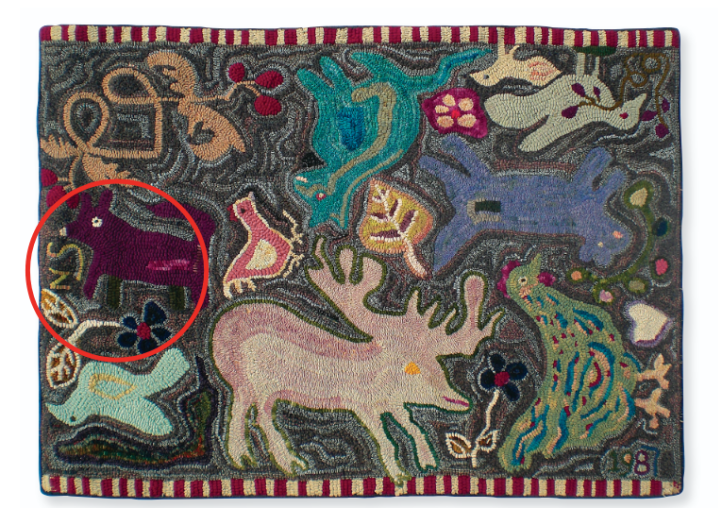
Animal Melange, 42″ x 32″, #4 and 8-cut wool and eyelet strips on linen. Designed and hooked by Nancy Smith, Roca, Nebraska, 1987. See the small animal circled near my initials? This rug illustrates how I took a creature from a previously hooked large rug and used it for the subject of a small pattern.