All Cards Designed And Hooked By Kim Dubay
Do you remember baseball cards? Did you—or your children—have a collection that grew and changed as time went on? Lately trading among rug hookers is starting to look a lot like that: hookers are exchanging small baseball-card-sized hooked works of art with each other. Welcome to the world of artist trading cards, hooked style.
Artist trading cards, or ATCs, are small works of art (2 1/2″ x 3 1/2″) that painters, collage artists, and fiber artists trade. Think of them as business cards. These trading cards for artists were first seen in Switzerland in a gallery showing at a bookstore in the mid-1990s. The public was captivated. The response was overwhelming, so people were told that if they wanted a card, all they needed to do is bring a card in to exchange. The idea spread, and years later, the trading of art cards came to North America. ATCs are alive and well today in many different art and craft fields: paper arts, collage, needlework and embroidery, scrapbooking, quilting. . .and now rug hooking.
Trading is not a new idea for rug hookers. For years, we have been trading hooked pieces, usually 8″ size mats. The beauty of trading these small ATCs at a rug workshop or gathering is that there need be no formal activity planned to accomplish a trade. Individuals can trade with other individuals—during lunch breaks, while mingling between classes, in the marketplace—regardless of the planned activities going on around them. Trading ATCs has always been informal and spontaneous, no real rules other than the specified standard size of 2 1/2″ x 3 1/2″.
Swapping ATCs is a wonderful way to trade original pieces of art in any medium. They are a great way to break the ice; one rug hooker approaches another with a smile and starts the conversation with the words, “Do you have any trades?” You give one of your pieces, and you get one in return—and your collection begins. It is as simple as that.
Making an Artist Trading Card

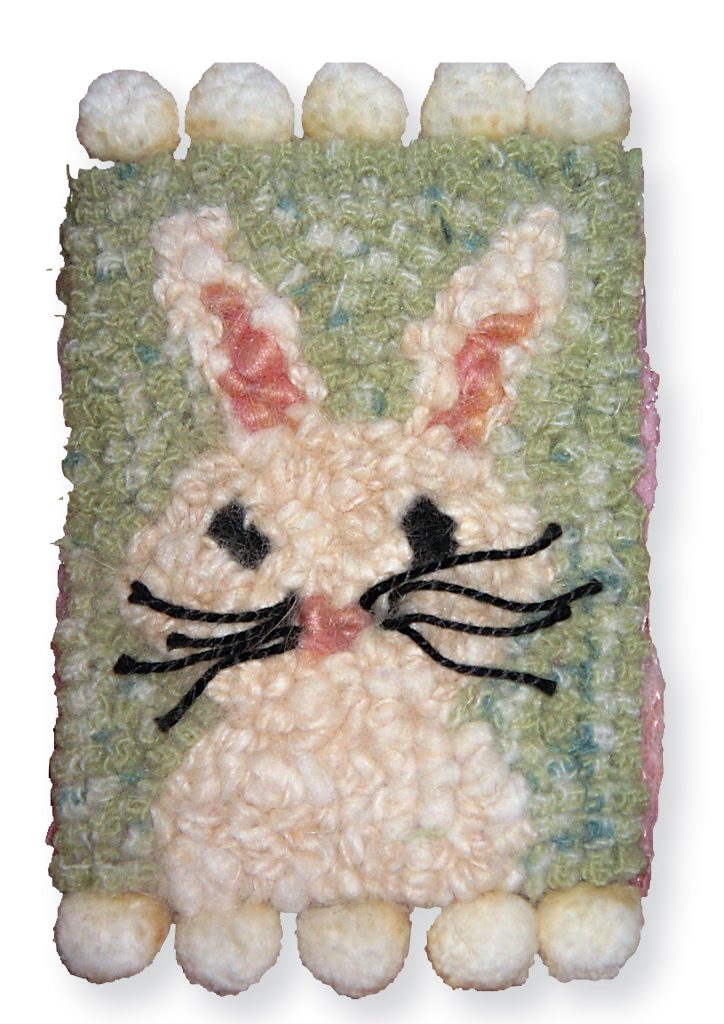
Sprockets (Critter Series), 2 1/2″ x 3 1/2″, #4- and 6-cut wool on linen. Wool strips, bead eyes, and a pearl cotton crocheted flower with button center lend a fun look to this ATC. Lil Green Monster (Critter Series), 2 1/2″ x 3 1/2″, #6-cut wool on linen. This whimsical design uses hooked wool strips, vintage shoe-button eyes, and a newspaper hat held in place with brads. Bunny Love, 2 1/2″ x 3 1/2″, #4-cut wool and hand-spun angora yarn on linen. Black pearl cotton whiskers and a pom-pom trim make this bunny ATC a fun trade.
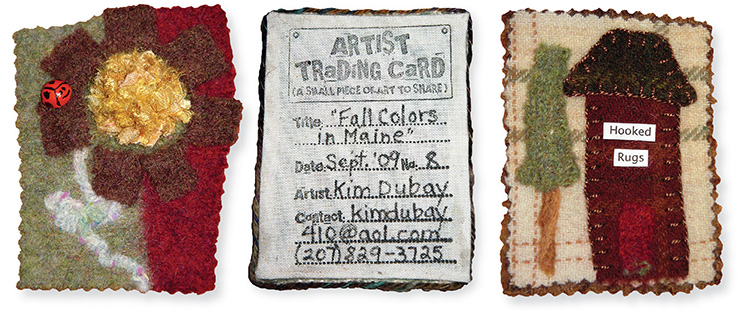
Ladybug’s Home, 2 1/2″ x 3 1/2″, wool, silk ribbon, yarn, handmade button on linen. The flower center was hooked with silk ribbon, the rest of the card was made from a felted sweater. The flower center is surrounded by needle felted flower petals. A yarn stem and a handmade ladybug button complete this ATC. ATC back of Fall Colors in Maine, 2 1/2″ x 3 1/2″, muslin with fabric ink and fabric marker on linen. Designed and hooked by Kim Dubay, North Yarmouth, Maine. Add a muslin label rubber stamped with fabric ink to the back of any ATC. Personal information can then be filled in with a fabric marker. Hooked Rugs Studio, 2 1/2″ x 3 1/2″, wool, yarn, paper, and pearl cotton. The house, roof, and background are appliquéd using wool samples. A wool sweater was stripped and needle felted for the door and treetop. The tree trunk was hooked with yarn. As a finishing touch, the words “Hooked Rugs” were added on paper.
Materials
- 14″ x 16″ piece of primitive linen (or the foundation of your choice). This size backing will make 4 ATCs, and the backing is sized to fit a standard size rug frame.
- Scraps of assorted #3 to #6 cut wool, for hooking and finishing
- One 4″ x 5″ piece of wool for each card, for the backing
- Rubber stamps and Stazon ink or fabric ink, for labels
- Paper or muslin, on which to print or stamp labels
- Fabric pen or fine permanent marker, for writing information onto labels
- Pinking shears (optional)
- Assorted trims, for hooking and/or finishing
- Elmer’s Glue and Aleene’s tacky glue
- Assorted sew on embellishments (optional)
- Basic rug hooking equipment
Let’s start with the foundation choice for cards. Primitive linen is my favorite because I can drag an ink pen into a groove and use that fine line as a guide for hooking. I don’t recommend using a permanent marker; it makes too wide a line and cards may end up hooked larger than 2 1/2″x 3 1/2″. One artist I know uses monk’s cloth so she can fringe the short sides of her cards to look like miniature rugs.
I draw all my patterns full size in a Moleskin notebook so there are no surprises when I transfer them to linen for an ATC. I make notes in the notebook’s margins about the wool colors or the width of cut I want to use. Sometimes, I will title the full-size drawing so I can later fill in the information on the back side of the card. The notebook is a great reference for ideas for designing cards, and it serves as a record of the cards I have made and given away.
To layout my ATCs efficiently, I place four or more cards on one piece of linen, spaced about 2″ or 3″ apart. The only drawback is that I have to hook them all before cutting them out.
Any width of wools up to a #6 cut can be used if the design is simple. A mixture of widths may help to show detail. I suggest hooking the outline row a thread or two inside the pen line when hooking a larger cut so that the cards won’t grow larger than the standard 2 1/2″ x 3 1/2″.
When I need detail, I use smaller materials like yarn, ribbon, or fabric; or I sew on embellishments. The intriguing part of planning ATCs is coming up with unique ideas that give the cards personality. Try buttons or beads for eyes, crochet a small flower, or add a folded paper hat. The key to a great ATC is to keep the hooked design simple.
Finishing
Once the cards are completely hooked, I use Elmer’s glue around the individual cards to keep the linen from fraying after I cut them apart. To do this, place the linen pattern right side down on a table and glue a 1/4″ wide path next to the outside row of hooking on each card. Let the glue dry until it appears clear. Using a sharp pair of fabric scissors, cut through the glue, leaving a couple of linen threads next to the hooked edge. These threads will be covered when the cards are finished later.
If I am attaching embellishments, such as buttons or beads, I sew them on now so that the wool backing, which will be applied next, will cover the thread knots. Any decorative trims also need to be glued in place before the backing is attached.
Next comes the backing. I decide whether to match the hooked background or contrast it with another wool used in the card. The first step is to cover my workspace—I generally use a table or a cookie sheet—with waxed paper to protect the surface from any glue that may seep out during pressing.
I recommend Aleene’s tacky glue for attaching the wool to the back of the hooked card. Cover the back of the card with a generous layer of glue. Then place the card, back side down, on the wool, leaving a 1/2″ margin of wool on all four sides. Lay heavy books on the cards and allow them to rest several hours or overnight, checking occasionally to be sure that they aren’t sticking to the waxed paper.
When the card is dry, I decide on an edging. Wool strips, yarn, or ribbon are all options—sometimes no edging is best. I let the design dictate what I use. When finishing the edge with a wool strip, put tacky glue on the linen threads and on the outside row of hooking. Then lay the strip on its side next to the last hooked row and glue it in place. To finish, I cut around the 1/2″ wool edge with fabric cutting pinking shears, leaving about 1/4″ of the wool showing.
The last step is to sign the card with your personal information. Rubber stamps designed for this very purpose are available in craft stores. You can stamp your own labels on muslin with fabric ink and then use a fabric marker to fill in the information. I suggest ironing the muslin to freezer paper so the fabric stays taut while your write.
Cut your fabric label 1/2″ bigger than the wool backing so that you can turn the raw edges of the label under about 1/4″ on each side. I use tacky glue to adhere both types of labels, but I apply the glue with a paint brush so that the label lays down flat.
Another option is to make a paper label stamped with Staz-on ink. Make sure to cut your paper label smaller than the backing wool so that it doesn’t show from the front of the card. You can use your computer to design and then print a label on paper or fabric.
Card-Making Suggestions
- Sometimes left over foundation margins from hooked rug patterns are wide enough for ATCs. I have two small quilting hoops, 8″ and 10″, to use as my frame for these small bits. Or you can add fabric to these smaller pieces so that the backing fits into your rug frame.
- Labels from wool clothing, buttons, and beads are just some of the embellishments you can use on your cards.
- Save the wool samples you get in the mail. They are perfect for appliqué or fabric collage cards.
- 100% wool felted sweaters make a great base to sew, needle felt, or stitch onto.
- Keep any printed materials such as old rug hooking newsletters, class and workshop announcements, or outdated rug catalogs to cut up and use on your cards. Or use the computer to print out rug hooking sayings.
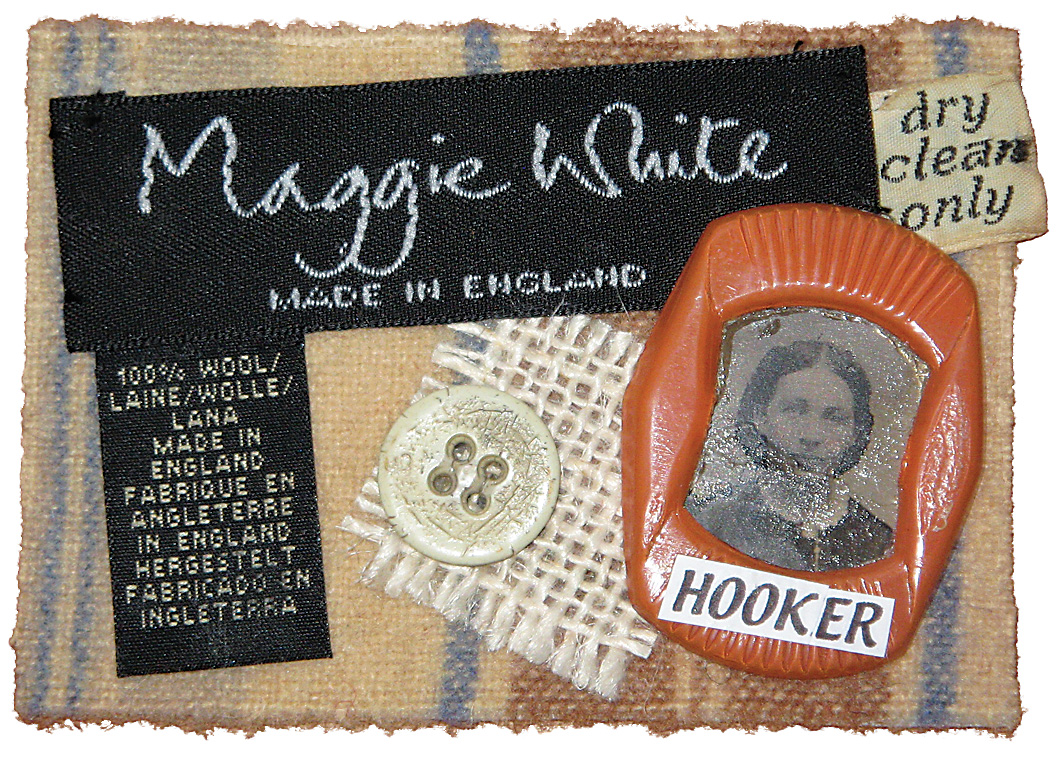
Hooking Green, 21/2″ x 31/2″, wool with wool clothing label, button, linen, vintage belt buckle, vintage tin-type photo, paper. The wool fabric background was topped with a wool clothing label, button, vintage belt buckle (with the center bar removed), and a vintage tintype photo.
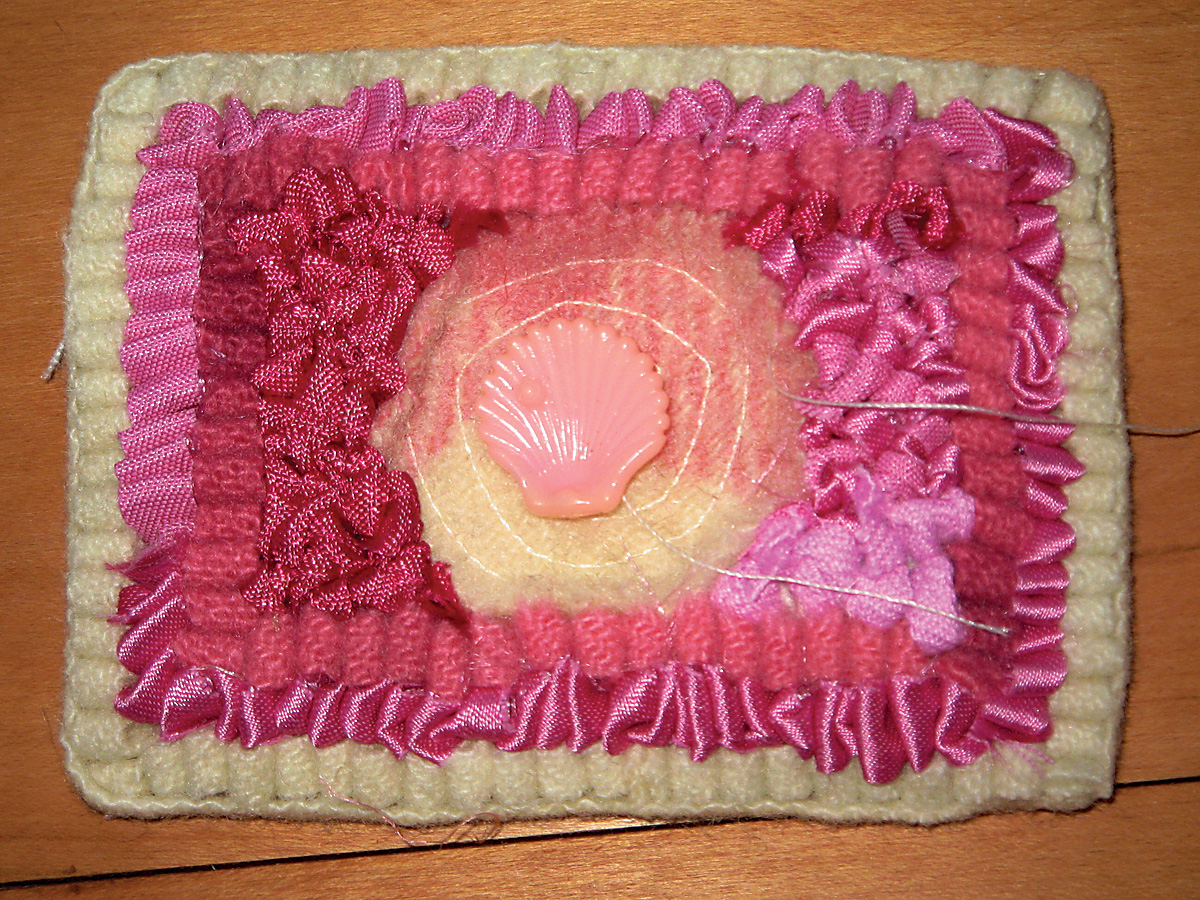
Shades of Pink, 2 1/2″ x 3 1/2″, #6 cut and hand-cut ribbon on linen. Here a hand-sewn shell button on a machine sewn wool disc is surrounded by hooked wool strips and assorted ribbons.
Why Artist Trading Cards?
The best part of making ATCs is the anticipation of the trade. I never know who I will meet or what kind of card they have created. When you make a card, you put a little bit of yourself into a little piece of art, then you trade with other like-minded hookers.
The point is to have fun, experiment, share, and be willing to put a small piece of art out there into the hooking world. Other rug hookers will respond in kind with one of their original ATCs.
Just think of all the little gems out there waiting for you – all you need to do is make a few cards to get started. It doesn’t get any better than that!