A sampler is a great project to use for reference whether you are a beginner or a seasoned rug hooker. While it may be easy to envision how a tweed will hook, it is not always so obvious when you are hooking a plaid or a stripe.
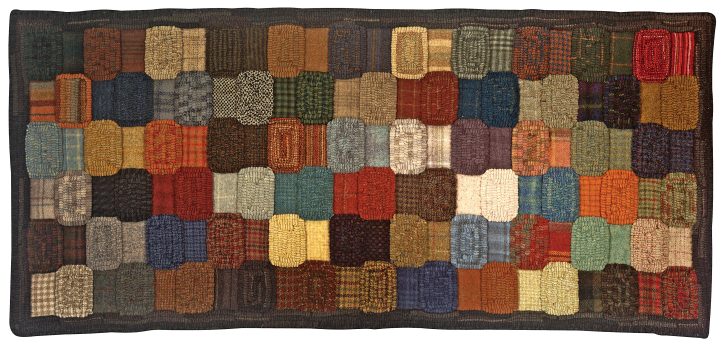
A wool sampler makes an interesting yet functional rug. By placing a piece of the wool next to the rectangle of hooked strips, a rug hooker has a handy reference to how checks, plaids, and other textured wools will look when hooked.
Samplers are not a new idea. In fact, many other fiber arts, like embroidery, crochet, and knitting, use samplers (aka swatches) to create a sort of scrapbook of stitches and ideas. The benefits of rug hooking samplers are often touted at rug hooking camps and workshops. I designed my first sampler to show how plaid and checked wools hook. When my project was completed, I was pleasantly surprised to discover that the end result was more than just a functional rug. It was actually a very interesting-looking rug hooking experiment.
MATERIALS
- Foundation of choice
- Sharpie marker
- 1 spool of nylon thread
- Assorted woolens, each 3″ x 30″
- Cording
- Rug tape (optional)
- Whipping yarn
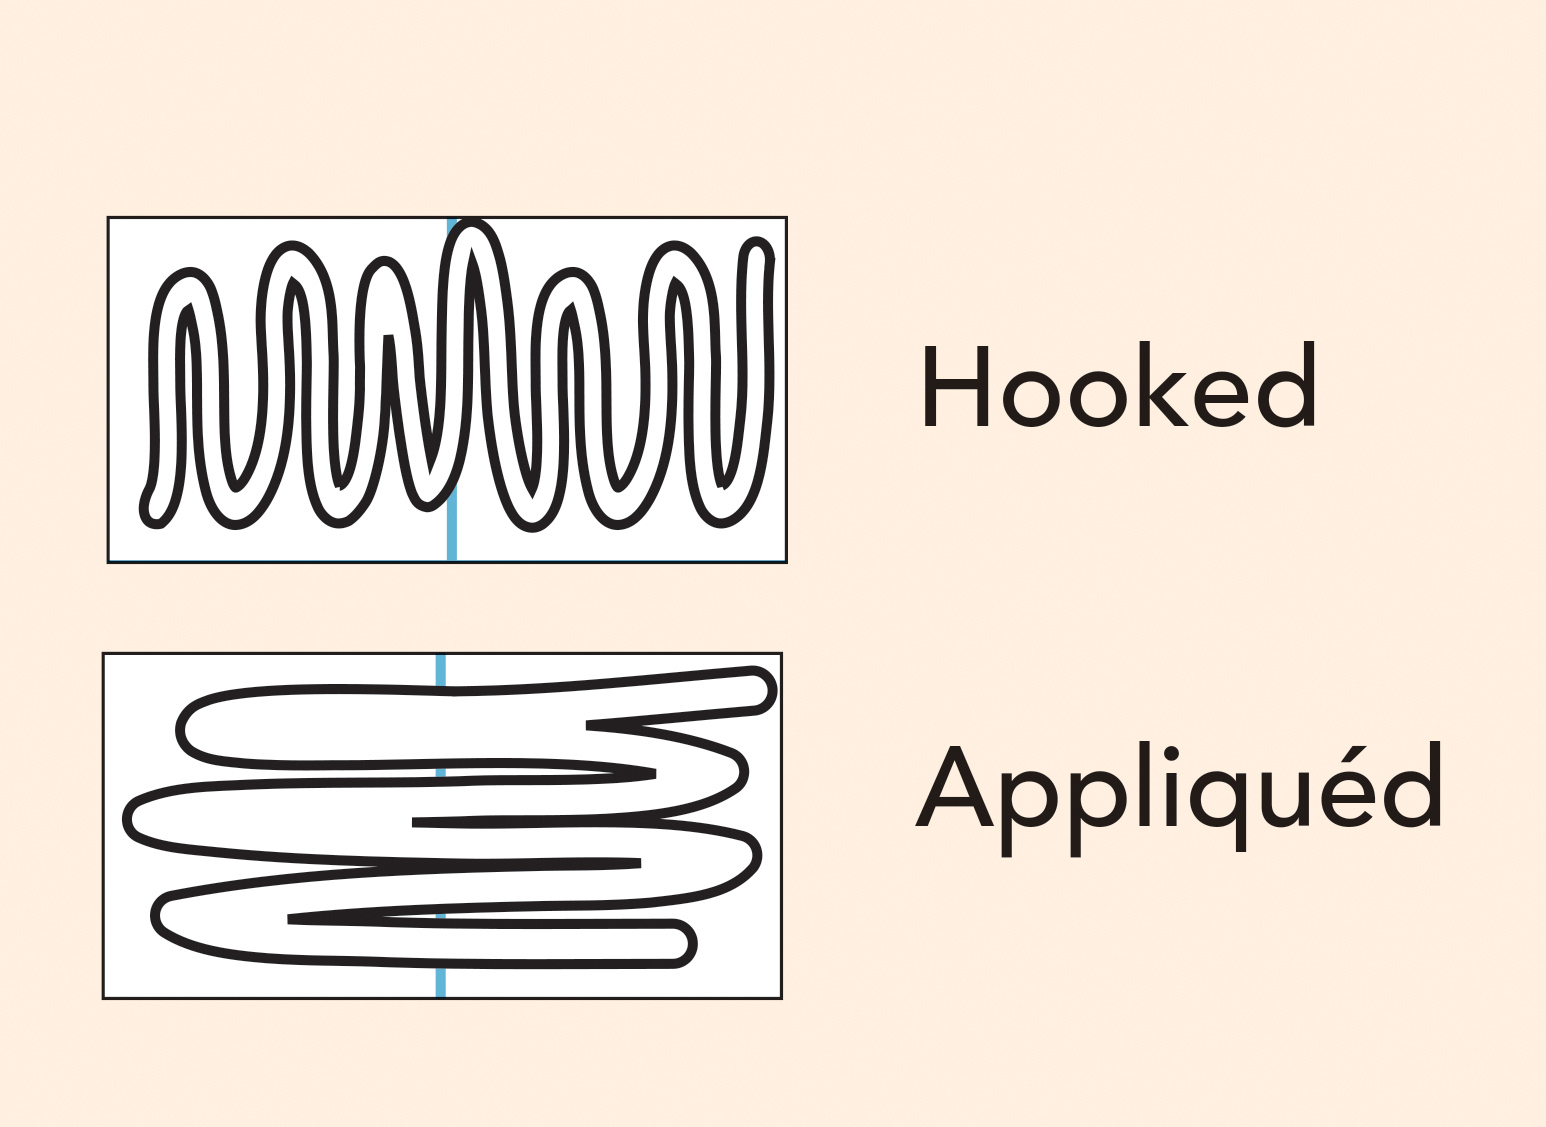
How to create this sampler: Divide the background into identical rectangles, then alternate hooking and appliquéing wools. Appliquéd wools are tucked in under the hooking and whipstitched in place.

Sampler Instructions
- I prefer monk’s cloth for this project because it has a white thread every 2″. That works well for marking a pattern that’s made up of 3″ wide x 2″ high blocks. Linen is certainly acceptable if that is your foundation of choice.
- Determine the size of your rug by allowing a 3″ wide x 4″ high space for each wool chosen. That measurement allows for a 3″ wide x 2″ high hooked piece and a 3″ wide x 2″ high appliquéd piece of the same wool right above or below it. Allow about 1″ for a border and the usual 4″ of extra monk’s cloth or linen all the way around the outside of your piece.
- Start by hooking 3 rows of border along the bottom of the piece. Continue hooking the border up the left and right sides about 6″ or 7″. I used #8 1/2-cut wool, but if you are cutting your wool smaller, you may want to hook more rows. Make sure you hook outside the border line and not on it. This border should keep your rug nice and straight as you hook or appliqué up to it.
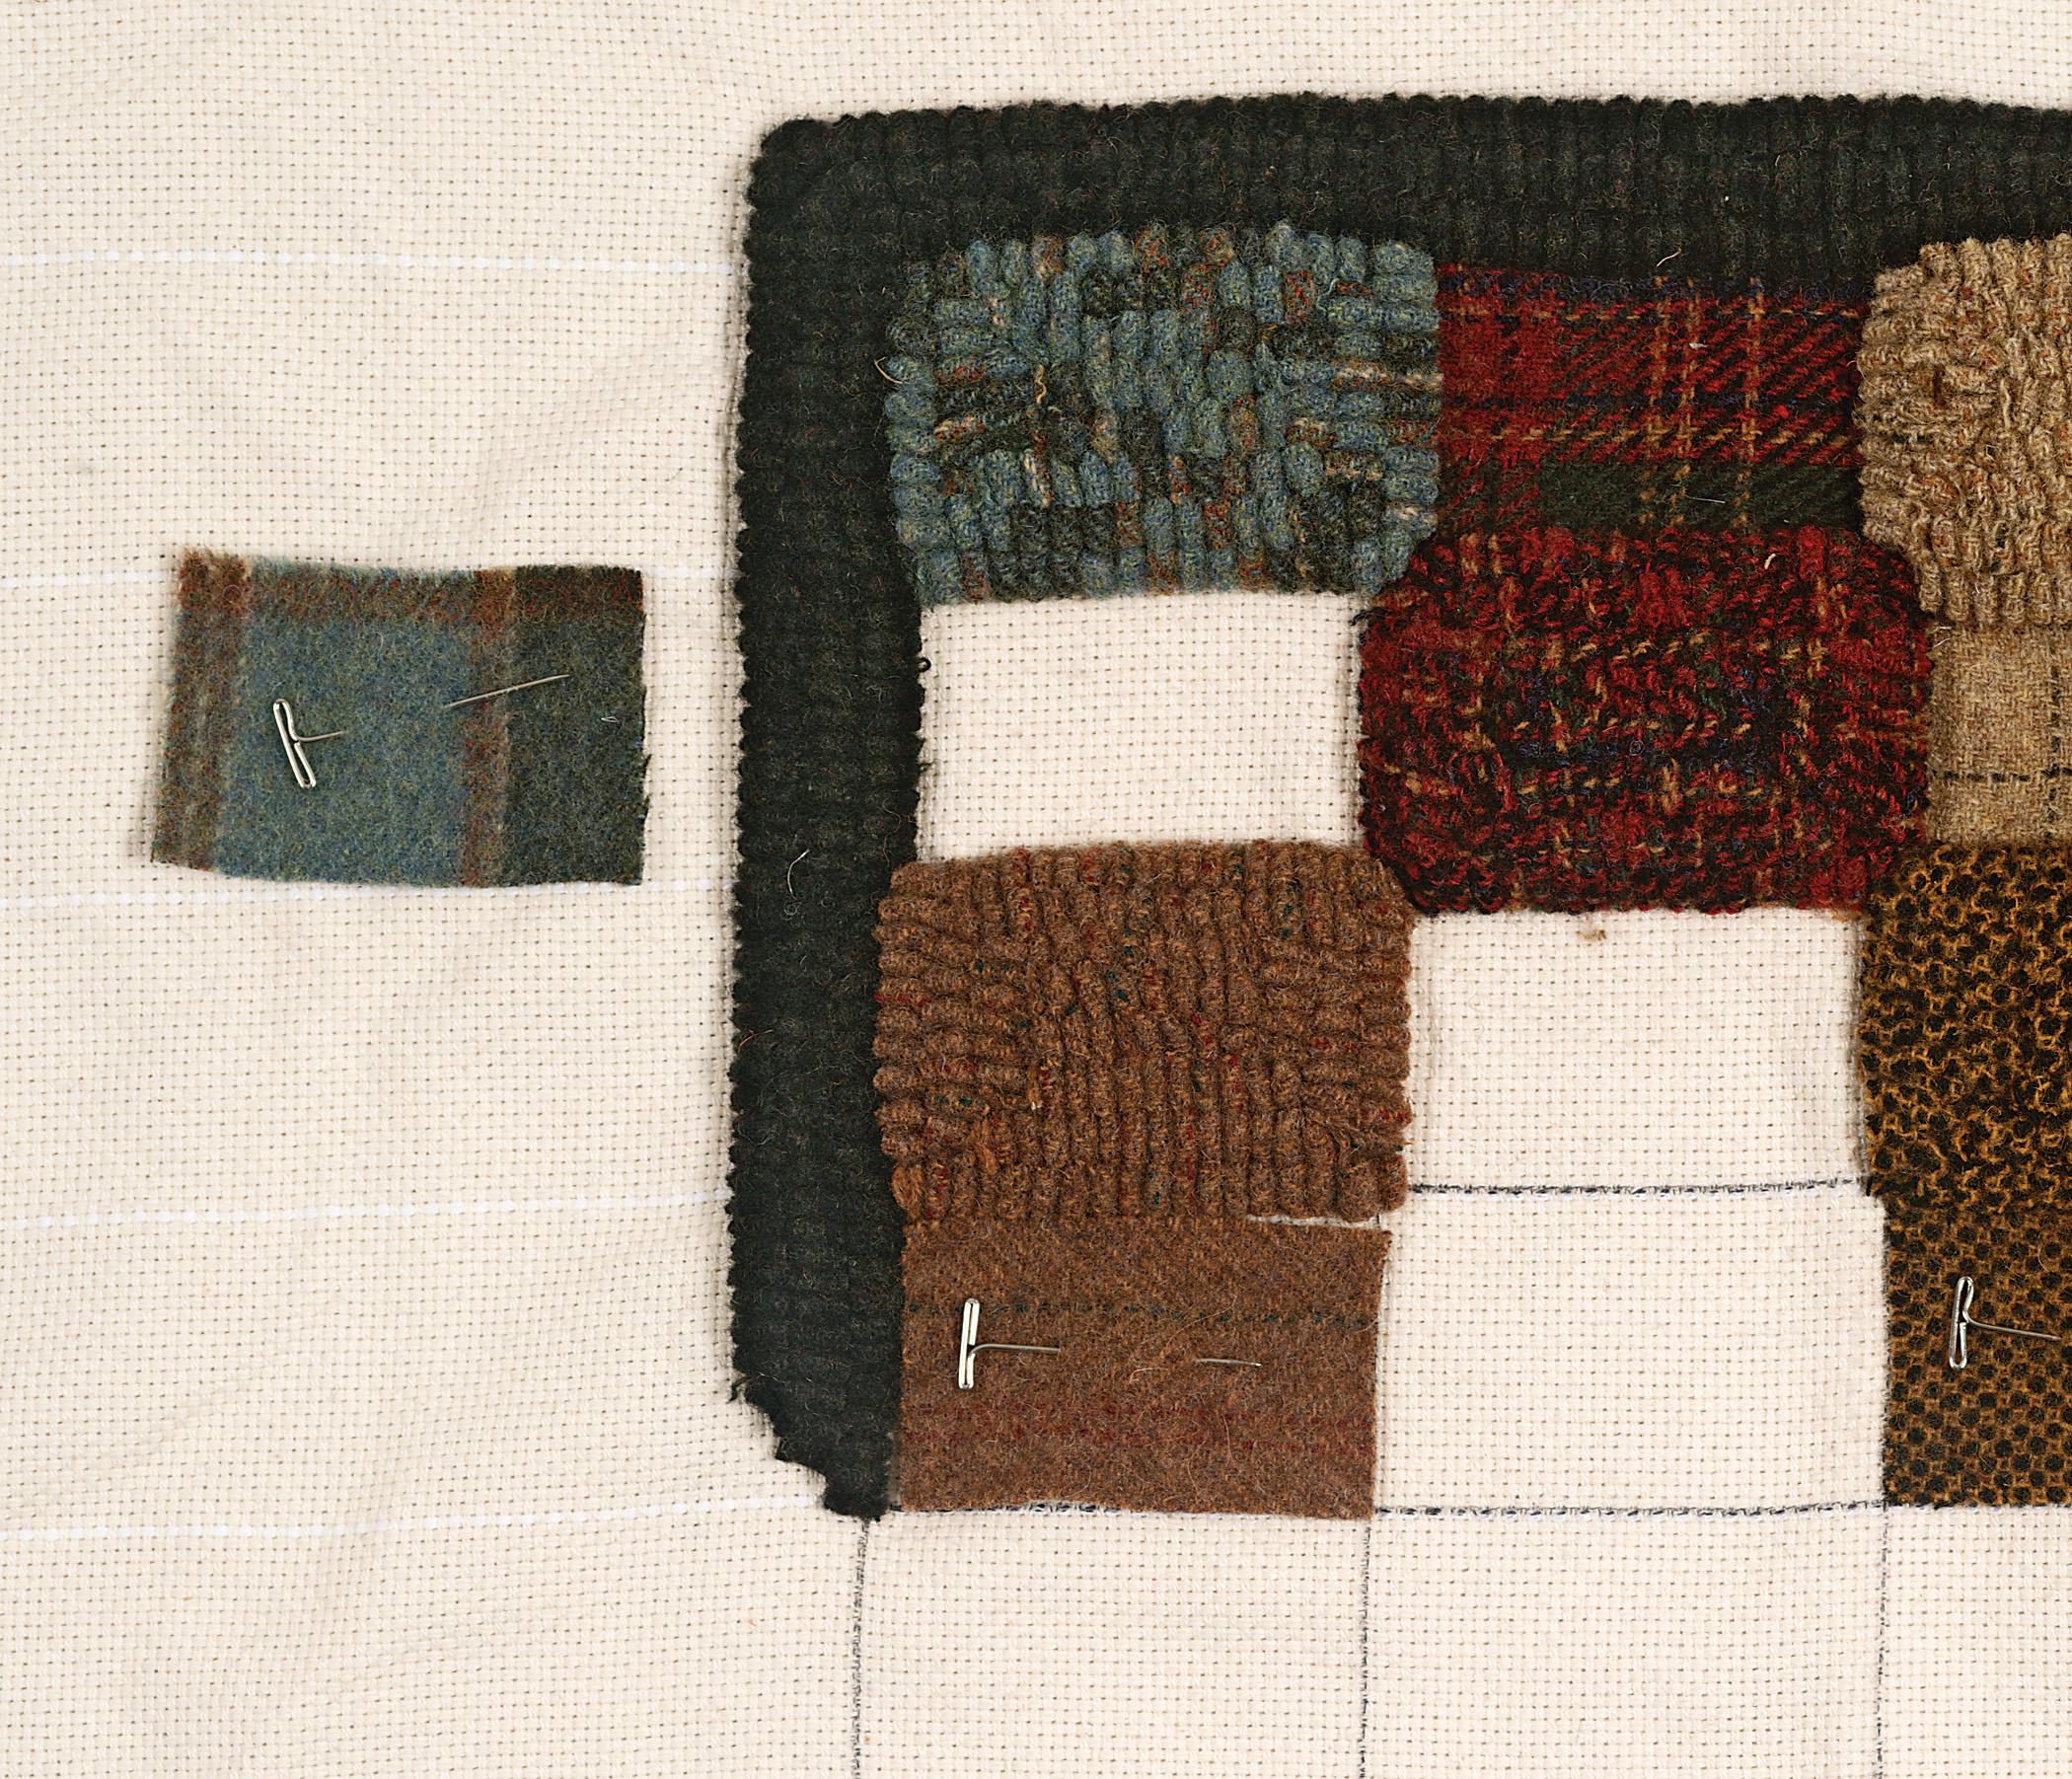
- After you have a partial border established, you are ready to hook the first section. Always hook inside the rectangle; otherwise, the 3″ x 2″ rectangle will grow and you won’t have the space you’ll need for an appliquéd sample.
- Choose your first wool, and hook a rectangle in the bottom left corner of your piece. Then cut a piece of the same wool (3″ x 2″) and pin it in the rectangle above the section you just hooked. Those two sections—one hooked and one appliquéd—constitute one block of the rug. As you continue, you will never have two hooked sections on top of or next to each other; you are always alternating the hooked and appliquéd sections.
- Choose your second piece of wool, and hook a 3″ x 2″ rectangle to the right of the piece you just pinned on. Pin a piece of that wool below the hooked rectangle. You now have two blocks.
- Move on to your third block, hooking the rectangle on the bottom and then pinning the flat piece of corresponding wool above the hooking. Proceed with the rest of your rug, constantly alternating a hooked rectangle with an appliquéd rectangle.
- Once you have one flat piece that is surrounded on all sides by hooking, you are ready to appliqué, or whipstitch, it in place. (Do not fold the edges under. I tried that the first time and it made the flat pieces puffy.) Tuck in the piece of wool so it’s tight against your hooking, trim it as needed, and whip it in place. I prefer nylon thread; I use black for the dark pieces and cream for the lights.
- Hook more of the border as the rug grows. I usually leave the border open ended in case I decide to make the sampler larger than I had originally planned. When you decide you are finished adding woolen blocks, complete the border.
- Finish this rug as you would any of your pieces. I prefer to cut the monk’s cloth to about 1 1/2″ from my hooked border. I then roll a piece of 6/32″ cording in the monk’s cloth rolling it toward the top of my piece—and whip it in place with wool yarn. You could apply rug tape if that is your finish of choice.
- Steam the rug by placing it right side down on a towel. Place a wet towel on top and press with an iron. Do not move the iron back and forth. Repeat this process on the other side.
FABRIC TIPS
- Plaids are especially versatile for rug hooking. Rug hookers often separate plaids into sections of color because each section will hook differently. The different color sections work well together when hooked in the same rug, but it is not always obvious that they came from the same piece of wool.
- Striped wool is just fun. Whether the stripes are narrow or wide, you have two choices: cut with the stripe and end up with stripes of color that work well together naturally, or cut across the stripe and find that each loop may be a different color.
- Tweeds, hound’s tooth, checks, and heathers are other wools you may want to add to your sampler.
COLOR SUGGESTIONS
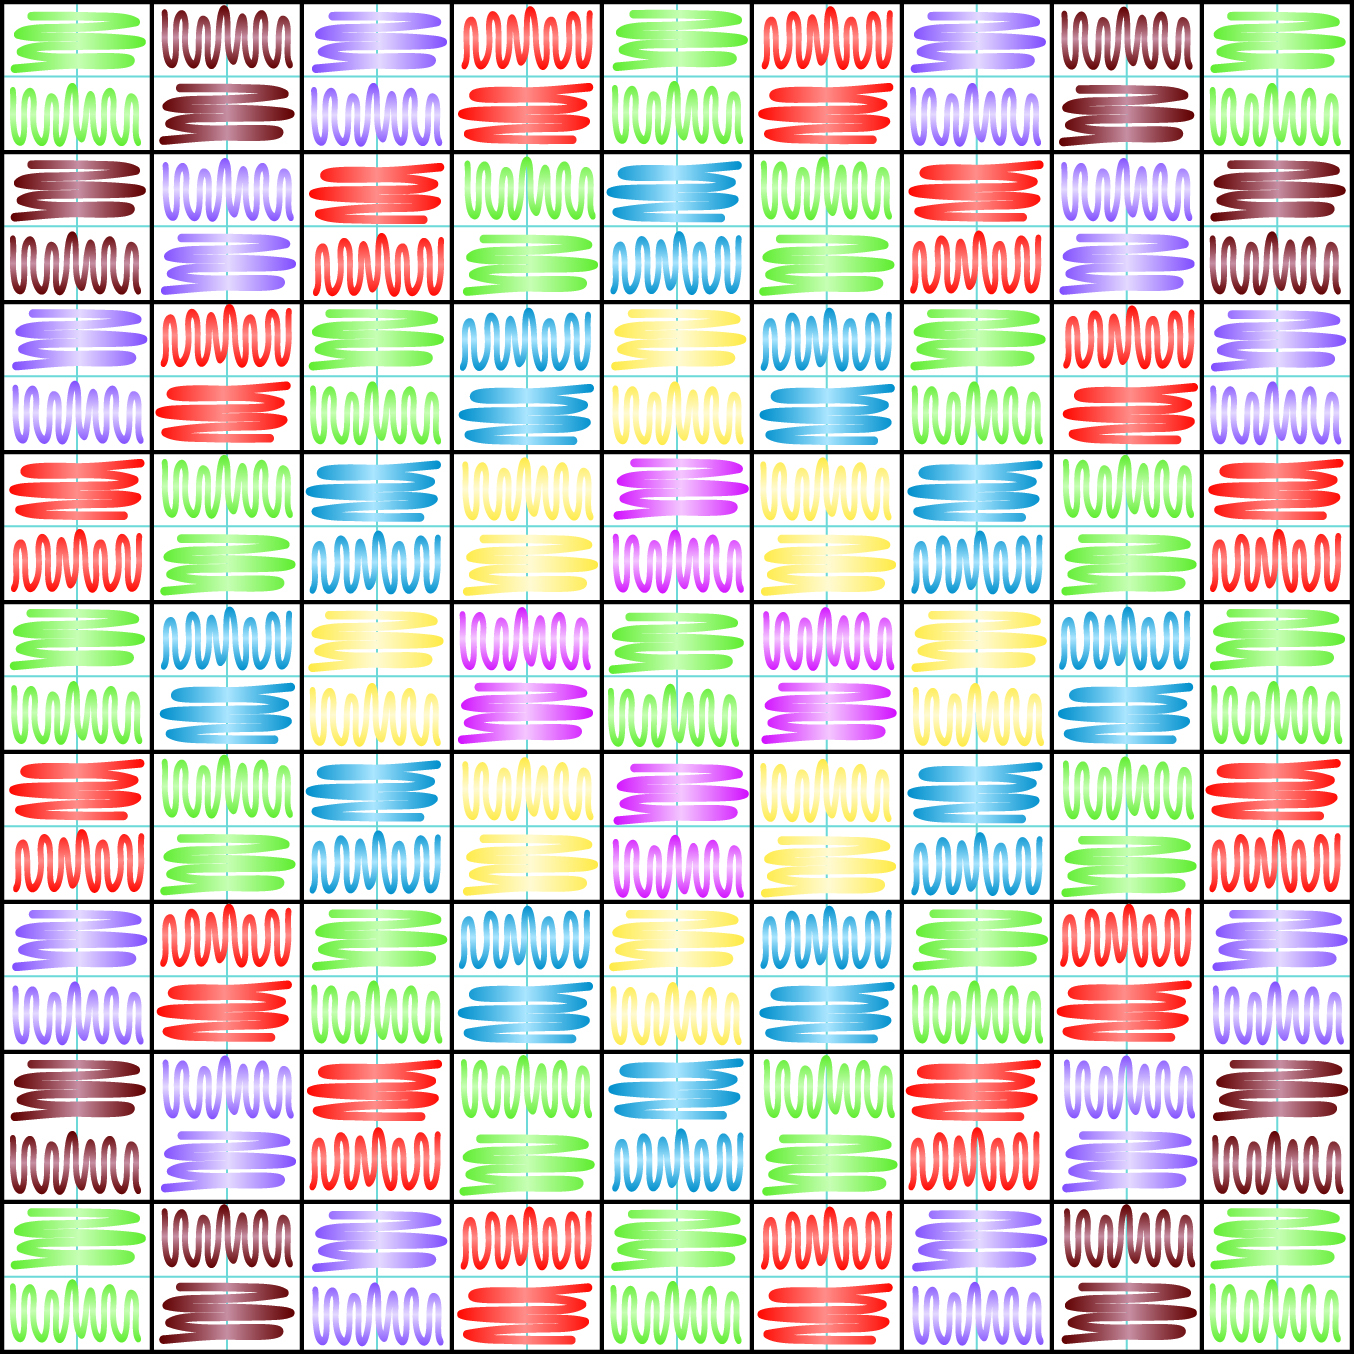
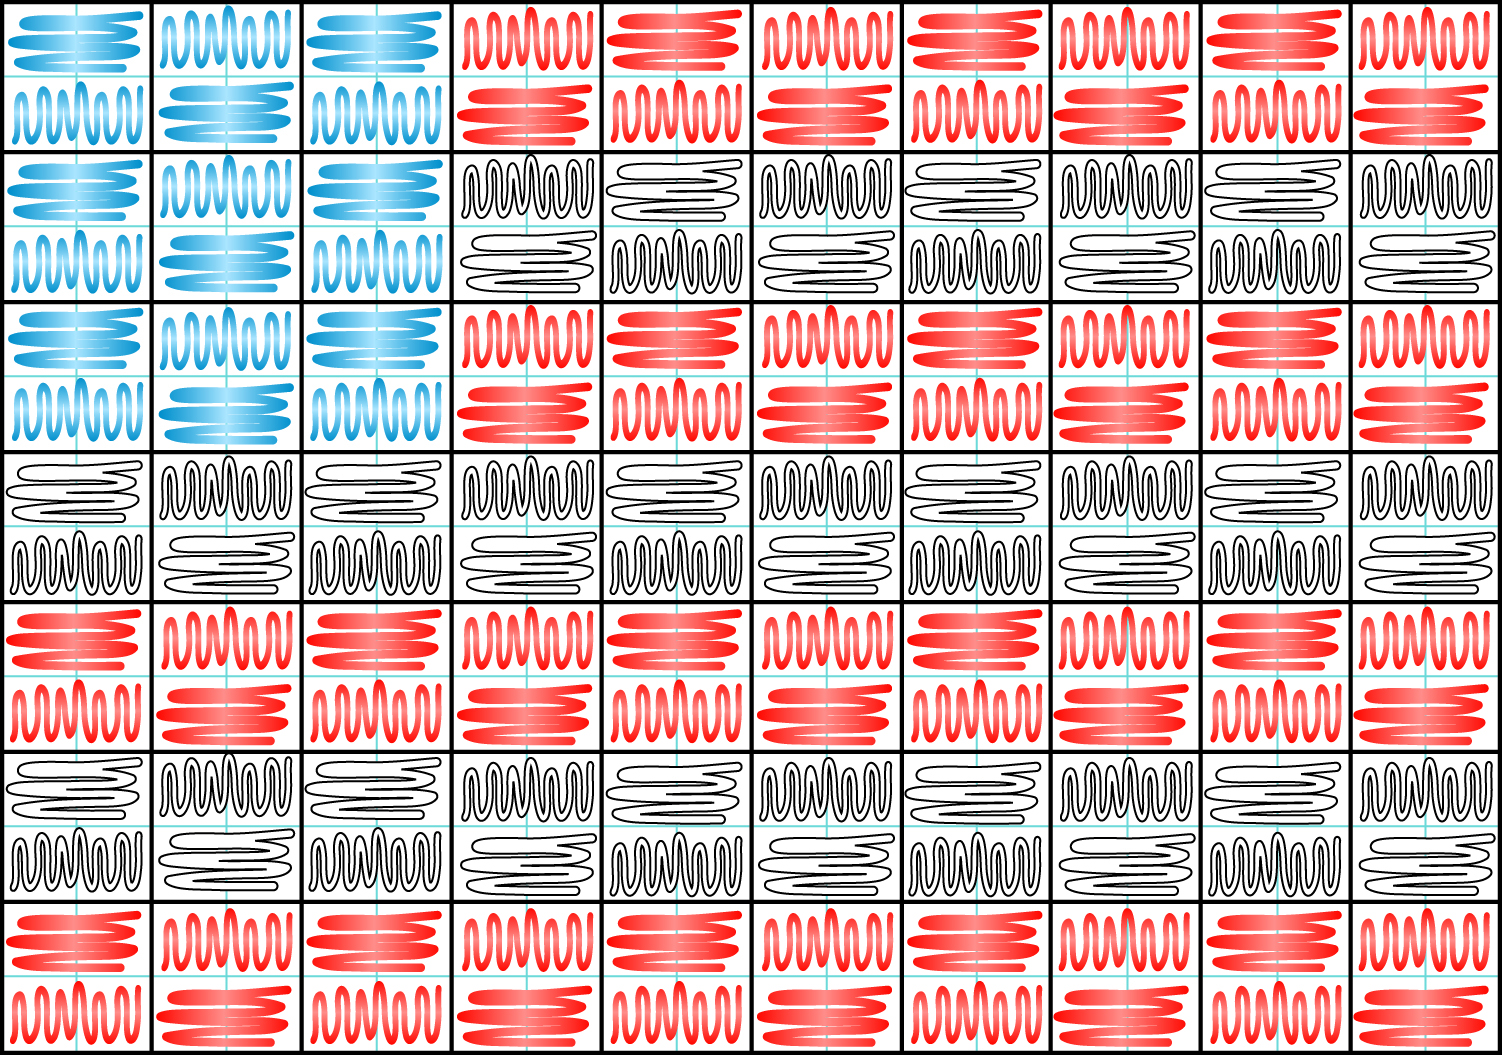
If you want to be more creative than just hit-or-miss, try these suggestions. This will take more thought and planning, but it will add a lot of interest to your piece. Use square blocks divided into two rectangles instead of the rectangular blocks used in the step-by-step sampler. The vertical squiggle represents a hooked rectangle and the horizontal squiggle represents an appliquéd piece.
- Patriotic colors work well. Create stripes of red and white and a block of blue. You will need various shades and textures of these three colors.
- Make it a log cabin. Separate your woolens into lights and darks and hook diagonal blocks of alternating shades the way you would hook a log cabin quilt pattern. The design possibilities are endless. Check out the many log cabin designs and let your imagination go wild.
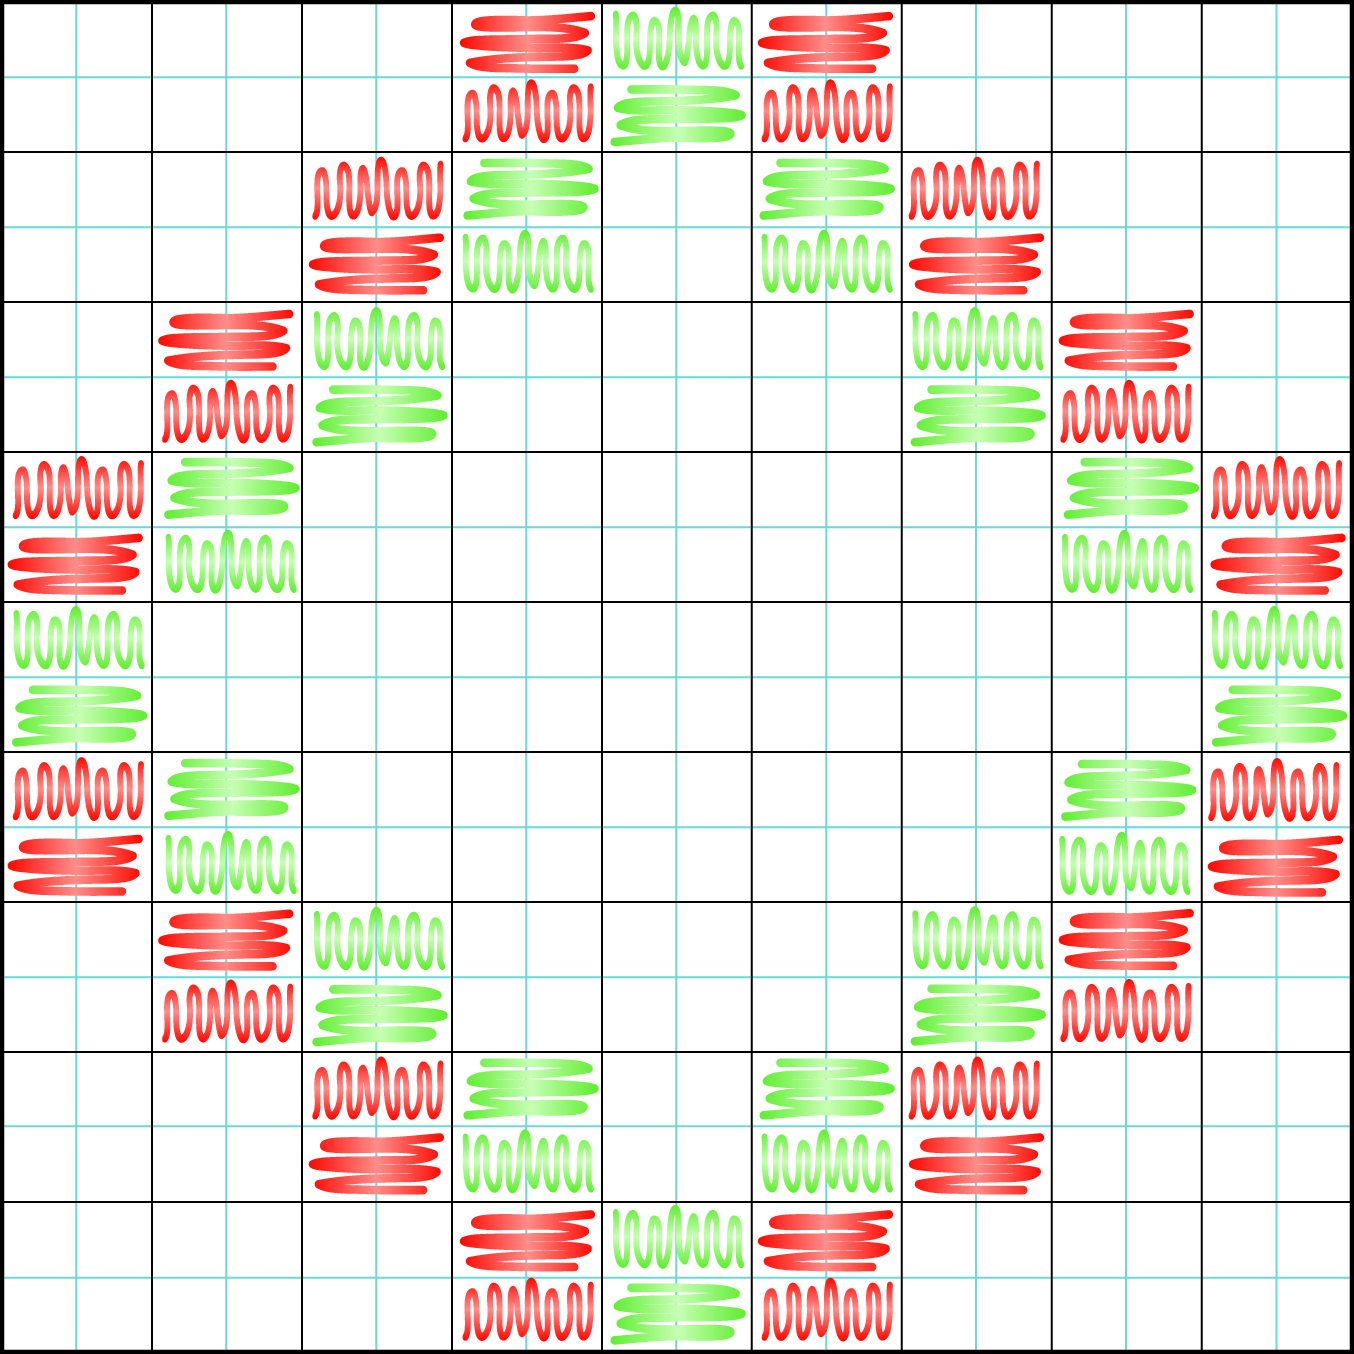
- Choose seasonal colors or use a limited palette.For a different log cabin pattern use seasonal colors, or incorporate your favorites to work best with the décor in a certain room. These colors can be hooked on a diagonal or in a diamond layout. You’ll need more variety of every color, and you might need to repeat some pieces.