It is always good to read and learn about other rug making techniques. These ideas can trigger ones’ imagination and whet the appetite, opening up a whole new world to adventurous hookers.
Proddy is a technique that gives texture and depth of pile to rugs—wonderful to curl your toes in on a cold winter’s night. Plus it’s a good way to use up odds and ends of material. In England, the term “rag rug” is a general name for a rug or mat made with rags using the two traditional methods of hooking and prodding.
In the past proddy has been more popular, but in recent years with the increase of rug making, the hooked method has spread throughout the country. The proddy mat has several names depending on which part of the British Isles you live. Clippie, stobbie, snip, and peg are still in use. Old proddy designs are very primitive and have a beauty of their own; it’s just not so easy to get the detail that you can with traditional hooking.
This proddy project is quick, easy, and a most useful item to make—within a few weeks you can easily make four pads. This luxurious seat pad is a very portable cushion. It’s light and easy to carry with you just in case you have an uncomfortable chair to sit on. So if you enjoy the technique why not make a whole set for your kitchen chairs? Each pad can have a different pattern using the same colors or reverse the idea and work the same pattern with different colors.
Striped designs will complement the checked pattern or try mixing a dozen or more colors together. This will give the old fashion feel of proddy. For a beginner, prod-dy may appear very thick as the technique looks totally different than hooking, but you will soon get used to it—proddy grows very quickly.
When using the proddy technique any design can be used but keep it simple. Tiny detail is not appropriate—simplistic shapes and pictures are easier to work as a proddy beginner. Once you have become familiar with the technique you can try your skills with shading and more realistic patterns, certainly more of a challenge.
Materials
- 22″ x 22″ piece of burlap
- 12″ x 12″ burlap for samples
- Selection of materials (woolen blankets, flannel, or plastic carrier bags)
- Backing material (woolen blankets do not fray making it easy to stitch onto pad), or any material that does not fray
- Cardboard for template
- Sharpie™ marker pen
- Needle and thread
- Pencil
Instructions
Seat Pad Shapes
Seat pads can be square, round, or drawn to the shape of your chair, but I have found that a 14″ round fits any size chair and looks charming with a rustic country feel or a modern look. You can make the round slightly smaller or larger by 1″; the instructions are still the same for your chosen size. The round pad is very versatile, fitting chairs throughout the house—dining, kitchen, bedroom or bathroom, and they look great in the garden with wooden garden furniture.
Color Planning
I have chosen modern fashion colors, but this pattern will lend itself to any color theme you wish to choose. Pick six, eight or even ten colors that you find attractive together, or that match your color scheme. Make sure that the ones you choose are a selection of light, medium, and dark color values. Remember that black, white, and yellow take special consideration.
Black can look very solid and overpowering. You may prefer to soften it up by mixing three or four shades of black together. We seem to think there is only one shade of black but there are actually many—gray-black, blue-black, and green-black.
White can often look icy and sparse, detracting from other colors, so mix whites with creams to soften and blend. Or, to really take the sting out of white material pop it into a pan of simmering water, add a teaspoon of tea and stir a couple of times. Simmer for 10 minutes, remove from pan, rinse and dry. This really softens the color and is very quick to do. No need to add vinegar, as tea is a stain and will not budge once on the fabric.
Finally remember that yellow is the most dominant color and needs to be used with care. Working this color in only one area will draw your eye there and you will not see the rest of the design. It is important to balance yellow throughout the pattern placing it in at least three areas. I chose to use yellow to give a lively feel and have placed it throughout the design.
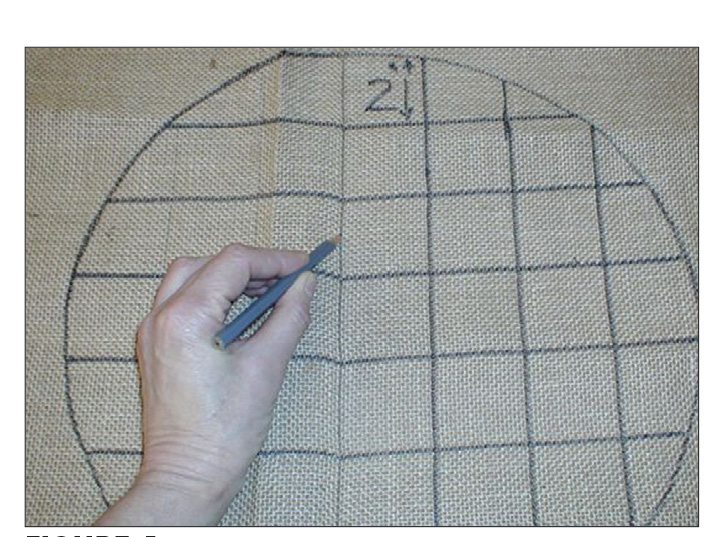
FIGURE 1: Drawing the checkered pattern.
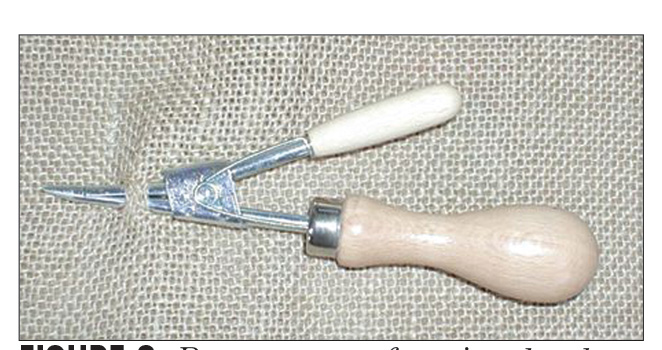
FIGURE 2: Proper use of spring hook.
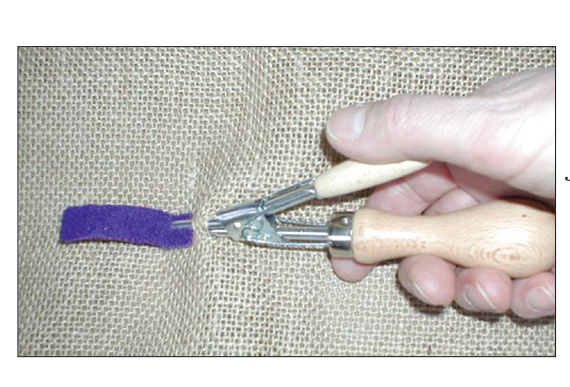
FIGURE 3: Pulling your first prod.
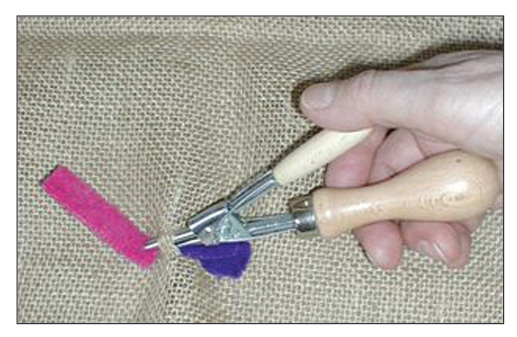
FIGURE 4: Pulling your second prod.
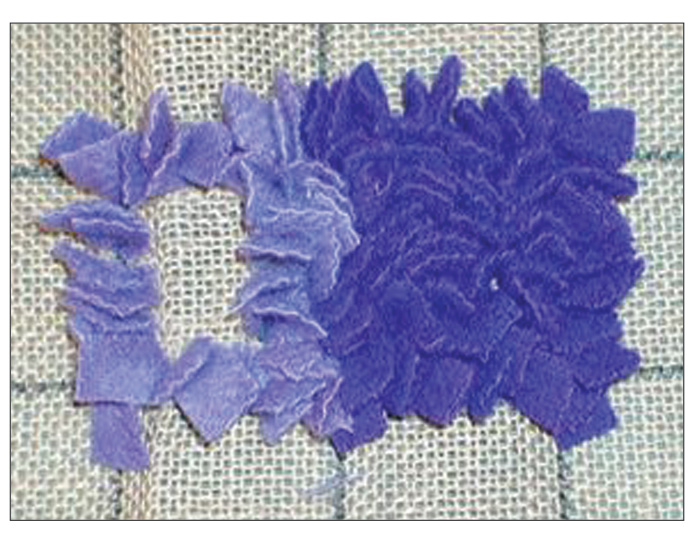
FIGURE 5: Start in the center square
FIGURE 6: Fold back burlap and press with a damp cloth.
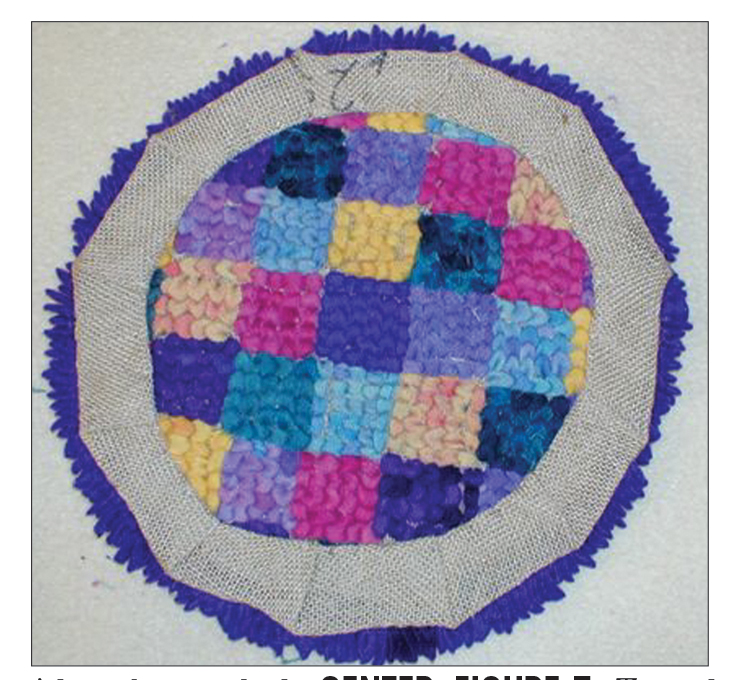
FIGURE 7: Turn hem over again and stitch.

FIGURE 8: Backing for seat pad.
Suitable Material
To give a good feel to the seat pad I use woolen material, such as hand dyed blankets, wool flannel, and recycled clothing. Thick fabric that is not particularly good to hook with would be perfect for this project. I tend to stick to the same type of material, but you can mix thick and thin to achieve an interesting texture.
Be aware that if you use softer fabrics they tend to flatten once they have been sat upon for a while. If you are not sure what to use, do a small sample, about 5″ x 5″, and rest a heavy weight (a couple of books will do) on top for a couple of hours and see the result. If soft materials have flattened too much then you can use firmer fabric.
Because you will only need small amounts of material, dive into your “rag bag” and use up all the odds and ends left over from other projects or color plan from your wool stash. If you want to do something different, try prodding with plastic colored shopping bags.
Making a Start
First you will need a 14″ cardboard template to place on your burlap and draw around. The easiest way to make a template is to take a piece of cardboard and find a round tray, box, or plate measuring 14″ (If it is a fraction more or less, that will be fine; particularly, if you require a smaller or larger size). Place the item onto the cardboard and draw around with a permanent marker pen. Then cut around the shape and you have your 14″ template. Place the template onto blank burlap at least 22″ x 22″ allowing for the hem. Draw around template with the mark-er and you are now ready for the design.
I have chosen a checked pattern. To draw the checks measure 2″ from the top of circle and with a pencil drag it across the threads giving you a straight line (Figure 1). Measure another 2″ and once again drag the pencil along the threads, repeating this until you reach the bottom.
Next measure 2″ from the right-hand side and drag your pencil down through the threads repeating until you have you reached the left-hand side.
Now take your marker and draw over the pencil lines. Your pattern is complete and you are ready to start prodding. To stop fraying around the edges of burlap, stabilize it by either sewing around with a zigzag stitch or applying masking tape around the edge.
The Amount of Material Required
The amount of material needed depends on the size of your proddy pieces. To make sure you have sufficient material, layer it eight times over the area you are prodding. I cut my material 2″ x 1/2″ or 3″ x 1/2″. Choose one length or the other; don’t use both. I use a rotary cutter, cutting board, and ruler (the type patch workers use to cut their fabric). They cut material very quickly or use a #10 and cut into 2″ strips with a good pair of scissors.
Prodding the Seat Pad
The spring hook is an old tool made over 100 years ago in England, and it is easy to use. It will provide you with a portable piece of work enabling you to prod without a frame. Using a spring hook means working on the front of the pattern as you would in hooking. Some of the working principles of proddy are very similar to hooking, so use them as guidelines. First start as near to the center as the design allows, outline each section, and fill in. Do not pack your proddy pieces too much or your seat pad will erupt in the center. When using very thick material make sure you do not cut the material any wider than 1/2″. It may be better to cut it slightly less as it makes it easier to pull though and stops eruptions.
If using thinner material you can cut it between 1/2″ and 3/4″. This gives it a little more thickness. Cottons and fabric of a sim-ilar thickness are better cut to 1″ x 2″.
The technique is worked by holding the hook in your right hand (if you are left-handed reverse the instructions), push the end into burlap and collect five threads and bring the end of hook to the top (Figure 2). Squeeze the handles and open the jaw, place a piece of material in the jaw and close. Now pull material through the burlap. When half the material is through, open jaw and release it. You have pulled your first prod (Figure 3). Push your hook back into the same hole as your last piece of material and gather another five threads, and continue as you did with the first piece (Figure 4).
Starting with the center square choose your color and prod the outline of the square then fill in by working straight rows prodding right to left.
Using your next color, repeat by outlining and filling in with straight rows and once again working from right to left. (Figure 5)
Work every square adjacent to the center completing nine squares in all, then move out to the edge and work the outside row. Then fill in the squares next to those already worked.
I haven’t colored planned each square. I have worked the colors in an adlib way for fun and the element of surprise. This really makes you think about color placement and is a great exercise for beginners and experienced rug makers alike. Sometimes it is good to be liberated!
Finishing
There are two ways in which you can finish your pad. For both methods trim off excess burlap measuring 3″ from the last row of proddy and cut around the circle. Then turn the hem, making pleats as you go so the burlap will lay flat. Using a damp cloth press the pleats with a hot iron so they lay flat. (Figure 6) Then turn the hem over again and stitch down to complete (Figure 7).
The other finishing method is to add a backing to your piece. Using the 14″ round template, place it onto backing material and draw around it with the marker, then cut out just inside the line. Place material onto back of seat pad; pin to keep in place and stitch around the edge (Figure 8). Your seat pad is now ready to use.
If you haven’t the heart to sit on your newly made pad you can always hang it on the wall. They look every bit as good hanging in any room, especially on a door!
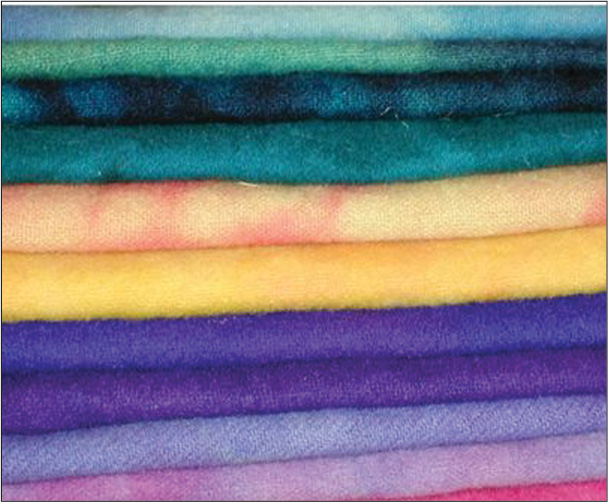
Swatches and hand-dyed blanket used in seat pad.
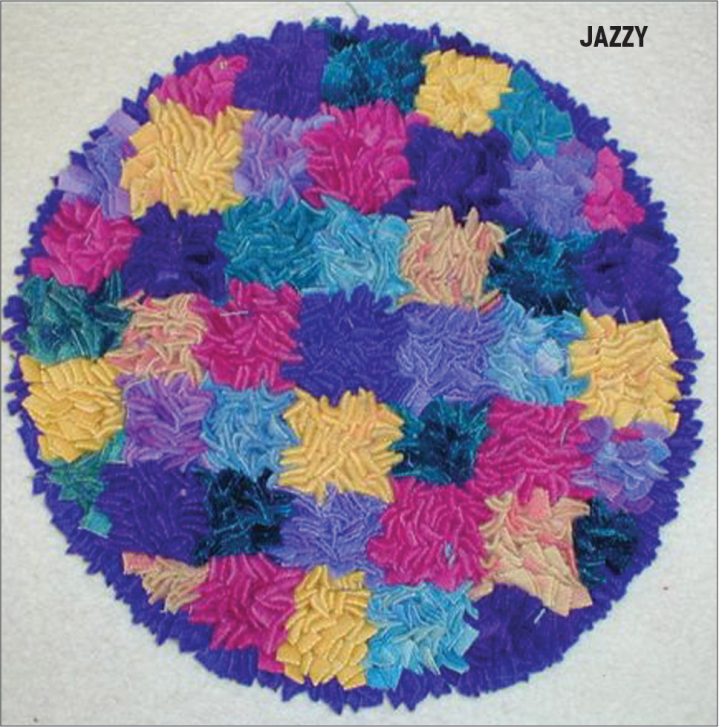
Great idea for a soft, comfort seating chair with color.