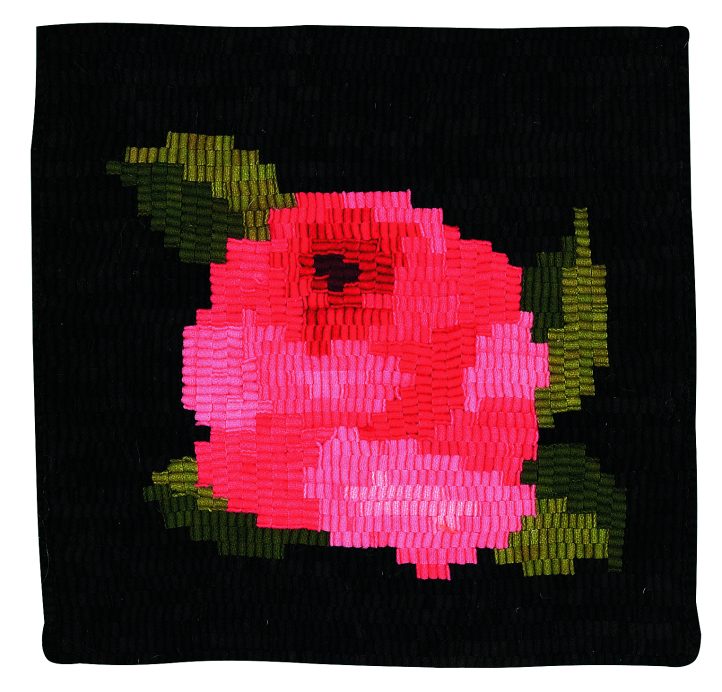
OLD WORLD ROSE, 11″ x 10 1/2″, #8-cut wool on linen. Designed and hooked by Melissa Elliott, Versailles, Kentucky, 2004.
Tapestry Rug Hooking
Perhaps I should have chosen a different name for this technique since more experienced rug hookers will see “tapestry” and may think, “fine-cut, beautifully shaded floral medallions with scroll borders.” But the kinds of tapestry I’m referring to are the types in woven rugs and wall hangings, which are produced on large looms.
When I first thought about this technique, I was in the process of shopping for a rug for a new room my husband had just built on our house. I loved the look of the flat weave Kilim and Soumak rugs and while looking closely at them, I realized that the large weave makes it impossible to create smooth rounded edges. All curves are a series of horizontals and verticals. If one stands back far enough, the eye will see a diagonal or curved line but upon close inspection, the weave creates an up-over-up-over pattern. The same goes for the large woven tapestries that have become so popular. Since I have a tendency to imagine everything I see as a hooked rug, I began to wonder how an ordinary rounded motif would look woven on a tapestry loom or better yet, how it would look hand-hooked using only horizontal and vertical rows.
Technique
This tapestry rug technique is based on a 1/4″ grid and, luckily, so is graph paper. If you think about this in hooking terms, it takes four 1/4″ strips (#8 cut) to hook 1″. So, using this technique, all patterns must be converted to a drawing based on a 1/4″ grid. This will not work using any other cut, for example a #6, unless you have graph paper that divides 1″ into six parts. Almost any design can be hooked in the tapestry technique. But to best take advantage of the shading, motifs should be large enough to be hooked in a #8 cut but have enough color variation to be interesting. A large solid colored house for example, would be rather boring hooked this way. Whereas fruit and flower designs would work particularly well with this technique and lend themselves to the “old world” look. Whether you design your own pattern or convert an existing one, the fun aspect of hooking a design in this manner is the unexpected look that is achieved when a round object is converted to a geometric pattern.

FIGURE 2
Directional Hooking
The beauty of the tapestry technique is that all rows are straight—no diagonals! A motif (i.e. flower) should be hooked in both horizontal and vertical rows, but each section (i.e. petal) should be hooked in one direction. Some areas within the motif are more suited to one hooking direction than the other. When deciding which direction would be best, consider the natural flow of the area or the direction of an artist’s brushstrokes. Also consider the shape of the area.
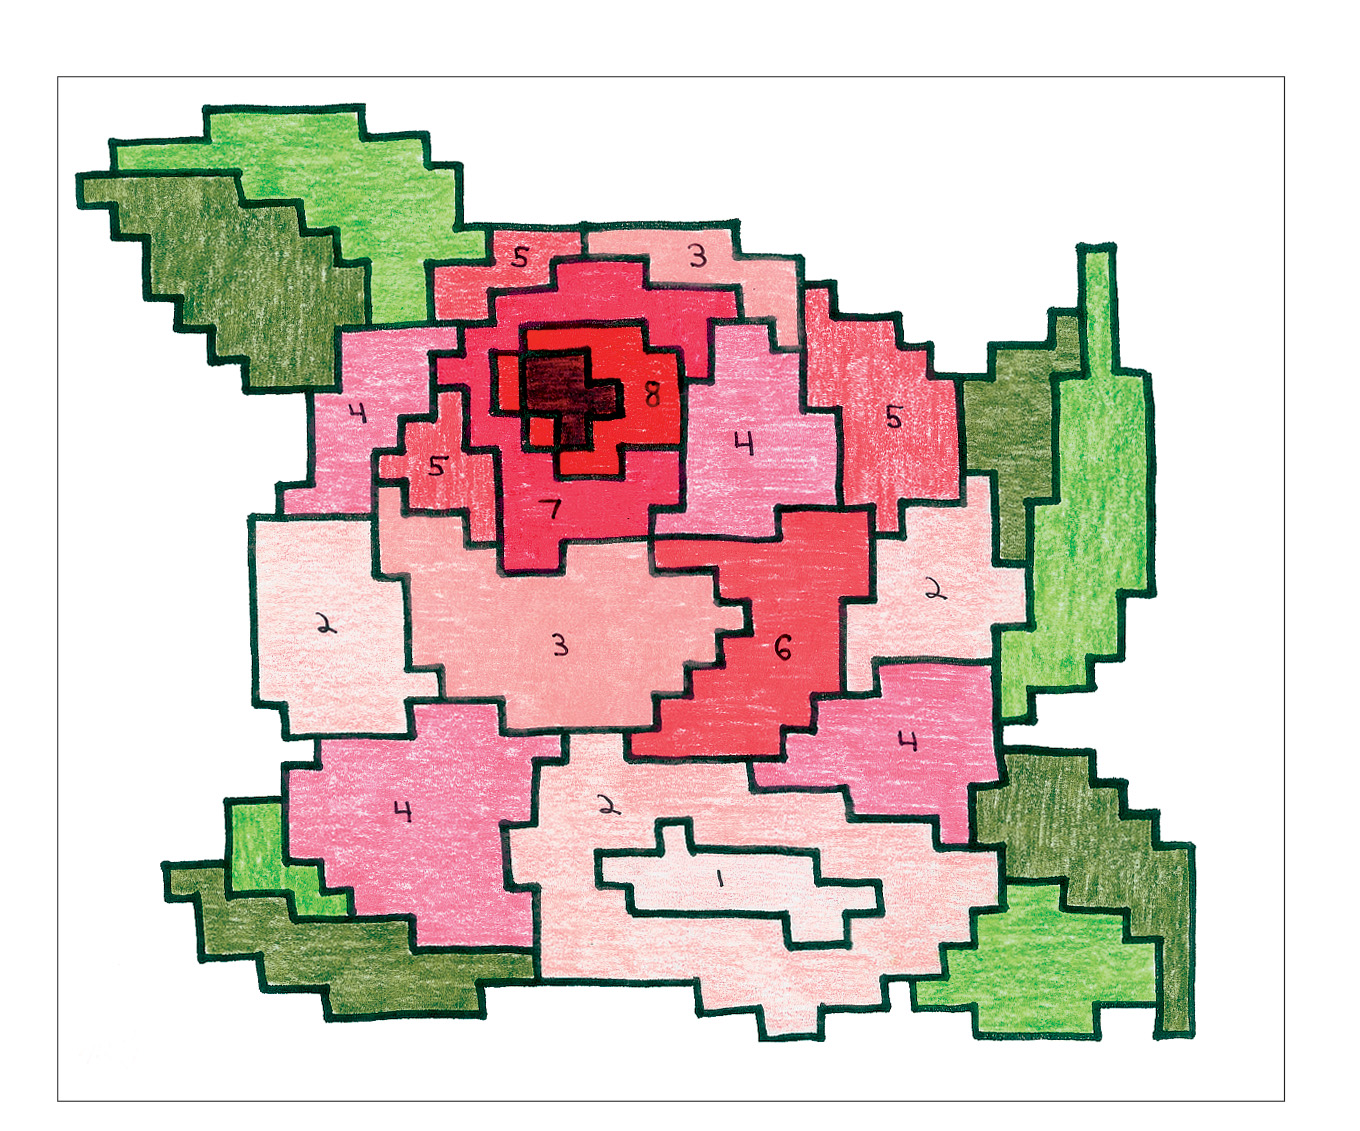
FIGURE 3
Four long rows are easier to hook and more natural looking than eight short rows, for example. Also, alternating the direction of hooking within your motif will add more interest and add to the woven effect. Two areas both hooked in the same direction would not be nearly as interesting to the eye as one hooked horizontally and the one next to it hooked vertically. When planning a pattern, you will want to mark the direction of hooking for each area. A vertical or horizontal arrow drawn in each area will remind you of the best direction when you begin hooking. (Figures 2 and 3).
Shading
My first dyeing experience was an eight-value swatch set. I loved the dyeing technique but never really had much use for the swatch sets until I found that they were perfect for the tapestry technique. Here, shading is accomplished by varying the shade of each area within a motif or even within a single area. Some designs might require an eight-value swatch set (like Old World Rose) or they may simply require three or four values. Either way, this is a great way to use jar dyed swatches in a non-traditional way! Even if you don’t have access to swatch sets, choosing several shades of one color will work nicely. A leaf, for example, would be beautiful hooked with a light yellow green, a medium sage green, and a darker teal green. So, although swatch sets are a great way to shade this technique, they are certainly not required. And since each area is rather small in terms of wool needed, it is a great way to use leftovers! Also, keep in mind that Dorr Mill sells 6-value swatch sets if you aren’t into dyeing them yourself.
Background
The background should be hooked in one direction (unless you are feeling creative and want to hook it in a checkerboard pattern, for example). Typically, rows will look best if hooked from long side to long side. In other words, if your rug is taller than it is wide, background rows should be hooked horizontally. When beginning a background row, pull your background strip up in the same hole in which a motif strip ended and continue the row in the same row of holes. Some back-ground rows will butt up next to an area, which was hooked in the opposite direction. Just start your strip next to the design and hook across. But remember to check your gauge periodically to keep your rows aligned with the “four strips per inch” rule. In other words, if you have 3″ of background to hook, you should have 12 rows of hooking. In addition, hooking a single outside border row will give you a row to butt your tails up to. Or you might want to hide your tails since you will have a long row of them exposed, although I don’t find this objectionable.
Designing Old World Rose
Materials
- 20″ x 20″ piece of foundation (linen)
- Pattern – enlarged to 10″ x 11″
- Permanent marker
- 1 – 8 value swatch set (your color choice) – if swatches are shorter than 16″, two sets may be needed – all strips are #8 cut
- One strip of very dark color for center
- 2 – 3″ strips green (1 light, 1 dark)
- 1/4-yard Antique Black background (or color of your choice)
- Your choice of finishing materials (yarn, rug tape, pillow, etc.)
This design was begun with a simple line drawing done with black marker (Figure 1). A piece of graph paper was then placed on top and secured. Although the drawing was visible through the graph paper, I used a light box to make the transfer easier. Here’s where the fun part came in turning the design into a geometric image (Figure 2). Since there are no diagonals, all lines had to be drawn as “up and over” lines. My rule was if more than half of the 1/4″ square was part of the motif, it was included. If less than half the square was visible, it was excluded. After a short time, redrawing the motif in the “up and over” method was fast and fun.
After I had my geometric design, I had to assign color values to each area (Figure 3). Old World Rose needs one eight-value swatch plus one strip of very dark red for the center, but the leaves require only two values. To make this job easier, I used colored pencils to shade each area, but crayons would work well too. You can then assign a number to each value to make hooking easier.
Transferring Pattern to Backing
If you choose to use light-colored linen (my favorite), the pattern can be placed underneath the linen and drawn directly onto the backing since the pattern will be visible through the linen. If you are transferring to burlap, use pellon interfacing to trace the pattern. Place it on top of the burlap, secure tightly, and retrace the design, which will go through the pellon to the burlap. It is very important to make sure that all horizontal lines be kept lined up with the horizontal weave (weft) threads. A line begun on the left side of the rug, if drawn all the way across the rug, should follow the same weft thread. The same goes for vertical lines—they should follow the warp thread. Using a new marker with a sharp point will help keep the design crisp and thus easier to hook.
Hooking Old World Rose
Most of the hard work has been completed. Hooking is the fun and easy part. You have every color area drawn, you know where each shade is to be hooked and in which direction, and you know where to stop and start each color. All decisions have been made—now you execute the “weaving” or hooking. I found it helpful to have a small ruler or sewing gauge handy. A quick measure will tell you that, for example, the bottom left petal is 2 1/4″ wide and will, therefore, be nine rows wide. A periodic check with the ruler will help keep rows lined up as they would be on graph paper. (You obsessive/compulsive types will especially like this aspect). When hooking, all rows should be kept straight. Hook a row, finish it, and snip. Don’t try to hook a 180-degree turn with your strip. It’s not necessary as sharp corners with exposed tails make the geometric design even more interesting. Concentrate on each area separately. Before long you will see your design take shape. As it does, step back from it to see the design look less geometric. After the rose is completed, hooking the background is fast and easy. Begin by hooking a holding line around the outer border and then hook the background in horizontal rows. Remember to use the ruler periodically to keep rows in their proper place.
Finishing
You have several options for finishing this piece. Since it is small, you might want to try a new technique—a crocheted edge or making a small pillow. I have a good friend who makes fabulous purses from projects this size. I can definitely see this Old World Rose dangling from the ends of silk cording and slung over the shoulder. You will undoubtedly get rave reviews!
This is beautiful! I can’t wait to get started.