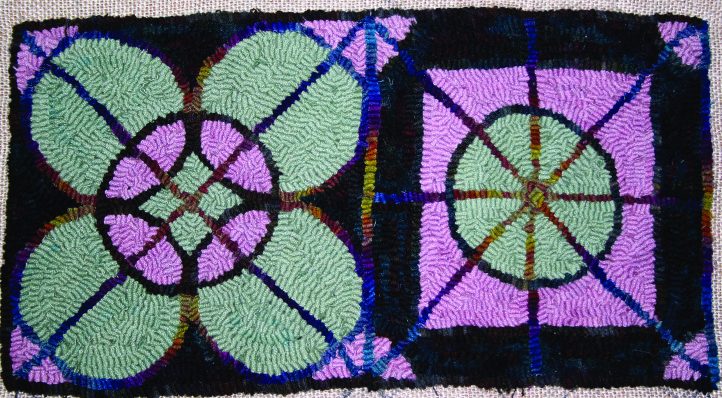
Trivial Cathedral (partial), 15″ x 71/2″, #7-cut wool on linen. Designed and hooked by Wanda Kerr, 2010.
Candidates for The Gray Academy lurk at the bottom of our stashes and in the forgotten corners of our wool closets. We welcome them because their wool is the best weight for hooking, but once we have them home among our other wools, these students lack vivacity, and, frankly, we don’t quite know what to do with them. Most lack luster as is, so we need coach them into achieving their potential. Let’s tutor them on to greater possibilities via the dye pot.
When you dye already dyed wool, it’s called over dyeing, and it’s good to know the color value of what you have and what you want to achieve. I’ve divided this article into three value sections: light grays, medium grays, and dark grays.
LIGHT GRAYS
These grays are not found as often as one might wish in the upcycling stores. But don’t despair; you can often buy terrific grays from wool suppliers. I only had solids on hand when I dyed the samples for this article, but I encourage you to treat gray textures and plaids the same way.
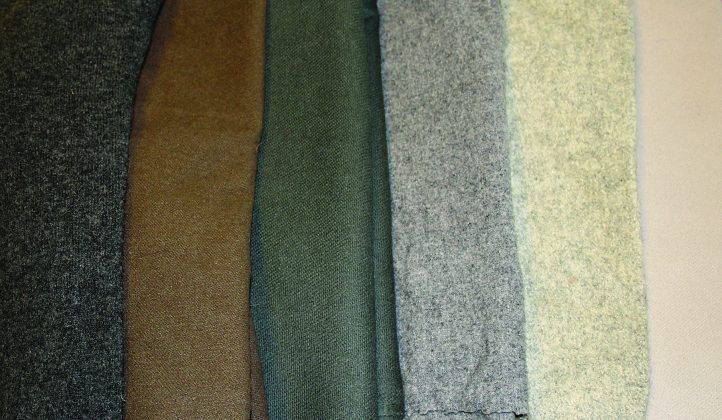
Gray and variants of gray, the students of this article. Tell me: Are they all in order of value? Answer: The brown wool second from the left needs to move one spot to the right.

These light grays are wonderfully adaptable to all of our favorite recipes and dyes. By substituting gray for natural or white, we are making another, more interesting version lower on the saturation scale; gray naturally makes this transition occur. The gray color underneath gives those colors a dim turn, and we have a deep need for these tones in our rugs.
Light gray can be spot dyed, dip dyed, wandered, and made beautiful with Karen Kahle’s marbleizing method. Anything you would do with natural wool will work with light gray. I like to save my lightest grays for making lighter-valued dyed wool. (If I need something medium or dark, I often start with medium or dark wool to save dye.)
Rainy Day Windows
Here is a simple spot dye for light gray. Use any dyes or favorite formulas as you wish.
Wet wool crumpled in pan with the dyes applied for Rainy Day Windows. If the colors are too bright for you, add a toothpick of seal brown to all or give it all a light seal brown slosh at the end.
Rainy Day Windows makes great window reflections. Or use browns and reds to create a wonderful worn deck or barn look.
Wool
- 1/2 yd. or 7 oz. light gray wet wool crumpled in a pan with hills and valleys; try not to tuck or fold any wool under.
Dye
Make large spots or Ws and Ms of the following:
- 1/16 tsp. Majic Carpet Blue
- 1/32 tsp. Majic Carpet Bottle Green
- 1/64 tsp. Majic Carpet Blue Violet
Note: If your blue violet is acting too red, just add blue dye to it.
Then apply:
- 1/64 tsp. Majic Carpet Black over all areas
Method
- Cook the wool in a 350˚F oven or electric frying pan until the water clears.
- Rinse well, then dry the wool as you desire by machine or air.
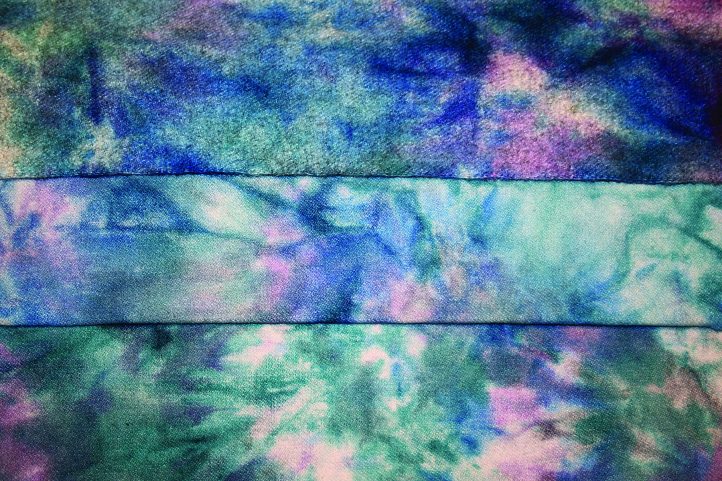
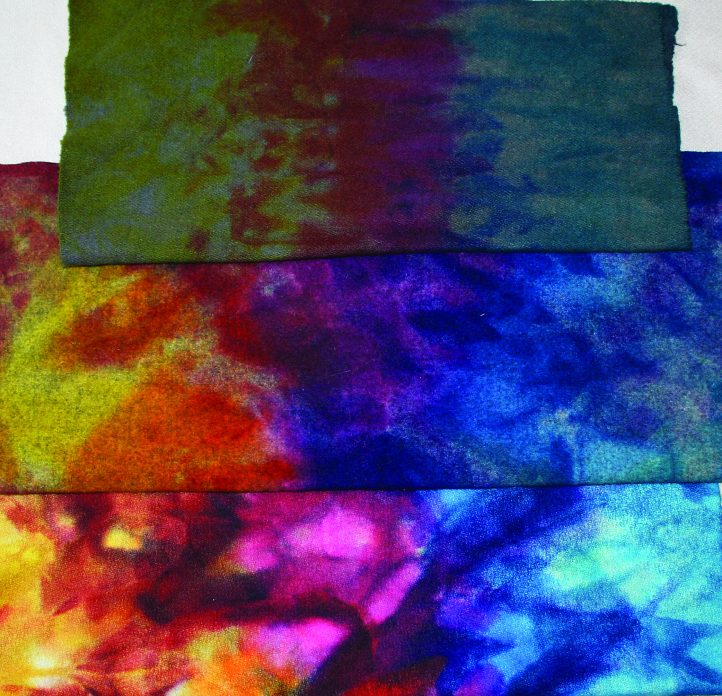
Dried Leaves and Ashes of Roses
I also used two of my favorite dye combinations and dyed them over gray to show you the subtleties of over dyeing gray. Throw in some natural wool to reveal the formula’s true identity.
Leaves (left) and Ashes of Roses
Method
- Dissolve together the two dyes listed below in 1/4 cup boiling water, top off with some cool water, then pour in a dye bath. A shallow bath will give more variance in color depth; a deeper bath will help your wool to be smoothly colored. Heat the wool until all color is almost gone, then add the acid, wait 10 minutes, and remove the wool from the dye bath. Rinse it well, and dry it as you wish.
Ashes of Roses
Over 1/4 yd. wet light gray wool:
- 1/64 tsp. Majic Carpet Red Violet
- 1/64 tsp. Majic Carpet Seal Brown
Dried Leaves
Over 1/4 yd. wet light gray wool:
- 1/64 tsp. Majic Carpet Black
- 1/64 tsp. Majic Carpet Bottle Green
- 1/32 tsp. Majic Carpet Moss Green
MEDIUM GRAYS

We see plenty of these “librarian skirt” grays in the stores. With a little over dyeing, they don’t have to be quite so boring as their name implies.
Every time we add dye, we increase the darkness of our wool. Yellow creates the least value change because it is always a light color, even at its highest saturation. It can also create lots of drama on cool colors and add sparkle even to warm colors that are darker than it, such as red violet. However, the closer the colors are to yellow on the color wheel, the less impact yellow will have.
I love what happens in this range of grays when I use very bright colors on it. The richness created is heavenly. It increases the mystery in a rug and delights the viewer.
Try using these over-dyed librarian grays as a basis for dyeing stormy skies, backgrounds, mud and trunks, rocks, and oriental and crewel neutrals, as well as sparkle lines or fence lines for geometrics.
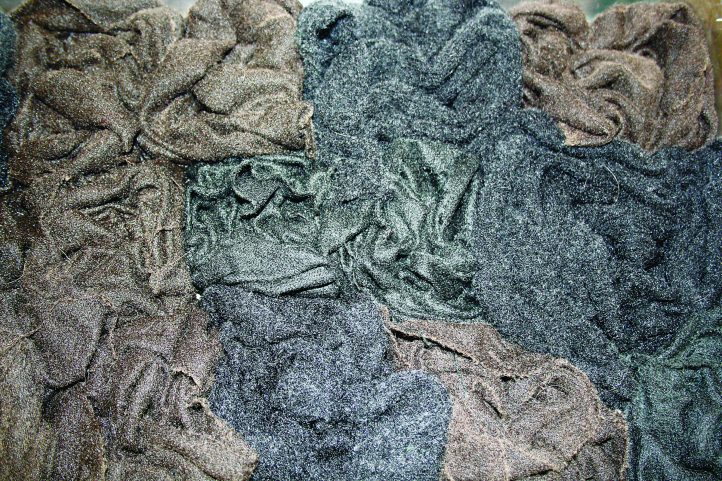
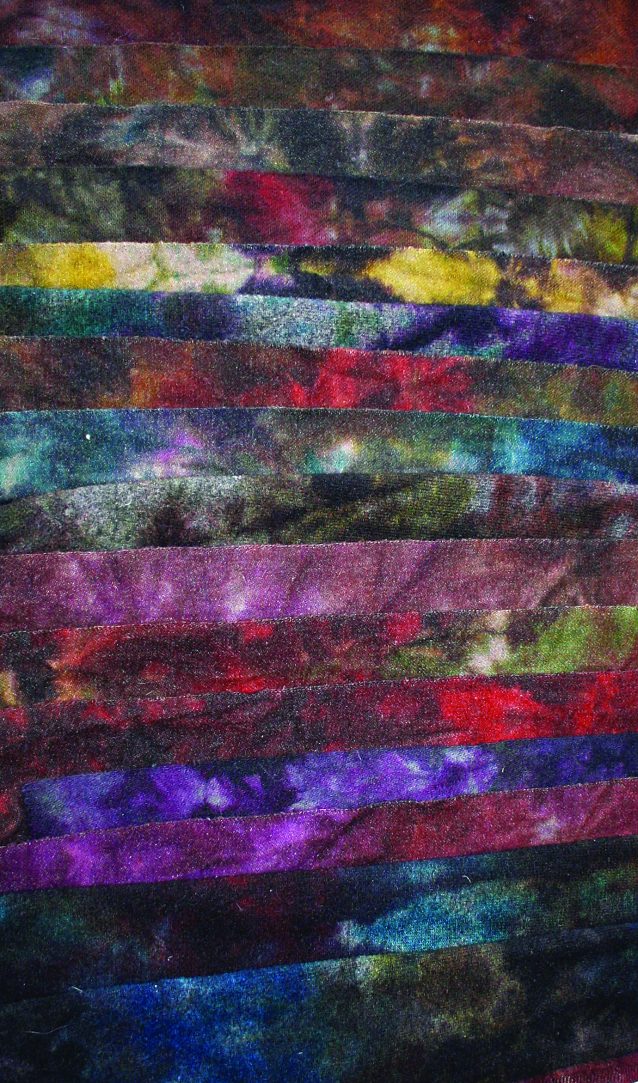
Triplet
Triplet preparation: Look closely to see the wool lying horizontally and dye stripes applied vertically. What a difference the value of wool makes to the recipe!
Triplet: bottom, light gray wool; middle, medium gray wool; top, darker gray wool.
Method
- Arrange three medium grays in a row in an electric frying pan or in a pan for the oven. Use slightly different grays if you want; I added a light one and a dark one in my batch so you could see what happened to them. Crumple them up a bit, but not too much.
- Use about 1/3 yd. of wool, about 4 or 5 oz.; I used 6/16 yd.
- Mix 2/32 tsp. of each color (except as noted) in 1/2 cup water. Place each color in its own container.
- Yellow Majic Carpet
- Orange Majic Carpet
- Red Violet Majic Carpet
- 3/32 tsp. Blue Majic Carpet (it is weaker)
- Turquoise Majic Carpet
- Following the order above, pour these colors on the wool in a line going across the rows of wool. Be sure to leave enough room to use all the dyes.
- Turn your electric frying pan on high. Do not touch the wool. Sprinkle 1/16 tsp. acid over all. When the water is clear, you are done. Note: If you are using the frying pan, don’t walk away. Attend to frying pan dye-ing with all senses at all times.
Also try this method with forest colors: red, orange, yellow, moss green, and brown.
Wow! Now your tired gray students are racing to the top of the class. Let’s see if we can bring the dark grays up to speed, too.
DARK GRAYS

My favorites, these grays make the most amazing, rich darks. In this sample, I’m using two kinds of dark gray wool: one is quite warm, almost brownish; the other is green. The third dark fabric is a sweater. Did you know that hooking with fine knit sweaters that have been felted is a wonderful experience? I blend them right in with woven wool. (Actually, I hook with anything as long as it looks as classy as my hand-dyed flannel and is the right value.)
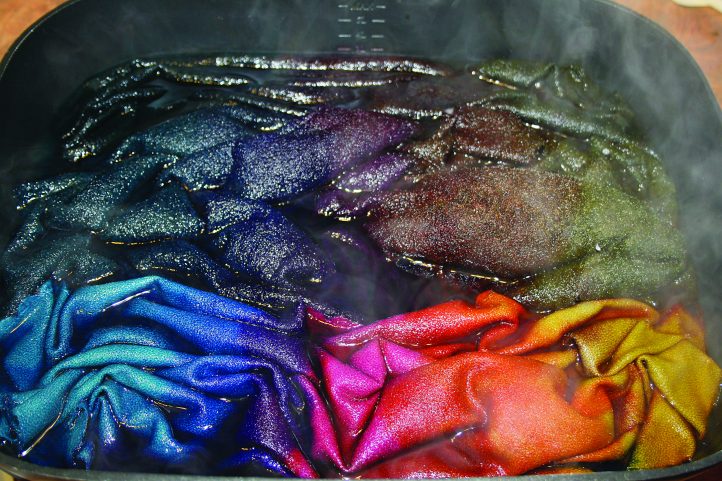
Glory
We could try the Chelsea Roll method (different colored wool with four dyes poured over) with this sample, but let’s use the Micarelli method instead.
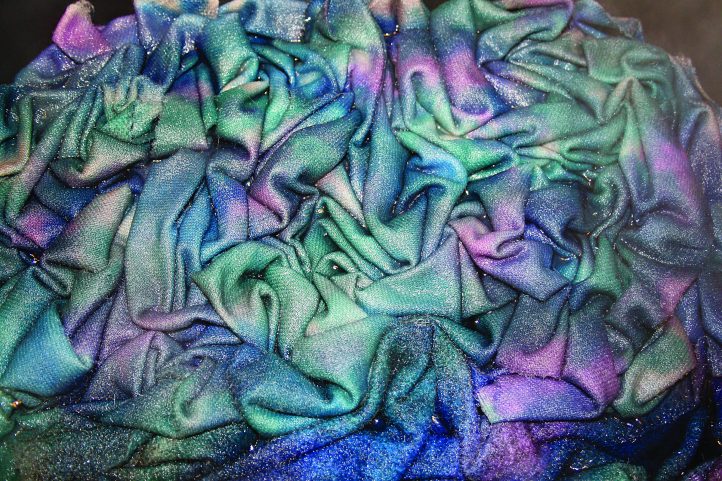
Twirled or crumpled nests might look like this.
Glory: The results of my gray nests.
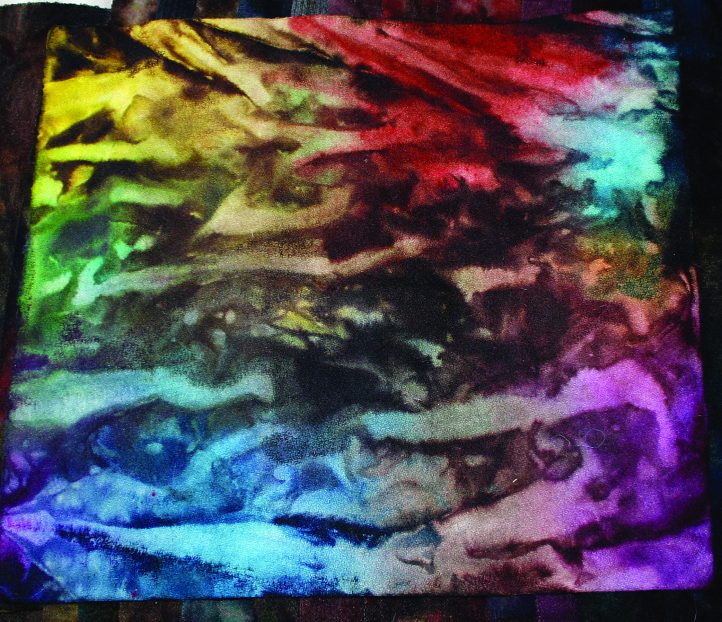
The echo I created with light gray wool. I shoved some areas deep into the nests with the edge of my hand; this action created the darker areas.
Materials
- Approximately 1 yd. wool divided into 16ths, or weighing 12 or 13 oz.
- 1 flat pan as big as a cookie sheet but deeper; we use 8 cups of water in this method
- 16 colors of dye or formulas; brights show the best results
Oven Method
- Make slightly bigger nests of wool than in the Chelsea Roll method, snuggle them up together, and pour on one dye per nest. When placing your nests in the pan, make sure you can’t see the bottom of the pan through the wool. Dye that lies on the bottom of the pan with only a little wool or a low water level will create a black bottom. Have you ever dyed a spot dye and had a lot of dark striation in it? You can stop this from happening by increasing the water level. This deeper water will distribute the dye more evenly through the wool.
- Place the rolls in rows, cheek by jowl, kind of roughly twirled around. Don’t make the twirls too tight. Or, crumple them up like a tissue if twirling is not your style.
- Next comes the fun part: adding the colors. Use about 3/32 tsp. of dye per nest in 1/2 cup water, and add in 1/32 tsp. of acid. We are using so much dye because the wool is already dark; to make the color show, it needs to be strong.
- Choose colors from all parts of the color wheel. Even if you only love blues, greens, and violets, adding orange-reds and yellows to this mix will add vivacity. This doesn’t mean I’m advocating for garish! I’m referring to creating harmony, a balance between colors.
- If you look in nature, you’ll find a call and response of complements: a blue sky with a peach sunset, a bright pink flower with a yellow-green center . . . We are used to seeing these combinations in nature; we crave them when we look at created works, and we feel more satisfied when we see a rug that employs them. So use a full array of colors when you dye.
- In this sample, I used every Majic Carpet color except black. And I used yellow and turquoise twice!
- Once the dyes are prepared, pour one dye color right over one nest. Let slopping and migrating occur as you pour; this effect is highly desired. Place warms and cools and opposites side by side to create a dye convergence where the nests touch.
- When you are finished pouring, mash the wool down lightly with a jar bottom or a dedicated dyeing masher. I placed an echo—a piece of light wool (I used gray)—over all the nests, and pushed down lightly. I poked my echo wool into the nests to show you what black bottom striations look like.
- Place the container in a 350˚F oven until the water clears; it may take an hour or more. Also, if you are dyeing over very dark fabric with factory-dyed color, some may bleed out and acid is not enough to cause it to return. If you see light color present in the water, just flush it out with synthrapol when you rinse.
- Rinse the wool well, and dry it as you wish by machine or air.
POSSIBILITIES
Try these other ideas to get a different set of results:
- Use 1/2 yd. wool and a smaller pan.
- Use a crock pot and make layers of crumpled wool—two crumples for each layer in a small pot, three or four for a bigger one. Pour one color of dye over each layer.
- Try using dull dyes over gray for a great set of neutrals. Come on, you know we need them!
- Need to make more dull dye colors? Dull the bright colors down by adding black, the color’s complement, or a black brown.