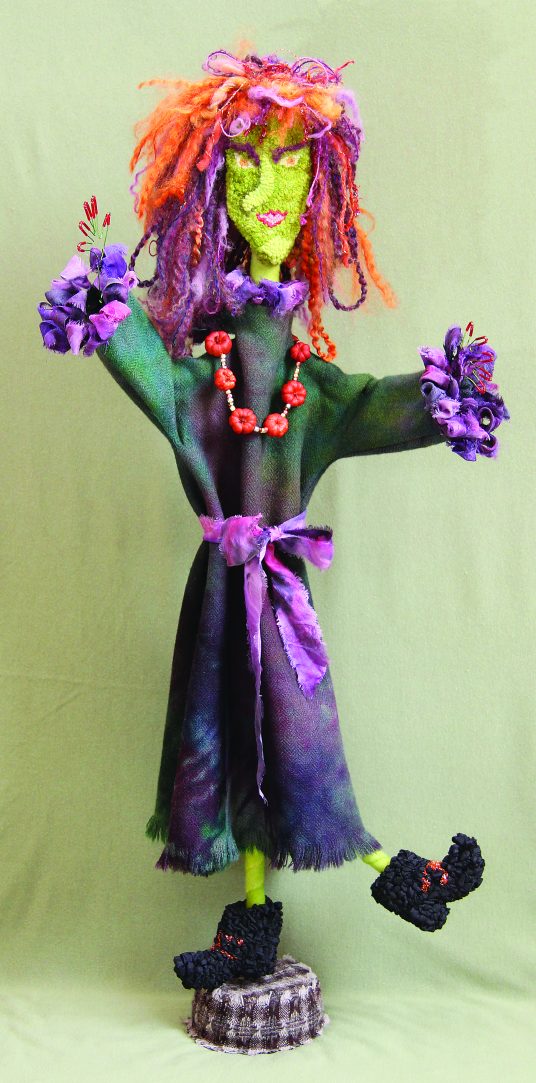
Witchy Witch can be posed in many ways by changing the armature underneath.
PHOTOGRAPHY BY DON TINSON II
Everyone loves decorating for Halloween. This three-dimensional, mixed media witch will add to any Halloween décor. She’s fun and funky, and you can make her your own.
Her face, hair, dress trim, and boots are hooked. She has a simple wire armature and stands about 30″ tall, including the base. Her size may be easily changed by reducing or enlarging the pattern and components proportionally. She lends herself to your interpretation. So go ahead and hook and embellish her in a variety of ways with wools, yarns, fibers, and fabrics of your choosing.
Transfer face, hair base, and boot patterns to foundation fabric. You will need four boots, two pointing left and two pointing right. I used monk’s cloth for the face and burlap for the hair and boots. After drawing hair base pattern on foundation, draw another horizontal line 4″ below the pattern to serve as a hair length guide.
MATERIALS
- Foundation fabric
- Wool and yarns for face, hair, body, and dress
- Shiny fabric for boots
- White glue
- Hot glue, mini size
- Support rod, dowel, or twig
- Base
- 12-gauge aluminum floral wire
- 22-gauge beading wire
- Optional beads, trim, embellishments
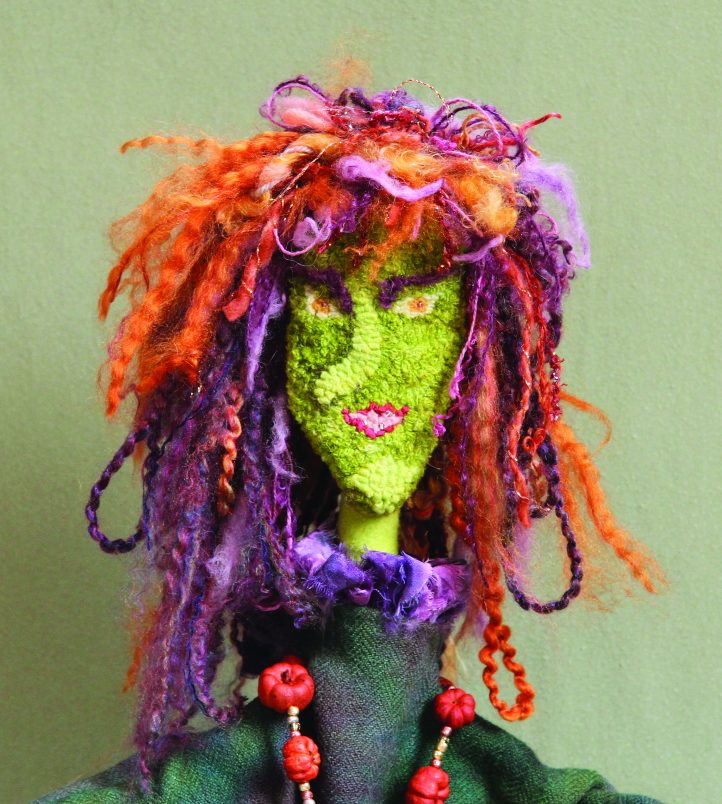
FACE
I dyed the wool with Cushing chartreuse for her nose and chin and Cushing yellow and aqua green in a 2:1 ratio spot dye for the rest of her face. Her lips are hooked using a silk sari strip and her eyebrows with two strands of a fuzzy yarn. I hooked her face with a #4 cut. I added a seed bead for the eye highlight and three tiny bugle beads for her teeth.
After hooking, turn the face over. On the back side of the hooked face, lay a bead of white glue on the foundation (I prefer Aleene’s Original Tacky Glue) around the perimeter of the face, about 1/4″ wide. Smooth the glue evenly with your fingers. When the glue is dry, cut around the face, leaving about a 3/8″ margin of the foundation that includes the glued perimeter. I use pinking shears. Carefully fold under and glue this margin on the back side with hot glue. Do not let the foundation show on the front of the face; use the hot glue sparingly.
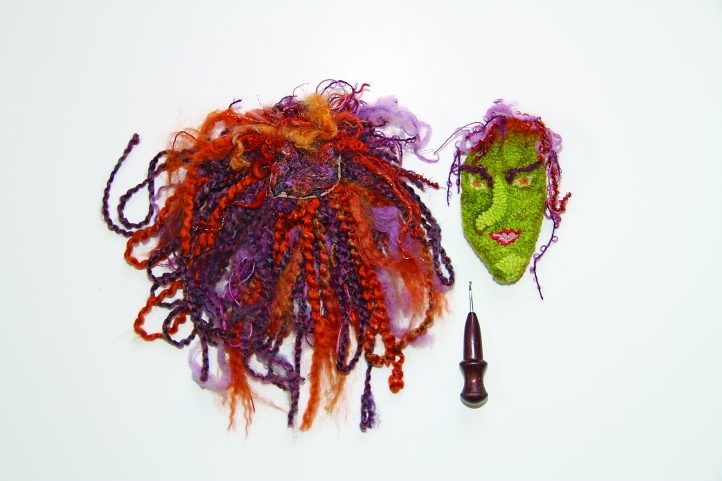
HAIR
This part was the most fun. Gather an assortment of yarns, fibers, and any other items you want to use for hair. I chose several kinds and varying weights of yarns and dyed locks.
Choose one or two yarns as your primary hair material. Hook long loops across the bottom line of the pattern and up to the hair length guide line. Hook three or four more horizontal rows of loopy hair, shortening the loop length as you move toward the crown of the head.
How thickly you fill in at this point is determined by how much more you want to hook in. Also, remember that what you hook on the perimeter of this piece will be what frames the face. Allow for bangs and layers on the side of the face. Continue filling in and packing the area with other yarns and fibers. The hair will be much larger than the drawn pattern. (Note the photo comparing the hair and face.)
After hooking, on the back side, cover the hooked area with white glue, extending the glue 1/4″ onto the foundation. Smooth the glue evenly with your fingers, particularly where the hooked edge meets the foundation. When the glue is dry, trim the excess close to hooking, taking care not to cut into the hooking.
COMPLETING THE HAIR AND FACE
The finished hair piece and the finished face piece are ready to be assembled.
A variety of colorful yarn surrounds the witch’s face.
Lay the hair piece flat, back side facing up. Position the face on top of the hair. At this point, you may add additional hair accents by gluing individual strands to either the hair piece or the back of face, if desired. Using a piece of the face wool, carefully cut and glue a backing for the face. I use pinking shears for this step, too, and do small sections at a time using hot glue. Stuff the face gently with fiberfill to round it out before gluing the last section. Set the face and hair aside for the moment.
MAKING THE ARMATURE AND BASE
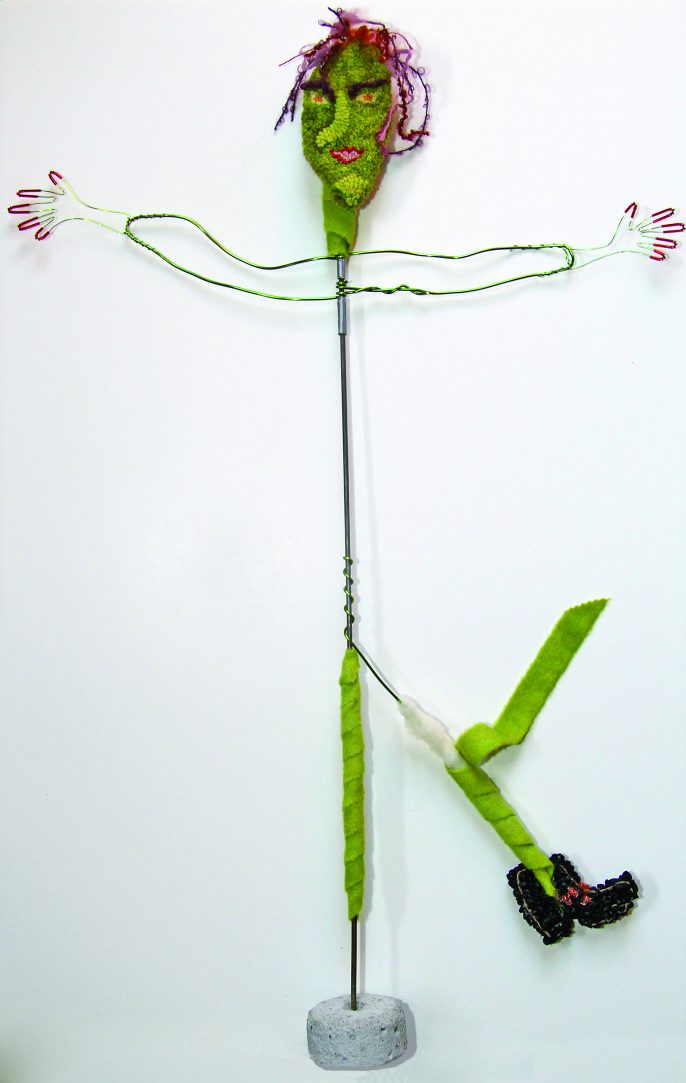
An armature supports the witch.
The witch has a simple wire armature. I used a steel rod (from an old political yard sign) for the main support. Other choices might be a twig or dowel. Embed the support rod in a base of some sort. I made a plaster of Paris base, which I later covered with wool. Make sure the base is heavy enough to support your witch. Determine the desired height of the witch and cut the support rod about 1″ shorter.
ATTACHING THE NECK, FACE, AND HAIR
Using 1″-wide strips, wrap a 4″ section of the support rod with quilt batting and wool where the neck should be. Glue the face in position on the neck and unwrapped upper section of support rod. Glue the hair base in position on the back side of the face.
ADDING THE ARMS AND HANDS
Using 12-gauge aluminum floral wire, shape the arms around the support rod. Aluminum wire is easily bendable, which is a good choice if you want to move and position the arms like I did. I wrapped a strip of duct tape around the support to keep the arms from sliding down the rod. I used 22-gauge beading wire to shape the hands and allow for bugle beads to be added as fingernails. Attach the hands to the arms.
BOOTS
I hooked my witch’s boots with a silky fabric to look shiny and added a glitzy netting for the buckles. After you finish hooking, on the back side, cover the hooked boots completely with glue, extending 1/4″ onto the foundation. Smooth the glue evenly with your fingers, particularly where the hooked edge meets the foundation. When the glue is dry, trim close to the hooking, taking care not to cut into the hooking. Use a black sharpie to color any foundation that shows. Again using 1″ wide strips of batting and wool, wrap about 7″ of a support rod, beginning just below the height of the boot and continuing up the leg. Glue the two boots together, except for the bottom of the heel and the back of the boot seam. Position the glued boot around the support rod, and finish gluing.
SECOND LEG AND BOOT
Cut another length of 12-gauge floral wire for the second leg, allowing enough length to wrap it several times around the support rod. Wrap the leg with batting and wool, and attach it to the boot as before. Attach the completed leg to the support rod. Wrap a strip of duct tape around the rod to keep the leg from sliding down.
DRESS
The witch’s dress is a slightly modified T shape. I overdyed a spot-dyed wool with Cushing silver grey. I suggest making a dress from muslin to make sure it fits correctly before cutting the dress from wool. When sewing, leave the center back seam open most of the way for ease in getting the dress on. After sewing the dress together, I hooked silk fabric strips into the wool around the neck and cuffs and fringed the bottom edge. Put the dress on the witch. Hand stitch the back seam, or simply pin it closed. Add Halloween props as you wish.
Your wonderful, wooly witch will now reign over your Halloween festivities.