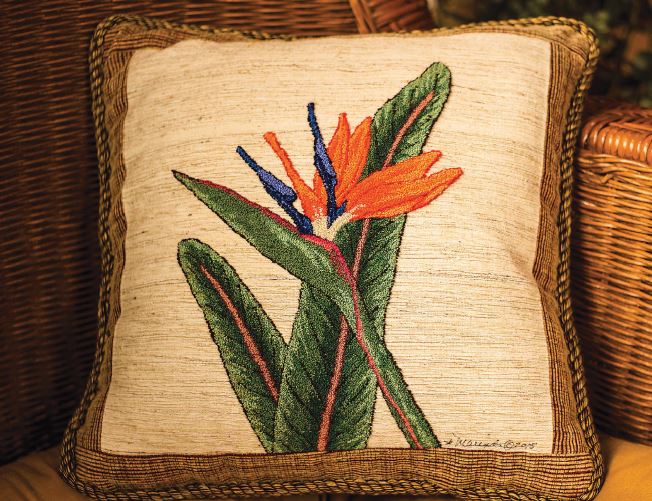
Bird of Paradise Pillow, 14″ x 14″, embroidery floss on silk. Designed and punch hooked by Marinda Stewart, Round Rock, Texas, 2014.
PROJECT BY MARINDA STEWART; PHOTOGRAPHY BY KATHLEEN ECKHAUS
The bird-of-paradise is a dramatic flower originally from South Africa where it is also called the crane flower because of its resemblance to a bird’s head. Its appealing, bold, complementary colors (opposites on the color wheel) command attention. A mature plant looks like a cluster of happily chattering birds. Incidentally, it is also the emblem flower for Los Angeles, where it grows easily and in abundance.
Regardless of where you live, the beauty of a bird-of-paradise can be added to your home through a beautiful piece of artwork if not in all its living color. This design is close to life size. Once embroidered, it can be framed, or as you see here, finished into a pillow. If you have limited sewing skills, you can hand sew it to a purchased decorator pillow 14″ square or larger. Or, for a larger-than-life splash of color in your home, enlarge the design to make an area rug.
The background fabric I chose is unexpected. I used raw silk tussah because of its bark-like texture rather than the usual Weaver’s Cloth. Tips for working with silk are included in the directions. I used hand-dyed, variegated floss for all the green elements; the subtle color variations add realism, shading, and luminosity to the leaves and stems.
Transfer the Pattern
Following the manufacturer’s directions for the iron-on transfer pencil, trace the design onto the tracing paper. Set the traced design aside.
Iron the fusible side of the nylon tricot interfacing to the wrong side of the silk tussah. Carefully follow the manufacturer’s directions. The nylon tricot interfacing stabilizes and strengthens the silk. It also accepts the iron-on transfer image faster and with less heat compared to working directly on and possibly scorching the silk.
Place the tracing paper, traced side down, on the top of the nylon tricot. Secure the corners of the transfer with a few pins to prevent the design from shifting.
Hold the iron in place only long enough for the design to be easily read on the nylon tricot. In some cases the same transfer can be used more than one time. All my original iron-on transfers go into a file for future reference and possible reuse.
Place the silk/nylon fused fabric in the padded embroidery hoop, nylon tricot side up. Stretch the fabric tautly for punching but not so tightly that you distort the silk.
Punch the Outlines
Outline each design element with a darker or contrast color to define the motif. Refer to the color diagram for guidance.
Outline Guide

- 3371: leaves, side veins, bottom edges and sides of the stems
- 315: center vein on the leaves, top edge of stem, wrapped side of stem
- 900: orange petals
- 939: blue stamens
- 3024: base of petals
Fill in the Colors
Separate 2 strands of floss from the 6-strand skein.
Work the design throughout using a #3 punch needle and two strands of floss at a time. To create subtle shading, use two different colors of floss in the needle at one time.
Refer to the color diagram for placement of the fill-in colors. Move the hoop from area to area as needed to complete the design.
Finish the Design
Place the finished design face down on top of a terry cloth towel. Lightly mist the front of the embroidery. Steam press the back to remove any distortion from the hoop and to set the stitches.
Check the front of the piece for flattened stitches. Carefully run your thumbnail over the loops to revive them. Repeat if needed. The loops will eventually stand up straight again.
To strengthen the design lines, gently rearrange the outline loops into continuous lines by pushing the dark loops together and moving any lighter loops into the filled-in areas. This can be done with the tip of the needle or with the tip of your scissors. Trim any longer loops or tag ends so they are even with the surrounding loops. This process is a bit tedious—and optional—but it makes a significant difference in the finished appearance of the piece.
Finish as desired: frame it or make it into a colorful pillow.
TIPS

- For a padded hoop, choose a wooden hoop with an adjustable screw on the outer ring. Tightly wrap the inner ring with leftover yarn; knitting worsted, acrylic, or baby works well. Knot off inside the inner ring.
- I prefer a padded wooden embroidery hoop for working with delicate fabrics. It holds the fabric taut and reduces the possibility of a permanent hoop ring or mark on the finished piece. This bird-of-paradise design is bigger than most hoops, so you will have to reposition the design as you punch. This will put the hoop over completed stitching, but the padding reduces the impact on the existing loops and allows the embroidery to be more easily revived. Remove the hoop between punching sessions to eliminate any extra distress to the loops.
- When transferring the pattern, lift the iron, move it, set it in place, and repeat. Do not slide the iron back and forth; that will create blurred lines and a fuzzy image.
- When outlining an area, place the stitches closer together to make a defined line. As you are punching, the outline stitches will look a bit random. This will change once the design is filled in.
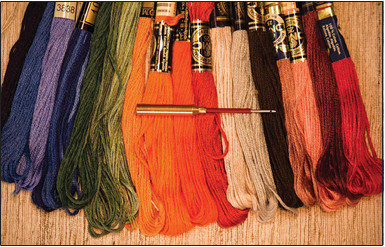
Embroidery floss and punch needle used for Bird-of-Paradise.
MATERIALS
- #3 medium punch needle
- Small, sharp embroidery scissors
- 13″ square raw silk tussah, natural color (or fabric of your choice)
- 13″ square iron-on fusible white nylon tricot interfacing
- Iron-on transfer pencil (preferably not red)
- Tracing paper
- 7″, 8″, or 9″ embroidery hoop (preferably wooden with padded inner ring)
- 1 skein each 6-strand cotton embroidery floss DMC
- Corals, for petals: 315, 3859 (leaf veins), 3832, 352 (stem details)
- Oranges, for petals: 900, 947, 971, 722
- Blues, for stamens: 939, 797, 3838, 103 (variegated)
- Neutrals, for details: 543 (ivory), 3024 (pale gray), 3371 (dark brown) Weeks Dye Works
- Greens, for leaves and stems: 1279 (Holly, 2 skeins), 2156 (Hunter, 6 skeins), 4111 (Lucky, 3 skeins)
- Bird- of-Paradise©, Marinda Stewart, 2014.
Enlarge pattern to your chosen size; pillow shown is 14″ x 14″. For personal use only, not for resale.
Transfer the pattern to the nylon tricot interfacing and fuse it to the silk.