SUPPLY LIST
- ½ yard of plaid wool (the wilder and crazier the better)
- 1 piece of wool matching a color from the plaid: 3″ x 16″, for center square.
- 1 piece of wool matching a color from the plaid: 4″ x 16″, for the four center sections.
- 1 piece of wool matching a color from the plaid: ½ yard, for the outline and proddy edge.
- Stuffing for the pillow. I used dryer lint from washing the wool.
- 1 piece of linen: 20″ x 20″
- Spring-loaded proddy tool
- #10 or 1″ cutting blade from BeeLine Art Tools, or rotary cutter and mat
- Sewing thread to match plaid
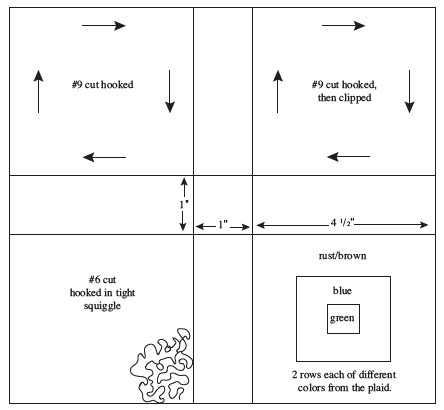
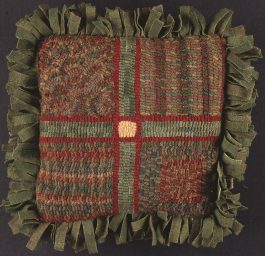
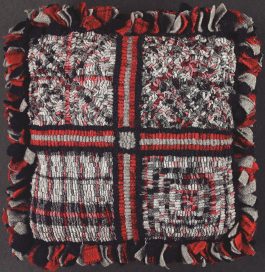
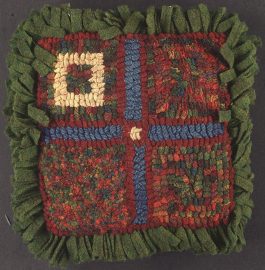
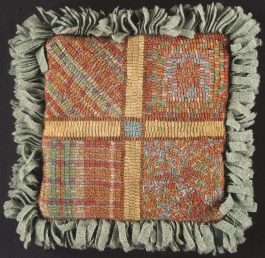
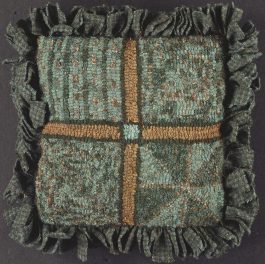
Pillow diagram. I used 4″ squares and 1″ connecting sections
It all starts with wool, doesn’t it? You see it and want it. The color calls to you. The touch of it is titillating. The price is right. You’re here, it’s here. Why not go home together? Texture is so tempting, but something is holding you back. It’s new to you. You have not used this one before. There are no samples of what this wool can do. How will this wool hook up?
Despite the warning voices in your head, you buy it and take the temptress home. You carefully place the wool on your wool shelf. At first you notice it often. It calls to you. You talk to it on a regular basis asking the question, “What will you look like cut up and hooked? Where shall I put you into a rug?” It does not answer your questions. It is silent. Eventually, this wool is moved to the back of the shelf to make room for new friends.
And so it goes. Sound familiar? Don’t worry! We’ve all been there. I have a project for you to explore what your wool is capable of and how to best use it. We will use a wild and crazy plaid and pull three colors from the plaid to coordinate.


The Pillow Project
- Wash and dry your fabric.
- Set aside a 12″ x 12″ piece of the plaid for the back of the pillow.
- Draw four 4 ½” squares on your linen, with 1″ between the squares. Between your 4 large squares you will have a small 1″ square.
- Hook the outlines with a #6 cut.
- Hook the 1″ square in the center with a #8 cut.
- Hook the 1″ rectangles coming out from the center with a #8 cut.
- For your first square: cut approximately a 6″ x 16″ piece of your plaid in wide strips (#8, 8.5, or 9). Hook it starting at the outside edge. Follow that around and fill in toward the center. Oryou can hook lines, either horizontal or vertical.
- For your second square: cut approximately a 6″ x 16″ piece of your plaid. Use the same size cut you used for the first square. Hook exactly the same as the first square. When you are finished hooking, clip each loop with your scissors.
- For your third square: cut approximately a 6″ x 16″ piece of your plaid in a smaller cut than the first two squares. I suggest a #4, 5, or 6 cut. Start hooking this square in the corner. Hook it in a tight squiggle to fill the square; keep the loops close to each other andconstantly turn your hook and loops in random directions. Do not meander too far from the loop you just hooked.
- For your fourth square: separate out your last piece of the plaid into color groups. The plaid I used had a brown section, a blue section, and a green section. I had to cut it in the opposite direction than I normally would to get the different color sections. I used a #9 cut. Following the direction from your first square, hook this last square using your different colors from the plaid for each row. I did 2 rows of each color section. Another way you can hook this fourth square is to put the plaid through the cutter, using the same size cut as your first square. Before the wool goes all the way through the cutter, grab the cut ends and place them in order, from right to left on a piece of masking tape. Hook your square starting with the strip on the right. Hook straight lines either vertically or horizontally. Always have your tail the same length starting each row. For the second row, use the next strip on the right. Continue hooking in this way across the square. If hooked correctly, you will duplicate the plaid.
- Steam and block.
- Trim linen to 1″–1½” out from the hooking. You may want to Fray Check the edge or serge to prevent the linen from raveling.
- With right sides together, pin all the way around on the linen side. Sew all the way around, leaving an opening about 4″–5″ for turning. Sew 1/2″ from the hooking. This will leave a channel for the proddy edge.
- Turn right side out.
- Cut ten 3½” x 16″ pieces of wool with either a #10 or 1″ blade. Turn the wool and cut the short way. This creates the perfect size for proddy pieces. My pieces were 1″ x 3 ½”. (This is an approximate amount of wool. How much fringe you put on the edge will determine how much you will need. I used 1″ pieces for 1 row of proddy. If you use the #10 blade, you will do 2 rows.)16. Starting at the opening, proddy your “fringe” in the linen channel. Insert the proddy tool in the linen, coming up about 3–4 holes away from where you entered the linen. Pull the wool halfway through and release. Pull the wool out of the way and insert the proddy tool into the second hole you created. This becomes the first hole for your second piece of wool. Repeat the proddy instructions all the way around to the other side of the opening.
- Stuff. I used dryer lint from washing and drying the wool fabric. You can use polyfill if you like.
- Hand sew the opening with matching thread. When in doubt about the color of thread, use a neutral such as gray.
- Finish the proddy edge where you hand sewed the pillow together.
- You are finished!
REVIEW YOUR FINISHED PILLOW
- What size cut is best for my plaid?
- What direction is best for my plaid?
- Which square did I like the best and why?
- Did my first and second squares look different because of cutting the loops on the second square?
- How can I use the different color sections of my plaid in a rug?
- Is my plaid good for motifs or background?
- Would I use this plaid again to hook into another project now that I know what this plaid is capable of doing?
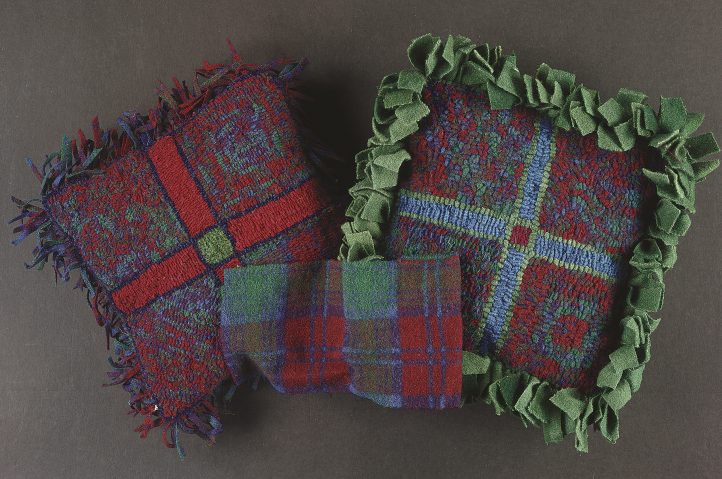
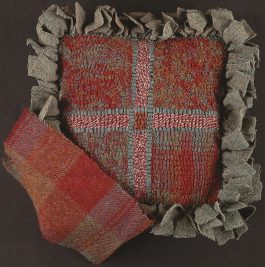
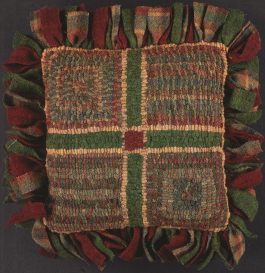
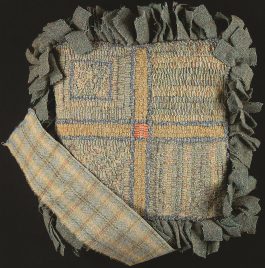
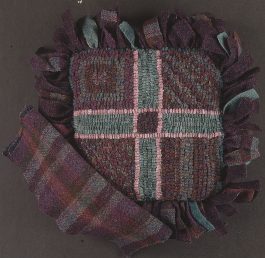
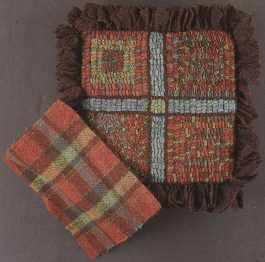
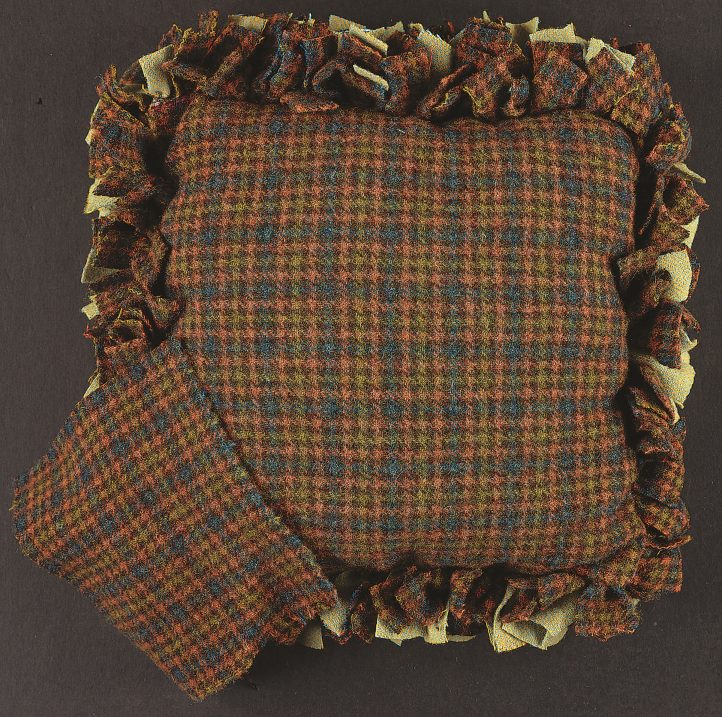
The back of the pillow shows the original plaid wool before it is cut or hooked. On the front of the pillow you will see the four squares with different ways to hook your plaid. By pulling colors from your plaid, you will have coordinating colors to accent your pillow.