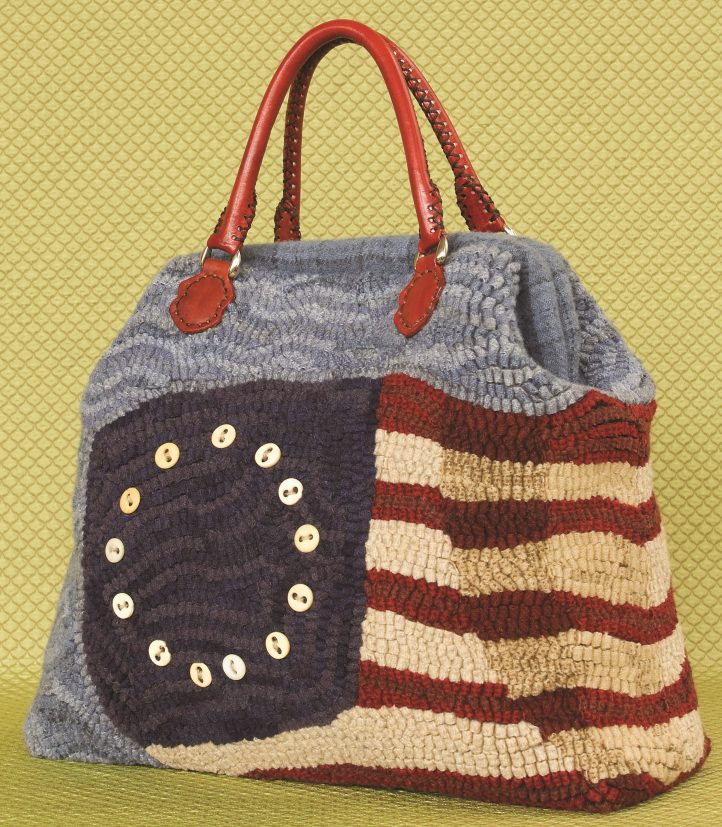
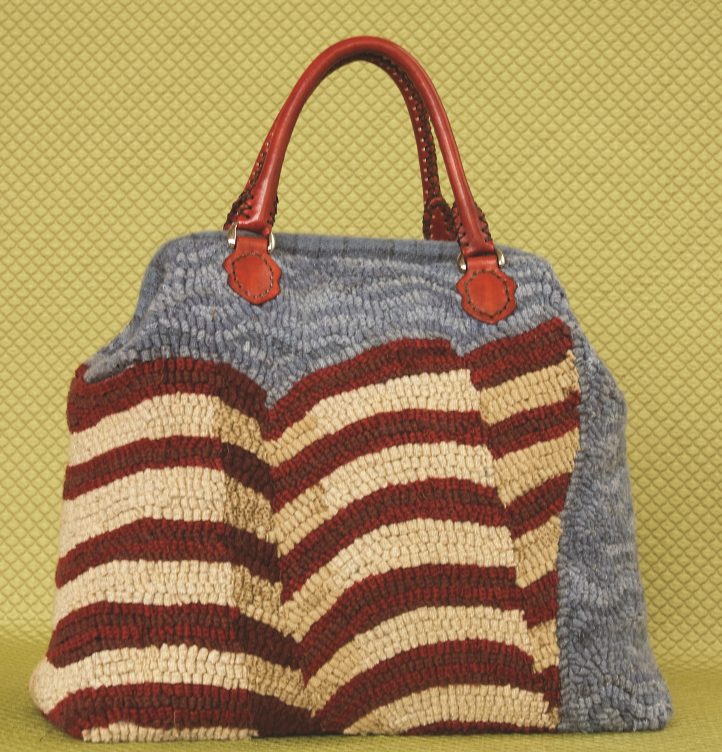
Revolution Bag (Front & Reverse), 14″ x 111/2″ x 5″, #8-cut wool on linen, antique bone buttons, leather handles. Designed by Marita Friedman for The Merry Hooker Woolens. Hooked by Denise Killingsworth, Walnut Creek, California, 2009. Constructed by Marita Friedman, Moraga, California, 2009.
MATERIALS LIST
- 30″ x 45″ piece of unbleached linen foundation fabric
- 22″ x 40″ piece of Red Dot tracing fabric
- Sharpie marker
- Sewing machine with zigzag stitch
- Edgestitch sewing foot (optional)
- Steam iron
- See-thru quilter’s ruler
- 10″ tubular handbag frame
- 4 metal handbag feet
- 1 pair of leather handbag handles (premade or make your own)
- 13 buttons (I used 5/8″ diameter antique bone buttons)
- Heavy-duty waxed linen thread for sewing on the bag handles
- 43/4″ x 131/2″ acrylic bag bottom with holes predrilled for handbag feet
- Sharp awl
- Seam ripper
- Hand sewing needle
- Tapestry needle
- Threads in colors to match the bag and lining fabrics
- Silk thread for basting
- Beeswax
- Fray-chek
- Pliers
FABRIC LIST
Wools for hooking the bag
- 1/2-yard mix of medium-value blues for background
- ¼-yard mix of dark-value blues for flag field
- 3/8-yard mix of medium- and dark-value reds for stripes
- 3/8-yard mix of drab & grungy off-whites for stripes
Other Fabrics Required
- 1/2 yard of a medium-value blue wool with an interesting texture for the bag bottom & facings
- 1 yard of lining fabric: quilter’s weight cotton or linen is best
- Remnants of contrast fabrics for pockets, etc. (optional)
- 1 yard of Pellon Shirt Tailor fusible stabilizer for lining(optional)
- 1/2 yard of thick cotton flannel to cover the acrylic bottom
TIPS FOR SUCCESS
-
Use the best quality materials you can find. You will put many hours of work into your bag, and your time is worth the expense of fine materials.
-
Spend time planning your bag before you begin hooking to think about the steps involved. If you’re not sure how something will go together, get a notebook and draw a rough sketch of how you plan to perform the step. It may become clearer with a drawing or you may discover a way that works better for you. I often test a technique by making a sample before I go on to the real thing.
-
If you tend to hook high like I do, try to hook a little lower when hooking a carpetbag. This will reduce the overall weight of the finished bag. It’s a fairly large piece, and once you get your wallet, your iPhone, your lip-stick, and your ATM card into it, it may be a bit hefty.
-
Because the carpetbag is a three-dimensional object, try to do most of your hooking in a side-to-side (hori-zontal) direction. This method will allow the lines of loops to bend, rather than split, around curves and corners.
-
Hook the sides of your bag so that the motifs and colors will match when you sew the side seams together; this care will give a professional looking result, and once the bag is complete, you will hardly notice the side seams. I do this by counting the rows of each color I’ve hooked on one side. Then I do my best to hook the same number of rows of each color on the corresponding side.
-
Head off to the thrift store or a good consignment shop and keep your eyes peeled for old handbags with good handles. Or check the back of your closet; you may find a treasure that you can take apart and reuse for your carpetbag.
Preparing the Revolution Bag Pattern
Enlarge and Transfer the Pattern
- Using your preferred method, enlarge the bag, facing, and lining patterns given in Diagrams I and II to the dimensions noted on the diagrams. Transfer the pattern from Diagram I to Red Dot tracing fabric.
- Cut a piece of good quality primitive linen backing fabric to 30″ x 45″ and serge all four sides. I pre-fer unbleached linen for my carpetbags because the darker natural color of the fabric is not obvious if it happens to show through at the rounded edges of the bag. Press the linen, square up the grain, and lay it out flat on your work surface.
- Hand-draw the outside edges of the bag pattern, keeping the straight lines exactly on grain by drawing in the ditch between two parallel threads. Use a see-through ruler to draw the diagonal lines of the outside edges. These are the cutting lines of the bag pattern and will be used when the hooking is complete.
- After drawing the outside lines of the bag, transfer the pattern from the Red Dot tracing fabric to the linen. Several guide marks for sewing the bag appear on the pat-tern diagrams. Don’t draw these notations on the linen, but keep them handy for reference.
- Using a zigzag stitch, stitch around the pattern 1/8″ inside the cutting lines. This stitch stabilizes the linen when you construct the bag. Don’t substitute glue or tape for this step. Figure I shows how the pattern should look at this stage.
- Lay the linen pattern onto your work surface with the right side up.
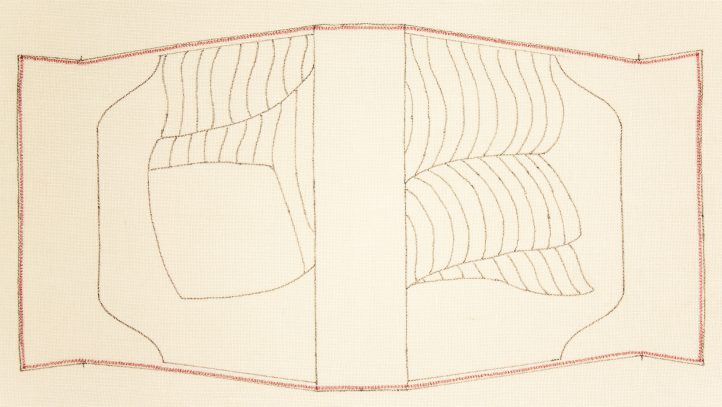
Figure I: The pattern is transferred to linen and zigzag stitched just inside the cutting line.
Add Bag Bottom and Facings
- Using the carpetbag facing pattern (Diagram II), cut two facings from wool fabric. Use a color complementary to the color you will use in the background of the Revolution Bag because this fabric will be visible on both the outside and the inside of the bag. I used a plaid that I dyed in the same dye bath with the darker of the background wools. Cut one 6″ x 201/2″ piece from the same fabric for the bottom of the bag.
- Staystitch the curved edges of each of facing piece by stitching along the edge with a very short stitch just inside the 1/2″ stitching line noted on the pattern (Figure II). This prevents the curved areas from stretching out of shape during construction. In the example shown on the right, I’ve used white thread for clarity, but it is best to use a thread color that matches your fabric. After staystitching, clip the seam allowance to, but not through, the stitching; notch the curves to reduce bulk in the seam allowance. Fold the 1/2″ seam allowance to the back, carefully following the curved shape and steam press it in place.
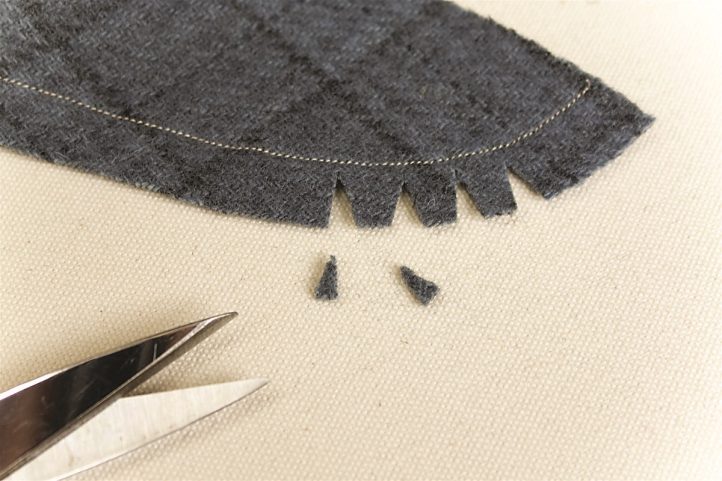
Figure II: Prepare the bag facings by staystitching and clipping the curves on the curved edge.
- With the right side up, place the shaped and folded edge of one facing onto the corresponding curve drawn on the linen pattern. The folded edge of the facing should be on the line drawn on the linen. Pin it in place, pinning perpendicular to the edge so that you don’t distort the line of the fabric. Using matching thread and an edgestitch foot, topstitch this folded, curved edge in place stitching as close to the edge as possible, removing the pins as you sew. Baste down the other three sides of the facing using silk thread. This will hold the facings in place as you hook the design.
- Repeat these steps with the second facing on the opposite side of the bag.
- To prepare the bag bottom, fold the 1/2″ seam allowances to the back on the long sides of the bag bottom and press the seams in place. Lay this piece, right side up, on the right side of the rectangular bottom area on the linen pattern. As with the facings, the folded edges of the bag bottom should lay on the lines on the linen. Pin and edgestitch them in place as you did with the facings. Baste the short sides in place.
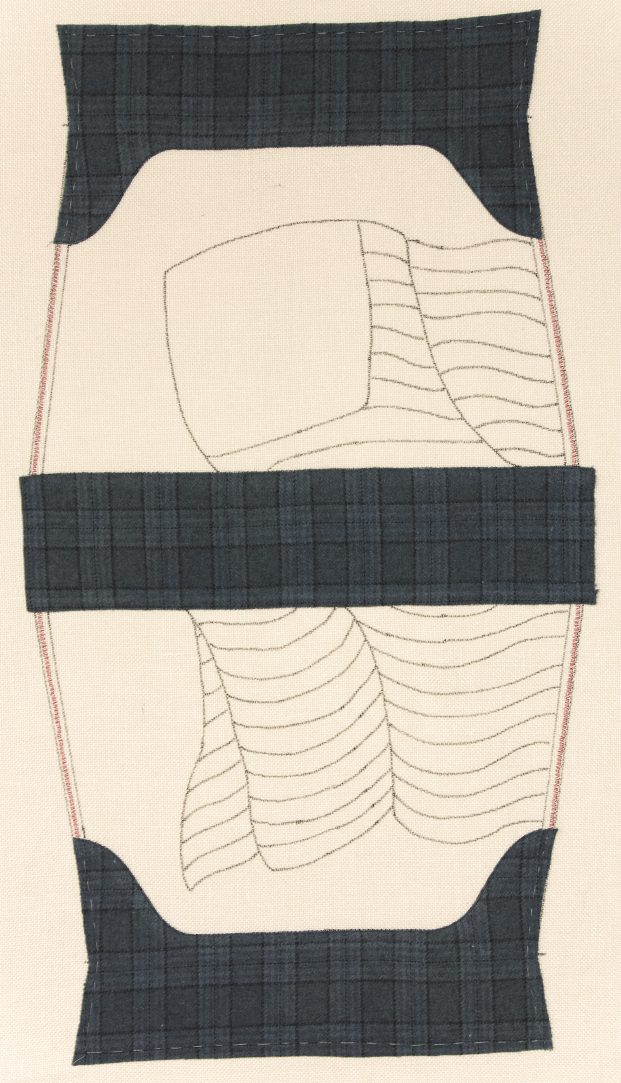
Figure III: The facing and bag bottom are applied to the front side of the linen backing and the pattern is ready to hook.
- As shown in Figure III above, the carpetbag pattern is ready to hook!
Mendocino Carpetbag, 161/2″ wide x 151/2″ high x 6″ deep, #6- and #8-cut wool on linen, handmade leather handles. Designed by Marita Friedman for The Merry Hooker Woolens. Hooked and constructed by Marita Friedman, Moraga, California, 2009.
Sebastopol Carpetbag, 171/2″ x 15″ x 6″, #8-cut wool, unspun fleece, hand-spun yarn, hand-cut and prodded wool, Bakelite buttons, leather handles. Designed by Marita Friedman for The Merry Hooker Woolens. Hooked and constructed by Marita Friedman, Moraga, California, 2009.
Preparing to Hook
Hooking the Revolution Bag is easy. The model bag was hooked in a #8 cut with a mix of hand-dyed, textured wools in primitive shades of red, white, and dark blue, and a mix of medium-value blues for the background. Follow these hints for hooking the carpetbag:
- Because the carpetbag is a three-dimensional object, try to do most of your hooking in a side-to-side (horizontal) direction. This method allows the loops to bend, rather than split, around corners.
- When hooking the sides of the Revolution Bag, keep in mind that the stripes should match when the side seams are sewn. Count the rows of each color hooked on one side. Hook the same number of rows of each color on the corresponding side. In other words, if on the front of the bag, the top red stripe has four rows of hooking at the side seam area, then the top red stripe on the back of the bag should have four rows of hooking at the corresponding side seam area.
- Leave uncut tails, 11/2″ to 2″ long, at the ends of your rows of hooking at the side seams. These long tails will be useful for making adjustments in the seam area when you are making up the bag.
- When hooking next to the edges of the pre-sewn facings and bag bottom, hook right next to the fabric without leaving space between.
Hooking the Revolution Bag
- To hook: Start with the front side of the bag and hook the dark blue field of the flag. Outline the field and fill it in with alternating textures of dark blue. Next, hook the red and white stripes, starting with a red stripe at the top of the flag. To hook primitively shaded furls in the flag, draw gently angled vertical lines onto the pattern where you want to place the darker shades of wool before you begin hooking. Fill in the back-ground with different values and textures of medium blue. Use an outline-and-fill technique or draw in squiggles or wavy lines as guides for more movement in the background.
- Once the hooking is complete, steam the piece on the reverse side, check for and fill in “holidays,” and use a pair of fulling tweezers to adjust wayward loops.
Assembling the Revolution Bag
- Using a mug or bowl as a guide, mark the placement of the 13 stars on the flag field with pins. Pull a thread of linen out of a linen backing remnant, wax the thread with beeswax, press the thread to melt the wax into the thread, and use it to sew on the buttons.
- Press the uncut 11/2″ to 2″ tails away from the side seam lines and toward the hooked area. To keep them out of the way, tape them down temporarily with blue painter’s tape.
- Cut away the excess linen backing on the cutting line and serge around the entire piece. As further insurance against unraveling, use Fray-chek on the seams; don’t use a stiffer glue as it will interfere with making up the bag.
- Lay the hooked piece, right side down, on your work surface and lightly press the side seam allowances toward the wrong side of the piece. Don’t press seam allowances on the top edges.
- Fold the piece in half at the bag bottom with the wrong sides together and match the hooked motifs and colors along the sides. Pin the side seams, placing the pins perpendicular to the seams (Figure IV).
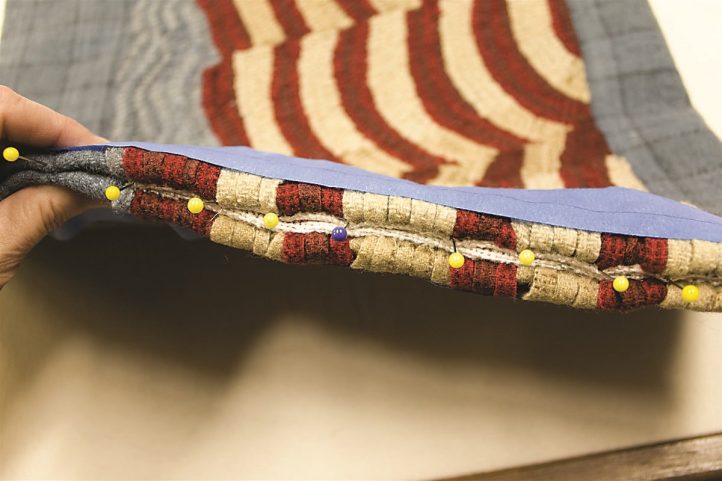
Figure IV: The excess side tails are taped away from the seam and the hooked area of the side seam is pinned with the wrong sides together. The stripes are matched in preparation for hand sewing.
- Prepare to sew the side seams by pulling two long threads out of a linen backing remnant. Pull the threads through a piece of beeswax and iron the waxed threads to melt the wax into the thread, which makes the thread stronger and prevents tangles.
- Thread a tapestry needle with the linen thread and sew the hooked side seams of the bag. Working from the outside of the piece, use a drawing stitch (a variation of the slip stitch) to sew the hooked portion of the sides. This stitch is made by alternately taking a short running stitch through a couple of threads of the linen backing, first in one folded edge and then the other, and drawing the thread taut so that the folds are pulled into each other. The seam will be almost invisible if you match the stripes of the flag as you sew. Don’t sew the unhooked areas of the side seams and bag bottom yet.
- To attach the bag handles, mark the top center front and back of your work with pins. Place one handle on the front and determine the most pleasing placement. Place the handle tab on the hooked portion of the bag and not on the flat facing piece. Pin mark the tab placement making sure the handle is symmetrically placed on the front of the bag. Repeat for the second handle on the back of the bag.
- Hand-sew each handle in place with heavy-duty waxed linen thread in a coordinating color. Using a running back stitch (Figure V) and a tapestry needle, firmly sew the tabs to the bag through the hooked loops and the linen backing. Once you’ve sewn all the way around each tab, tie a hard knot with the two tails of the thread. Clip the excess thread leaving a 1/2″ tail.
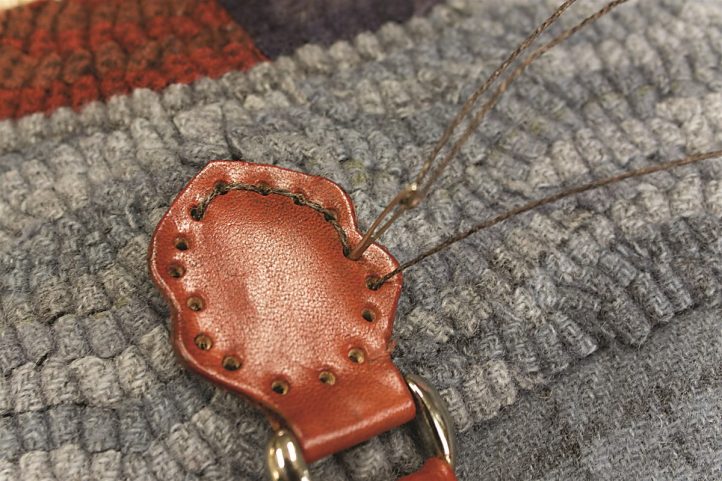
Figure V: The leather handle tabs are sewn onto the bag with heavy duty linen thread using a running backstitch.
- Turn the bag wrong side out and machine stitch the remainder of the side seams, leaving open and unstitched the 2″ section between the black dots shown (see Diagram I). You will eventually insert the tubular frame into the top of the bag here. As you near the hand-stitched portion of the seam, use your fingers to push aside the hooked loops and stitch right up to the line of hooking. Steam press the seams open and turn the bag right side out.
- Check over the bag and use a rug hook to adjust hooked loops as needed to prevent the backing from showing. If necessary for good coverage, use the long tails to pull a few loops up into the seam line.
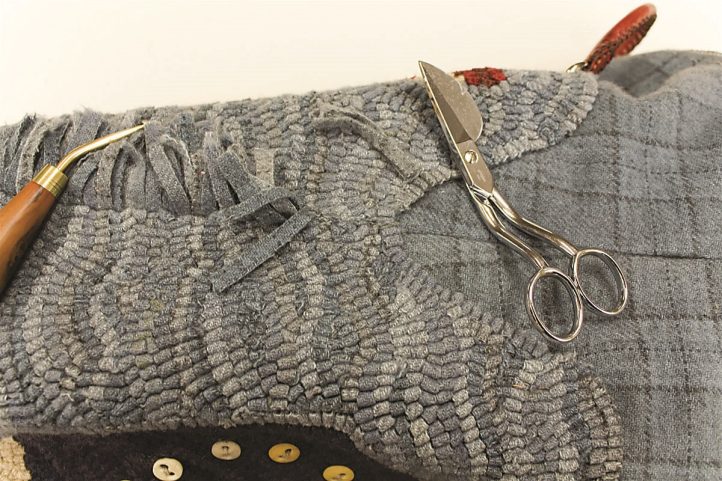
Figure VI: Spend time adjusting the hooked loops at the side seams, adding more loops if necessary. Carefully trim away the excess tails.
Drape the bag over an ironing board with one side seam laying flat with the right side up. Trim away the excess tails of the hooking at the side seams (Figure VI). Work slowly to make further adjustments to the loops as needed. After trimming the tails, steam the seam and let it dry before moving. Repeat these steps with the other side seam.
Forming the Bag Bottom
- Turn the bag wrong side out and place it flat on the work surface. At the bottom edge of the hooking, measure 21/2″ in from one of the side seams and mark this spot with a pin (Figure VII). Repeat this step on the other side of the same corner. Form a triangular flap by flattening out the two layers of fabric between the two pins you’ve use to mark the points (Figure VIII). Draw a straight line between these two points and baste along this line through all the layers of fabric, pushing the hooked loops on the inside out of the way so that they don’t get caught in the basting. Repeat for the other side of the bag and then carefully turn the bag right side out.
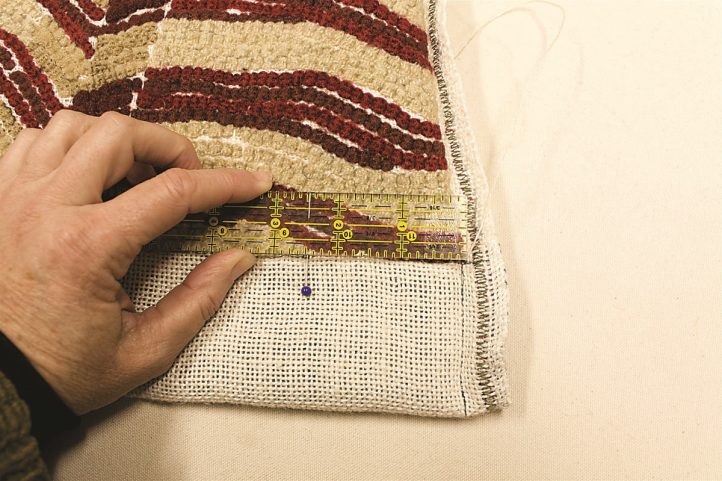
Figure VII: Measure 21/2″ in from each side seam at the bottom of the hooking and mark with a pin in preparation for sewing the bag bottom.
- Check to see that the bottom corners are square and that all of the hooked loops are free from the seam. After making any necessary adjustments, turn the bag wrong side out and machine sew the basted seams as close to the hooked line as possible without catching loops in the seam. Trim to the seams to 1/2″, serge the raw edges, and press them toward the sides of bag. Turn the bag right side out.
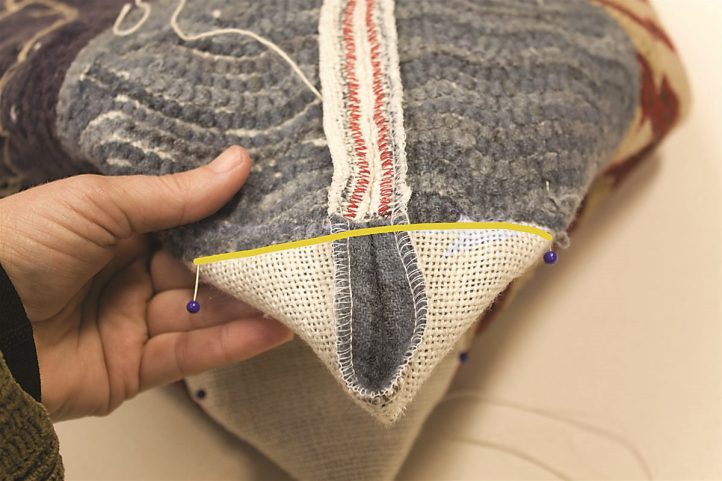
Figure VIII: Stitch from pin mark to pin mark, as noted by the yellow line, to form the rectangular bag bottom.
- Cover an acrylic bag bottom with a layer of cotton flannel and place it in the bottom of the bag. Using the predrilled holes in the acrylic bottom as guides, mark the placement for the metal handbag feet with pins. Poke holes through the fabric with an awl and secure the acrylic bottom in place with four metal handbag feet.
Constructing the Bag Lining
- Choose a quilter’s weight cotton or linen decorator fabric for the bag lining. I don’t recommend wool; a smooth fabric with a finer weave is more appropriate and has less weight.
- Place the lining pattern (Diagram II) on the fold of the fabric and cut one from two layers.
- If you are using a light-weight quilting cotton, fuse Pellon Shirt Tailor fusible interfacing to the wrong side of the lining before sewing. This interfacing provides stability and stiffness to the bag lining without adding weight.
- Spend a few minutes thinking about how you will use your bag and add pockets, snaps, clips, and so on with self or contrast fabrics and trims (Figure IX). You can have a lot of fun being creative as you individualize the inside of your bag. I added a swivel snap for my keys, which I am always losing, and a special pocket for my iPhone.
Figure IX: A fun lining fabric, individualized with pockets, snaps, and zippers, makes the carpetbag even more useful.
- After customizing the lining, fold along the fold line with the right sides together. Using a 1/2″ seam allowance, baste between the two black dots noted on the pattern and sew the remainder of the side seams. Sew the lining bottom using the directions given for the bag bottom.
Putting It All Together
- Start with the hooked bag right side out and the lining wrong side out.
- Put the bag into the lining piece so that the right sides are together, matching up the side seams. Starting at the side seams, pin the tops of the bag and lining together, easing the top of the bag into the top of the lining.
Machine stitch the seam, sewing with the bag on the bot-tom (against the feed dogs of your machine) and the bag lining on the top (against the presser foot of your machine). Sew all the way around. Press the seam toward the lining. Put the bag into the lining piece so that the right sides are together, matching up the side seams. Starting at the side seams, pin the tops of the bag and lining together, easing the top of the bag into the top of the lining. - The bag is completely sewn together and the wrong side is out. Use a seam ripper to pick apart the basting in the lining side seam. Turn the bag right side out, working slowly and easing the bag through the opening. Check your work to be sure you are satisfied with all the seams and make any corrections necessary. Using the drawing stitch, hand-sew the lining closed.
- Push the lining down into the bag, tucking the corners of the lining into the corresponding corners of the bag. Pin the fold line around the top of the bag and machine stitch 1″ down from the top fold to form casings for the tubular frame. You will stitch very close to the top line of hooked loops; a zipper foot works well here.
- Insert the two halves of the tubular frame into the openings at the top side seams, one half into each side of the bag. Before inserting, take a moment to play with the frame hinges so that you know which way to insert them; the rounded protrusions at each end will face toward each other when the bag is closed. The frame pieces will slide in smoothly if the insertion end is temporarily covered with a piece of plastic wrap.
- After the frames are inserted into the casings, line up the openings in the hinges according to the manufacturer’s directions and hold them together with pliers as you insert the hinge pin into the holes. If the holes are lined up correctly, the pin should easily snap into place. Repeat on the other end of the frame. Open and close the bag a couple of times to be sure it is connected properly.
- Fill the bag with unprinted paper, tucking the paper into all the corners. Spend a few minutes shaping the bag, give it a good steaming, and let it dry thoroughly.
Congratulations! You have constructed a lovely and useful carpetbag. Carry it with pride.