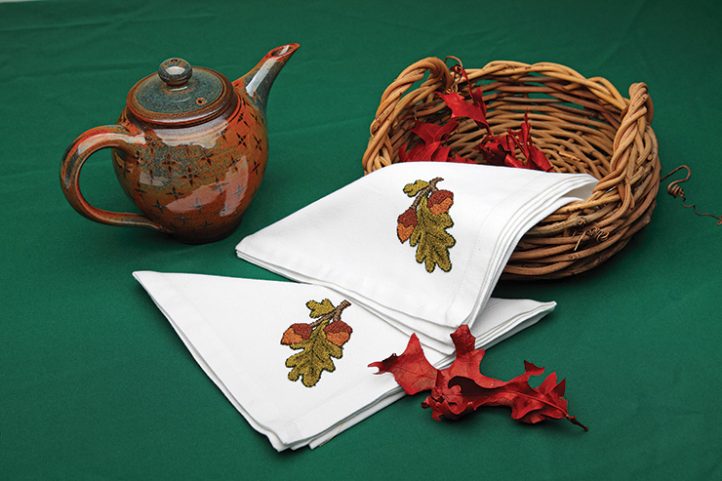
If you enjoy rug hooking or punching, I encourage you to try miniature punch needle embroidery. I think you’ll enjoy it, and these classic oak leaf and acorn napkins are a perfect place to start!
Punch needle stitching varies in scale from using a single strand of thread for embellishment to using a thick yarn to make rugs. The process is basically the same. The thread or yarn is fed through a hollow needle and out through an eye in the needle tip. When the needle is punched into the back of the fabric and withdrawn, it leaves a loop on the front. The loops are considered the right side of the work, and the collected loops create a lush pile surface.
The basic difference between rug punching and miniature punch-needle embroidery is scale. Rug punching needs to be worked on a quality woven fabric, like monk’s cloth, while miniature punch needle embroidery can be worked on a wide variety of fabrics, including Weaver’s Cloth®, silk, wool, velvet, cotton, linen, rayon, and blends. Punch needle of any type requires a rigid frame or an embroidery hoop to keep the fabric taut as it is being stitched.
Rug punching uses a specific number of stitches per linear inch to cover the background fabric,
whereas miniature punch needle embroidery uses as many stitches as needed to cover the background fabric. Both processes depend on the size of the thread, yarn, or fabric strip; the larger the fiber, the fewer the stitches needed to cover an area and the coarser the fabric weave needs to be. The rows of stitches for both need to be close together for proper coverage.
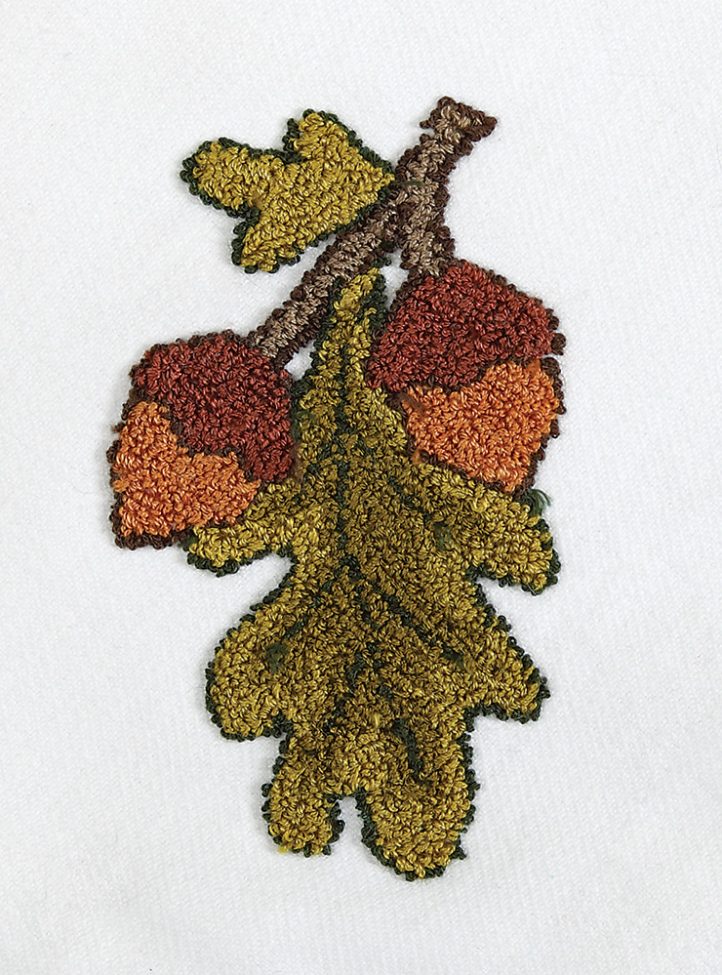
Classic Oak Leaf and Acorns Napkins
I chose the colors of this project for year-round use, but these napkins would be equally pretty worked on a gold or rust-colored napkin with color-ful autumn-toned leaves surrounding the acorns. Think how lovely they would be on a harvest table or for Thanksgiving dinner.
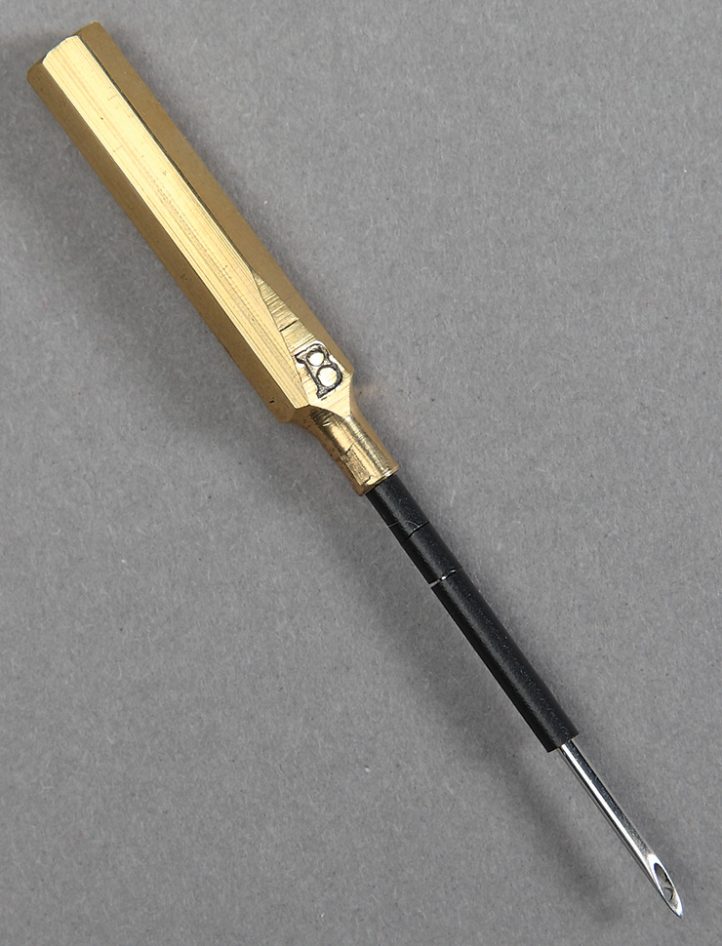
Punch Needles
Miniature punch needles are available in various sizes:
- The smallest needle uses one strand of 6-strand embroidery floss and is often referred to as a #1 needle. It gives the greatest detail, but takes the most time.
- The medium-sized needle accommodates two, three, or four strands of 6-strand embroidery floss. It works up faster than a #1 but still retains detail. Multiple colors and types of thread (such as matte cotton floss, shiny rayon, metallic, or #8 perle cotton) can be combined in the same needle.
- The largest needle takes all six strands of cotton embroidery floss, a #5 perle cotton, some crewel wool, and even 2mm silk ribbon. Called a #6 needle, it works up very fast and uses a lot of thread. Basically, if the thread flows easily through the needle and leaves a loop in the fabric, you can use it.
Materials
- 4 pre-made napkins (or as many as desired)
- 3-strand punch needle, such as Bernadine’s 2–3 strand punch needle
- small embroidery hoop, about 4″
- sharp embroidery scissors
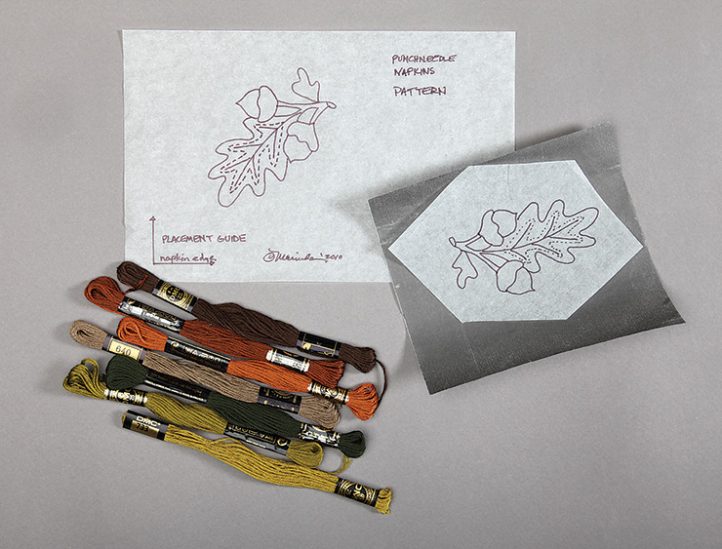
- dressmaker’s carbon paper (do not use carbon paper intended for typing)
- tracing paper and pencil
- 6-strand cotton DMC embroidery floss
- very dark brown – #3021
- medium leaf green – #731
- brown – #801
- grey-brown – #640
- very dark green – #934
- light leaf green – #733
- golden tan – #434
- straight pins
Supplies
- Bernadine’s Needle Art (needles)
- DMC Corp. (threads)
Embroidery thread is used to create the design. Be sure to use dressmaker’s carbon paper to transfer the design to the cloth napkins.
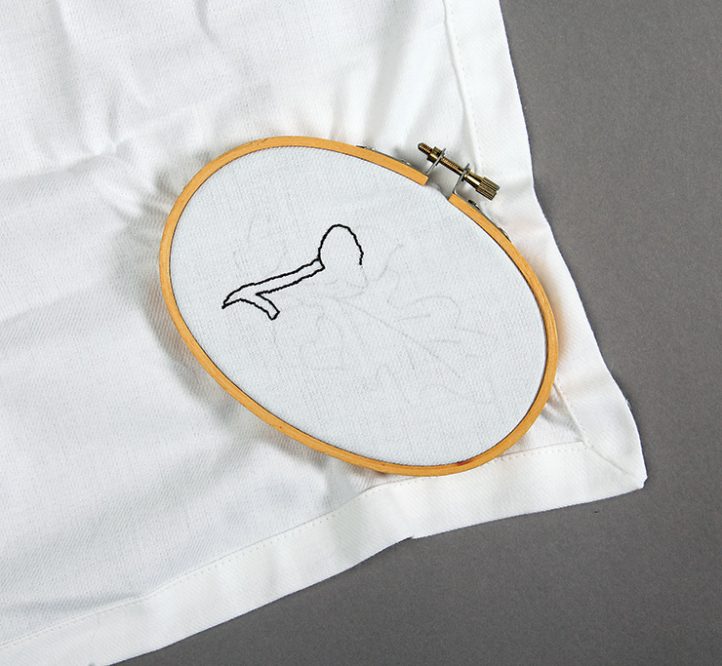
Trace the motif onto the wrong side of the napkin. Place the napkin in the hoop and stretch it tightly. Work the outlines of the design first, then fill it in.
Directions
- With a pencil, trace two or three motifs onto tracing paper.
- Position a motif on the wrong side of one napkin corner using the placement guide for centering. Pin the traced motif in place.
- Slide the dressmaker’s carbon paper between the fabric and the motif, carbon side against the fabric. Using a pencil, press firmly and trace the entire motif. Remove the carbon paper and motif. Repeat this step for each napkin.
- Place one napkin in an embroidery hoop with the design face up. Stretch the fabric tautly in the hoop.
- Read the directions accompanying the needle. Thread the needle following the manufacturer’s directions using two strands, which you have separated from 6-strand floss.
- Work the design as follows:
Outline the branch and acorns with #3021
Outline the leaves with #934
Fill in the acorn caps with #801
Fill in the acorn with #434
Fill in the branch with #640
Fill in the small leaf with #733
Fill in the outer edge of the large leaf (to the dotted line) with #733
Fill in the inner large leaf with #731 - Once the motif is complete, use the tip of the punch-needle or scissors on the right side to carefully rearrange the loops to clean up the design. The loops can be pushed into alignment to improve the details.
- To set the loops and remove any distortion caused by the embroidery hoop, wash the napkins in the washing machine. Iron the napkins, right sides down on top of a terry cloth towel, while they are still damp. Iron dry. Spray starch may be used if desired. Do not use glue to secure the loops. Clip any loose threads even with the loops.
If you plan to embroider multiple napkins—either for yourself or as gifts—try setting up an assembly line. I use three hoops and work one color at a time. If the design is simple, I can make napkins in an evening. More complex designs could take two nights.
If it is difficult to convince your friends and family to use these hand-embellished napkins and not save them for special occasions, tell them they’ve already been washed and ironed so that they won’t be afraid to toss them into the washing machine. Then remind them that as we all become more “green,” cloth napkins are a better choice for meals than paper napkins. And these napkins will add a touch of grace to any supper table.
A punch needle uses a wide variety of thread and leaves behind a loop that resembles a loop of cut wool on a hooked rug.
Wash and press the finished napkin to set the design.
A Brief History of Punch Needle
Punch needle has been around for hundreds of years. Some of the earliest examples date back to the 1500s when French nuns fashioned hollow bird bones into punch needles to stitch some of their needlework. In the 1700s, the Russian Old Believers, who split from the Russian Orthodox Church over modernization, used punch needle embroidery to embellish their clothing, icon panels, and household goods. In modern Old Believer communities, many located in the United States, miniature punch needle embroidery is the dominant technique used for embellishment.
Old punch needles were said to be made of rolled tin tied with thread or fine wire. Punch-needles used in today’s Old Believer communities start with repurposed hypodermic needles. A handle is added and an eye is drilled at the tip of each needle. A gauge or stopper is added to the shaft to ensure even, consistent loops.
I originally learned on a handmade needle from the Old Believers in Woodburn, Oregon. I still have the needle and treasure it. People are surprised when they see the size. It’s barely 1 1/4″ long, including the handle, and takes one strand of thread. RHM