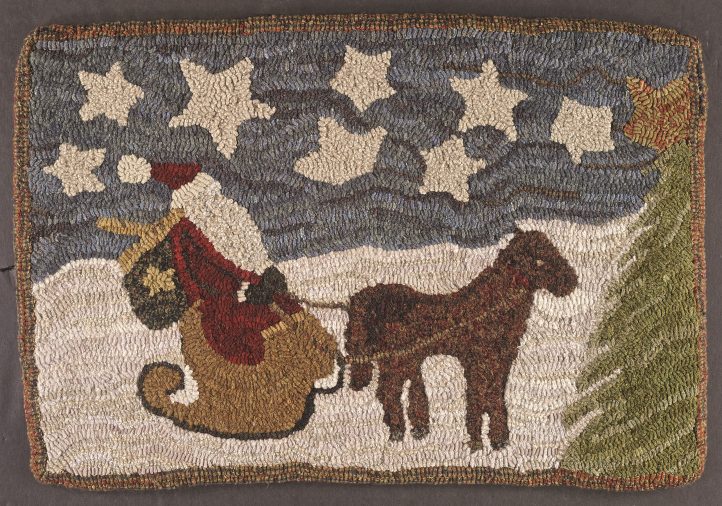
Here Comes Santa, 31″ x 25″, #8- and 8.5-cut wool on primitive linen. Designed and hooked by Lucille Festa, East Rupert, Vermont, 2012.
BY LUCILLE FESTA/AMERICAN COUNTRY RUGS PHOTOGRAPHY BY IMPACT XPOZURES
Christmas is my favorite time of the year. As the weather turns cold, I begin to anticipate the joys of the Christmas season. The smells, sights, and sounds evoke fond memories of my childhood. Today when my family gathers together we celebrate the time-honored traditions of giving, sharing, and loving.
For this festive folk art rug, I selected wools in old traditional colors. You can find lots of the wool for this project from your leftover strips. Many of the elements in the pattern are small and call for a few strips of this and a few strips of that; rummage through your leftovers before making a purchase.
To enhance the folk art feel, I cut my wool in strips that were sized according to each element. The sky, stars, tree, and horse were hooked using #8-cut wool and #8.5-cut wool. The sleigh, reigns, and Santa’s bag were hooked using #8 cut. All other elements were cut in various sizes to fit that element.
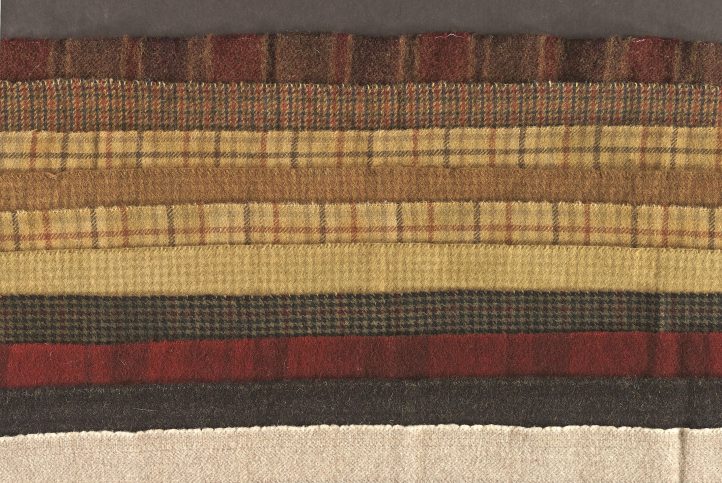
Plaids and textures used in Here Comes Santa.
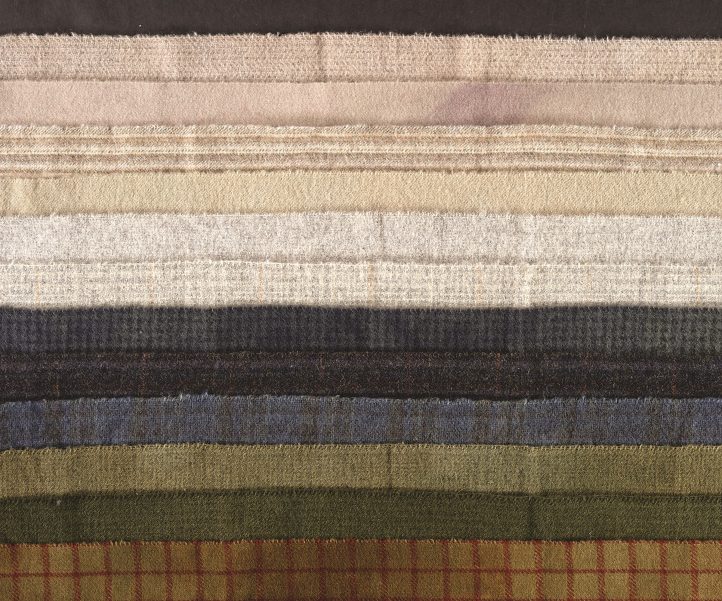
Plaids and textures used in Here Comes Santa.
Getting Started
The pattern measures 31″ x 25″. Add 5″ all around for ease of hooking. Choose a foundation material that measures 35″ x 411/2″. Secure the edges of the foundation by serging, zigzagging, or taping the edges with masking tape.
To transfer the pattern, first draw the outside edge of the pattern onto the foundation. Check that the outside edge is straight and the pattern measures 31″ x 25″. Then transfer the paper pattern to the foundation. Listed here are three suggested procedures:
Light Box: Place the paper pattern on the light box and arrange the foundation on top of the pattern. Use the pattern’s outside edge as your guide. Use a Sharpie to trace the pattern onto the foundation.
Window: Take the paper pattern and tape it to a large window. Tape the foundation of your choice on top of the pattern. Again, use the pattern’s out-side edge as your guide. Use a permanent marker to trace the pattern onto the foundation.
Red Dot: There are two steps in this procedure. One: tracing the pattern onto the red dot, and second: using the red dot pattern to trace the pattern onto the foundation. Place the red dot fabric over the paper pattern. Pinning the red dot onto the paper helps prevent the paper from sliding. Next, place the red dot pattern on top of the foundation, arrange the edges, and trace the pattern, pressing hard on the Sharpie to get clear lines.
Hooking the Rug
Santa
For the eye, hand cut a very narrow strip of medium blue wool. Pull the strip up, then pull the other end of the strip up so you have two ends up. Do not snip off the tabs until the face is hooked. Hook the face with off-white wool.
The beard is next. A small check in a mixed light gray wool works great. Under the beard is the trim of the Santa’s invisible arm. Hook the trim with the same wool that is used in the hat trim.
Start the hat with the trim and pompom. Use an off-white wool that has a different value than Santa’s face. Fill in the middle of the hat with the same red that you will use in Santa’s coat.
Small checks are best in small spaces, and they’re perfect for the mittens. Use a dark color of your choice. A narrow cut will ensure definition.
Hook the scarf in a gold check.
Outline Santa’s arm in a narrow strip of black wool to define the arm from the suit. Fill in the coat using a red plaid or check.
To complete the bag, first hook the star in a gold using a small herringbone or plaid. Hooking small stars can be tricky. Use a narrow cut to help keep the points sharp. Do not over hook the space. Finish the rest of the bag.
Sleigh
Hook the reins first in a small but noticeable plaid. If you use a #8 cut, one line is all you need.
The front trim is a narrow line; hand cut the wool to fit the space. One line of gold plaid is enough.
Hook the sleigh itself in a deep mustard plaid. Use one line of black for the runners.
Horse
Hook the eye using a nice light color. Again, use a narrow cut. Follow the instructions given for Santa’s eye.
For the feet, use a gray/blue plaid or similarly colored plaid; a few loops is all you need.
Hook the horse’s body in a large red, gold, green, and black plaid. Cut the lighter and darker sections separately. Use the red strips to hook the hindquarters. Hook the darker and lighter sections in different directions. Fill in any remaining space with all the other strips. Have some fun: similar wool that has different colors can be used in different places. Try changing the direction of your hooking.
Hook the horse’s collar using one line of the same red as Santa’s suit.
Tree and Snow
Hook the tree’s branches on a diagonal. Keep in mind that the branches’ points are like the tip of a star. Start hooking at the top of the tree using the darker green, and continue to the bottom. Try not to overhook the points. Repeat this process adding the lighter green at intervals. The combination of the greens will provide interest and depth. The tree was hooked in #8 and 8.5 cuts.
Hook the treetop star in a #8.5-cut strip of gold and red windowpane.
Hook the snow in vertical wavy lines using different values to create a shadowed effect. I used three different off-whites to add definition.
Sky and Stars
Hook the stars first. Use one off-white fabric for all the stars. I did not outline each star with the sky’s background color. Eliminating the outline makes the stars look like they are floating.
For the background, use three blues at random to create texture and movement.
Border
I chose a one-line border for this piece. I hooked the outside line of the pattern in a small red, gold, and green plaid (the same plaid used in the horse’s reins).
Finishing the Rug
Steam the rug and finish it with your choice of binding. The finished piece is ideal for the floor or the wall.
NOTES
- Red Dot is a common name that rug hookers use to describe a product made by Pellon for tracing patterns.
- For best results, keep the loops within the black lines.
- Santa’s face, beard, hat trim, and coat trim all touch. For best results, use light wools that work well together, but make sure the color values are distinct.
- When using similar colors in a small space, use fabrics that are noticeably different.
- Changing the hooking direction within the horse’s body will add texture and interest.
- When a rug does not have a border, try hooking one line of wool in a coordinating pattern and color on the edge line. This style idea anchors the edge and presents a finished look.
HERE COMES SANTA FABRIC SELECTION
ELEMENT: FABRIC AMOUNT NEEDED
- Sky: 3 blues. 1/8-3/8 yd. of each
- Stars in Sky: Khaki with blue large plaid. 1/8-1/2 of the darkest, 1/8 yd. of lightest, 1/4 yd. of medium
- Tree: 2 greens. 1/8-1.4 yd. of each
- Rug Edge Horse Reins.: Red, gold, green, and black plaid. 3/16 yd.
- Horse Feed: Gray-blue plaid. 2 strips
- Santa’s Suit: Black. 3 strips
- Arm Outline: Black. 2 strips
- Sleigh Outline: Black. 4 strips
- Santa’s Sleigh: Gold. 1/8 yd.
- Santa’s Scarf: Gold Check. 4 strips
- Sleigh Trim: Gold Check. 1 strip
- Santa’s Suit Trim: White. 6 strips
- Santa’s Face: White. 1 strip
- Santa’s Bag: Blue and red plaid. 1/16 yd.
- Star on Bag: Gold houndstooth. 2 strips
- Santa’s Beard: Gray mix. 1/16 yd.