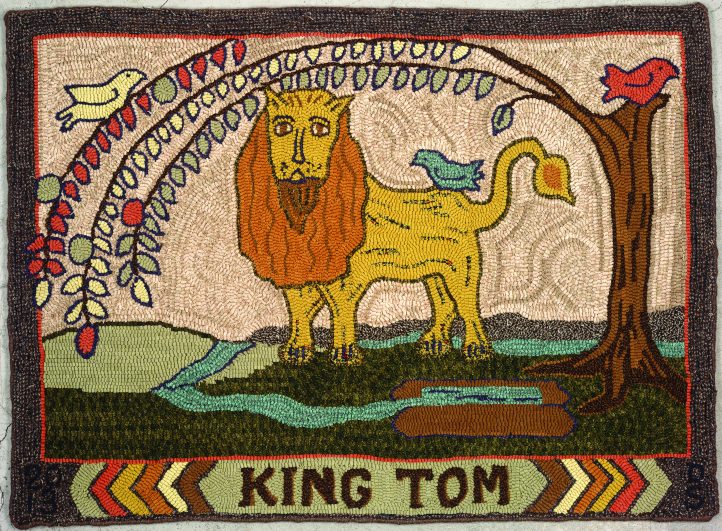
King Tom, 37″ x 27″, #4-, 6-, and 8-cut wool on linen. Wool dyed with natural dyes by Tom Knisely. Pattern designed by Karen Larsen; hooked by Debra Smith, Mechanicsburg, Pennsylvania, 2013. IMPACT XPOZURES
For as long as I can remember I have been interested in plants. That curiosity was encouraged by both my parents; my mother was a wonderful cook who used vegetables and fruits in season and canned and froze what we ate in the winter months, and my father was an organic gardener in the 1940s when it wasn’t in vogue. I learned early in life how to identify trees and plants. As a barefoot boy, I learned how to soothe a bee sting with plantain leaves, and how a little grated apple and a cup of mint tea will settle an upset stomach. The lowly dandelion was honored in our home—in the spring the greens were made into salads and wilted with a bacon dressing. The flowers became dandelion flower wine that rivaled any cream sherry.
One day I picked up a copy of The Rodale Herb Book (Rodale, 1974). The chapter dedicated to dyeing with herbs caught my attention. I was fascinated by the idea that dye could be extracted from local plants and used to color yarn. That was the beginning of a nearly 40-year love affair with natural dyeing.
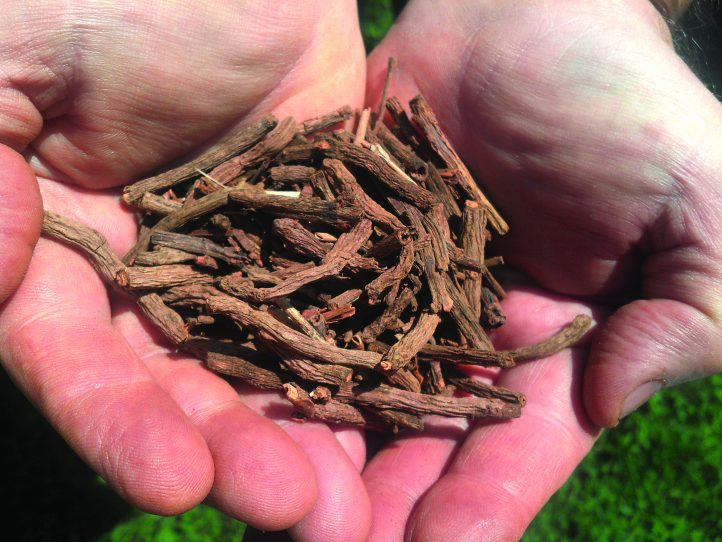
A handful of madder root makes a pinkish rust–colored dye. Madder root is grown in Central America and best found through a fiber arts supply store.
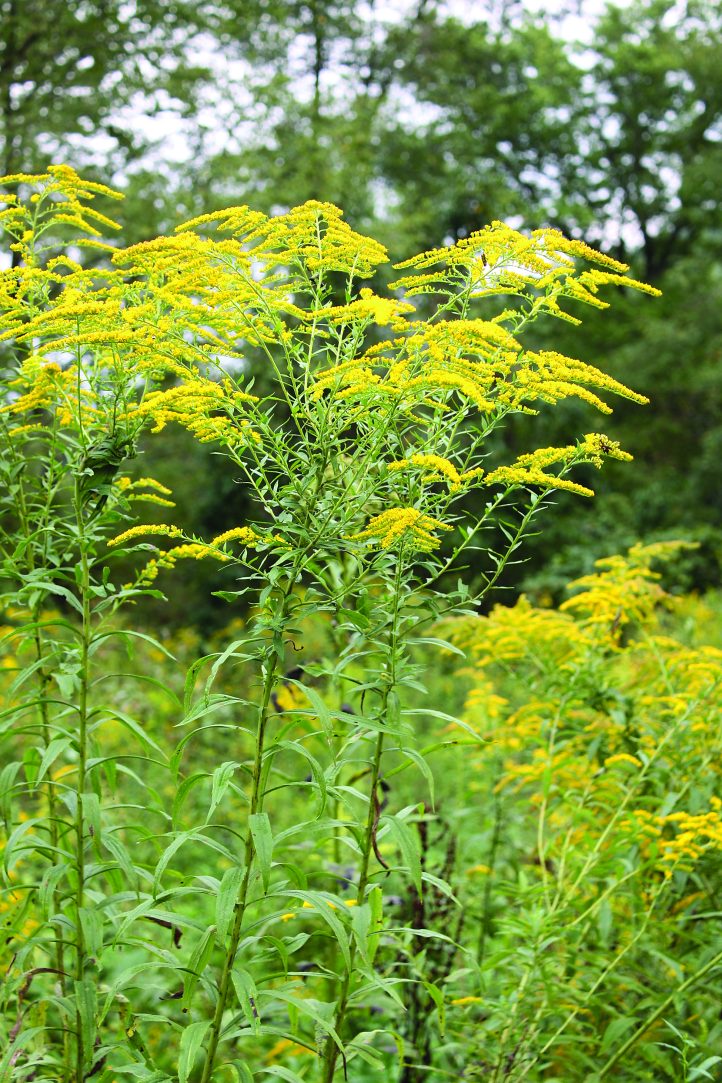
Goldenrod, common in Pennsylvania in the summertime, is used to make a yellow dye. Use the whole plant.
Before You Begin
Safety. First of all, let’s get one thing perfectly clear: “natural” doesn’t mean that these dyes will double as a spring tonic or energy drink. These are dyes for yarns and fabrics and require the addition of a mordant to provide colorfastness. The mordant is a mineral salt, such as potassium alum, iron, tin, or copper sulfate, which aids in keeping the color fast and will prevent fading. Some plant dyes are toxic, and although they may not kill you, ingesting them may make you sick enough to wish you were dead. Natural dyes aren’t toxic to the touch, but wearing gloves will protect you from hot pots and dye-stained hands.
Work space. Pick a safe place to work. You should never use your kitchen for dyeing. Many of you already have a designated dye area in your home. The basement or garage is a good place, especially if it has a source of water and a sink.
I worry about the person who thinks that he or she can get away with using the kitchen just this once. Folks, the kitchen is the place where you also prepare your food, so keep it separate, please. All you need is a splash or little spill onto that new stone countertop . . . the dye will seep into the pores of the stone. I personally like working outside on a pleasant day where there is a lot of ventilation. You can put up a folding table with an easy-to-clean surface and you are ready to go.
Heat source. My favorite heat source is simple: an electric hotplate or two. They are relatively inexpensive, and you can move them to wherever is convenient. But don’t plug too many hotplates into a single outlet or you will blow a fuse or trip the breaker. (Only one guess per reader on how I know this!) Or use a crock pot. Low and slow works well to extract dye from plants. Just mark that crock pot as your dye slow cooker and never use it again for cooking. If you think you may be doing a lot of dyeing, look for an old gas grill that uses propane. The surface of the grill can hold several dye pots at a time.
Dye pots. Your dye pots, whether new or used, should only be used for dyeing. Keep them separate from the kitchen, and don’t ever cook in them.
I love 12- or 16-quart stainless steel stock pots that are approximately 18 gauge. Thinner-walled stainless steel pots will work, but be careful that the materials being dyed do not burn on the bottom. You don’t need to buy expensive cookware. Both stainless steel and enamel are chemical resistant and will not change the colors of your dye.
If you use old copper, brass, or iron kettles, the dye will be affected by the metals. A naturally yellow dye cooked in a copper kettle will turn a greenish color due to the leaching of copper sulfate into the dye. An iron kettle will dull a color, what dyers refer to as “saddening.” (I once dyed some Easter eggs with onion skins and vinegar in an old cast iron Dutch oven and the result was Easter eggs that were nearly black instead of the reddish brown that I usually get in an aluminum or stainless steel pot.)
Many dye books warn against using an enamel pot, such as an old canner, with chips on the bottom. The authors’ claims are that any small chip will expose the iron below the enamel surface and change the color of the dye. Really now… How much can a small chip change the color? Each dye bath comes out slightly different anyway, and I doubt that I could tell the difference between one dye bath and another dye bath using the same recipe a week later. There are too many variables, even to the time of day that the plants were picked. The way I look at it is this: the largest dye companies have chemists and even they put dye lots on the labels of their yarns. I’m more worried about the small chip on the bottom of the enamel pot becoming a hole that will leak.
(Once again, readers, you have one guess on how I know that this can happen.)
Dyestuff
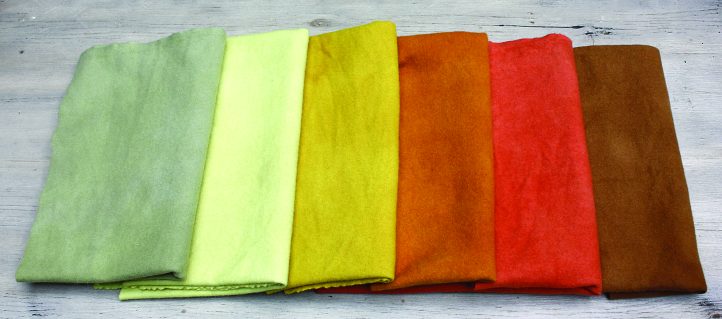
Fabric dyed with natural dyestuffs. From left to right: lantana, goldenrod, Osage orange, onion skin, madder root, walnut.
The term dyestuff is used to describe the plant material used to make the dye.
Because so many plants produce dye, I recommend that you start by consulting a good book on natural dyeing. For your first project, choose any plant that grows near your home or even one you have in your kitchen pantry. I used lantana, goldenrod, Osage orange, onion skins, madder root, and walnut hulls for these fabrics.
How much dyestuff do you need? A little bit will give you pale colors and lots will give you great colors. But remember that the fabric can only absorb so much dye, and the excess will come out eventually. We call that bleeding. If, after you have dyed your fabric or yarn, there is still a large amount of dye in the pot, toss in other pieces of fabric or yarn to dye them to a lighter version of that color.
Follow these general rules to estimate how much dyestuff you will need:
- Weigh the fabric that you are going to dye. (If you have washed the fabric, be sure that it is completely dry before you weigh it.)
- If you are using dry dyestuff, use the same amount in weight as the fabric or yarn that you are planning to dye. Consider thin and papery dry onion skins: it may seem like it will take an eternity to collect what you need, but ask your friends and the manager of your grocery store to save them for you. Before long, you will have enough for your dye pot.
If you are gathering fresh materials from your garden or from the fields, gather at least twice the weight of the dry weight fabric.
These are the basic rules, but keep good notes on your quantities. If you want to reproduce a color again sometime, your notes will help.
Mordants
A mordant is a mineral salt that is added to a dye bath to aid in colorfastness. Some mordants are simple household chemicals that you already have in your home, such as vinegar or ammonia. These chemicals change the pH in the dye bath and can push the color in a different direction. When experimenting with mordants, use small amounts and measure them carefully. Keep notes on what you have done for later reference.
I only use mordants that are safe to use. If a recipe calls for a mordant such as chrome, I avoid it because it can be harmful to you and the environment. Chrome will brighten a color, but I am content with the color I get in other ways. The mordant that I use the most is potassium alum. It has been used for hundreds of years around the world. It is inexpensive and can be found at most fiber-related suppliers. (The alum that you buy at the grocery store for making pickles is not the same as potassium alum.)
Getting Started
I purchased three yards of 54″-wide Dorr’s natural wool fabric. I cut it into six equal pieces measuring 18″ by 54″. I washed the fabric in warm water on the gentle cycle with a small amount of Dawn dishwashing liquid. I laid the fabric pieces out flat to dry.
When I use natural dyes, I pre-mordant my fabric. The general formula is 3 to 4 ounces of potassium alum per 16 ounces of dry weight material and 1 tablespoon of cream of tartar. (The cream of tartar levels out the mordant to make the dyeing more even.) Each of my pieces was 36 ounces. Be careful: use less alum rather than more. Too much alum will leave the fabric feeling harsh and/or sticky to the hand.
In a large 16-quart stainless steel stock pot, I dissolved the alum and cream of tartar in about 12 quarts of warm water and added the fabric to the bath. I put the pot onto a hotplate, brought the bath to a simmer (no need to cover it), and kept it gently simmering for 1 hour. Then I shut off the heat and let the bath cool down overnight. The next day, I spun the fabric in the washer and laid the pieces out to air dry. They were now ready for the dye pot.
Preparing the Dye Bath
A few hints here will save time and aggravation. Break up any large plants or bark into small pieces so they easily fit into the pot. To extract the dye from the dyestuff, simmer the plant materials in water for at least 1 hour (again, no need to cover the pot), and let the material cool down in the water.
When working with very small pieces such as sawdust-sized bits, I make a large “tea bag” out of cheesecloth. Fold the cheesecloth over itself several times, put the dyestuff in the middle of the cheesecloth, fold the edges up, and tie a string around the top to make a bundle. This treatment will allow the dye to escape, but keep all the small particles in the cheesecloth so they don’t coat your fabric or yarn.
After the dyestuff has simmered and cooled, strain the dye bath through a sieve or cheesecloth-lined colander and into another container. You are ready to go. If there is room in the dye pot for more water, add some. Additional water will not dilute the dye; it will give whatever material you are dyeing more room to move around and dye more evenly. After all, there will be the same number of dye particles in 1 gallon of water as there will be in 3 gallons.
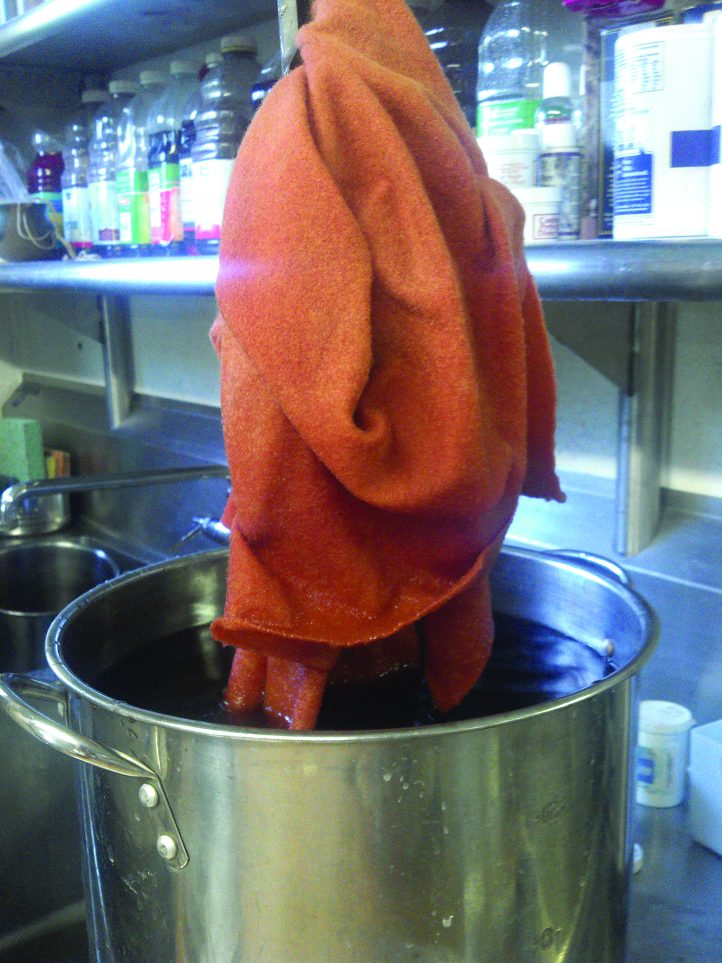
The material coming out of this dye pot was dyed with madder root.
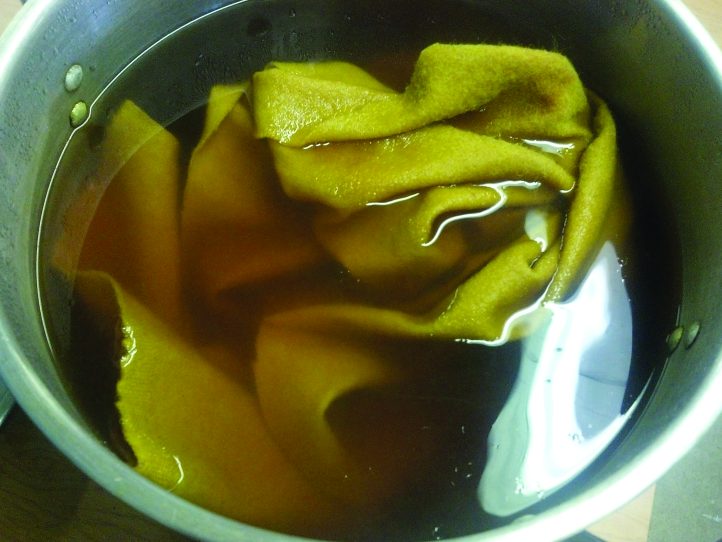
Additional water gives this wool more room to dye evenly in a dye bath of goldenrod.
Dyeing the Fabric
Now to the fun part!
Wet the fabric that you are planning to dye. This helps it slip into the dye water and not float on top. Submerge the material as quickly as possible so you don’t get uneven blotches on the fabric.(Note: If you want the fabric to have uneven spots with concentrations of light and dark areas, use less water or tie up the fabric with string or rubber bands to create a tie-dye look. For more even dyeing, move the material around carefully with a spoon or stirring stick.) Heat the dye pot to a simmer, let it simmer for at least 1 hour, then turn off the heat and let the dye bath cool down to room tem-perature. Then remove the material from the dye pot and rinse it in warm water. Spin it in the washer to remove excess water. Lay the fabric out to dry.
RESOURCES
Here are some of Tom’s favorite books on natural dyeing.
- A Weaver’s Garden by Rita Buchanan (Dover 1999)
- Wild Color by Jenny Dean (Watson-Guptil 1999)
- The Art and Craft of Natural Dyeing by Jim N. Liles (University of Tennessee Press 1990)
Books, mordants, and exotic dyestuffs are readily available through The Mannings Hand-weaving School and Supply Center in East Berlin, Pennsylvania. www.the-mannings.com. Check for dyeing supplies in your local area or from rug hooking suppliers.
Editor’s note: When I spoke to Tom about writing this article, I told him that if he dyed the wool, I would hook a rug with the wool that he dyed. A few months later, he handed me the pile of naturally dyed Dorr wool and my first thought was, “Lion!” So I asked pattern designer Karen Larsen to design a lion rug, and I hooked her design using Tom’s wool. The back-ground wool is off-the-bolt wool, overdyed with walnut tincture. The border is recycled wool: a Harris Tweed man’s jacket from a thrift shop. Tom’s naturally dyed wool colors are prominently displayed in the chevrons on either side of the words. King Tom now hangs in master weaver Tom Knisely’s office, majestically watching over his rug weaving kingdom. The pattern is available from Karen Larsen, crowsfootfarm@hotmail.com.
SMALL NECESSITIES
Gather these before you start.
- Stainless spoons or wooden dowel rods to stir
- Tongs
- Strainer or sieve
- Cheesecloth
- Measuring spoons
- Digital scale
- Thermometer
- Plastic pails and buckets
- Rubber gloves
- Paper towels