
A Rug Hooking Primer
An excerpt from Rug Hooker’s Companion by Donna Hrkman
So how does this rug hooking thing work?
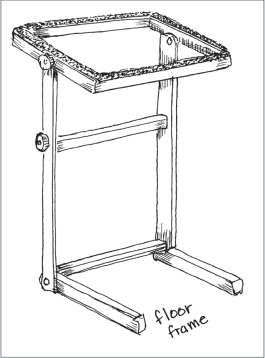
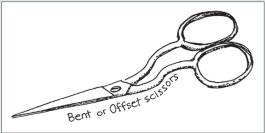
First, you must collect your tools. You will need a frame, a hook, a pair of scissors, a pattern drawn on backing material, and stripped wool. Make sure you have a comfy seat and good lighting. Squinting and straining over your frame will take a toll on your eyes and your back.
Stretch your pattern material on the frame, centering it over the open area. Make sure it’s as snug and as even as possible, lining up the weave of the backing material with the sides of the frame. Some rug hookers leave some slack in the fabric, but to get the most even, consistent loops pulled, a taut and square surface is the best.
Take your first strip of wool in the hand you don’t write with and hold it under the surface of backing. Holding the strip between your thumb and index finger like you’re pinching it. Holding your hook in the hand you write with, gently push the hook into a hole in the backing just inside the drawn line of the pattern. Feed the end of the wool strip to the end of the hook, catch it, and pull it through the hole so the tail of the strip pops up through the surface, leaving about a quarter inch of the end sticking up.
Push the hook down through the hole next to the tail you’ve just pulled up, feed the strip to the hook with your fingers underneath the backing, and catch it with the hook, pulling up a loop that forms about one quarter inch above the surface. Release the loop off the hook, put the hook into the next hole and repeat, pulling up another loop next to the first one, keeping the loops the same height.
Skip the next hole and pull a loop into the one after that. If you hook every single hole, the wool will be tightly crammed into the surface, which is called “packing.” The surface of the rug will be drawn up by the tension of the loops and will not lie flat. Hooking too tightly also wastes wool because you use more than you need. Wool needs air to be expand and contract naturally, so remember to space your loops evenly. You will develop a pattern of hooking—hole-hole-skip, hole-hole-skip. With practice, the wool will tell you where it needs to go.
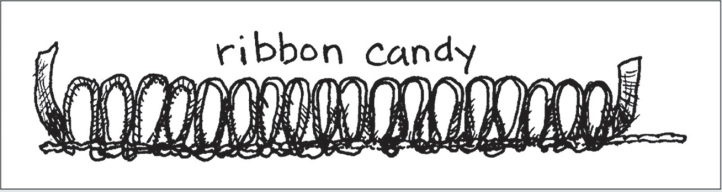
At the end of your strip, pull the last bit of tail to the surface. You should have a line of wool loops that runs evenly across the surface. From the side, the row should look like ribbon candy.
To continue, Take your next strip of wool, hold it under the surface next to the tail you just pulled up, and put the hook into the same hole you just pulled the tail through. Pull up the end of the new strip flat against the tail of the first strip, release it, then push the hook into the hole next to the two tails that are sticking up together and pull up a loop level to those in the first strip. Release the strip, reach, and pull a loop into the next hole in it, release, skip a hole, and pull up a loop in the next hole. Continue to create hooked lines to form an outline of the area you’re filling up, pulling up the tail as you go. The loops should stand like a row of soldiers, shoulder to shoulder. They should not be zigzagging like a zipper or rolling up and down like a roller coaster. You can adjust the height of the loops by gently tugging the loops with the hook to even them out.
To start a second row next to the first row, leave a row of backing open and push your hook through the backing into a hole one row over. If you’re carrying over from a previous row, you’ll continue hooking right to the left and left to the right, back and forth, with an empty row between the lines of hooked wool strips. The backing will be able to expand and contract, to “breathe.”
Your tails will be sticking up slightly higher than the surface of the rug loops. Some hookers leave the tails standing without trimming them as they work across the surface; I trim them as i go, or in brief intervals of hooking. To trim a tail, tug it gently up, trim it across evenly, and release it. Don’t cut at an angle. The slight tension and release will let the tail pull itself back just under the surface of the loops beside it, hiding it from view. The tails of your strip should not be higher than your loops.
Some basic tips for hooking:
Hook the outline of each area first and then fill it in. Hook just inside of the line, as hooking on the line or outside of it will distort the image. This is important on rugs with a geometric pattern or in rugs with fine detail. See the chapter for filling in to see how to direct your hooking lines.
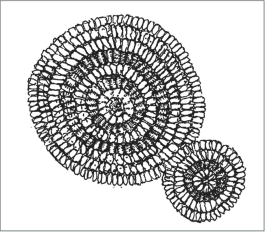
When hooking circles, start with a series of loops in the center and hook concentric rows outward. Make sure to keep the rows evenly spaced because the backing can draw up and form a dome if a circle is hooked too tightly.
Beginners often struggled with twisted strips as they learn how to manipulate them under the surface. After all, you’re doing this blind and relying on the feel of the strip twisting can happen sometimes because the strips are thin or the texture of the wool is loose and your fingers can’t feed it smoothly without having it twist. Usually the twisting goes away as you develop a sensitivity to how the strips feel in your fingers.
Sometimes a strip pulls apart and breaks. If this happens, pull the last end up to the surface, trim it off evenly, discard the broken strip, and start a new strip in the same hole as the broken one and continue hooking.
You’ll be amazed how quickly you develop a feel for the wool strips and the process of pulling loops. You’ll get into a rhythm of pulling up the loops and working across the surface of your rug and then you’ll relax and enjoy the art of rug hooking.
Remember, practice really does make perfect. Draw some straight lines, some circles, some curvy and wavy lines and practice hooking them until you feel comfortable with the consistency of your loops and rows. And don’t be too strict with yourself as you’re learning. Give yourself time, have fun, and create something beautiful!
Rug Hooking Glossary
by Donna Hrkman and We Like Rug Hooking Editorial Team
Allover: A freestyle hooking technique that fills large areas in a rug background by using squiggly lines or repetitive curli- cues. Alternative names include higgledy-piggledy, annagogglin, antigoglin, bundling, and meandering.
Background: The parts of a design surrounding the main motif or subject, often requiring more loops or punches to cover.
Backing: An additional fabric layer applied to the back of a completed piece for durability.
Backing Fabric: The base fabric onto which fibers are hooked or punched. Common choices are monk’s cloth, burlap, and linen.
Binding: The edges of rugs need to be finished in a way that protects the exposed edge from wear and supports the outside row of loops. Binding methods include sewing flat ribbon-like bindings, whipping edges with yarn, or decorative techniques like crochet or braiding.
Blocking: The process of wetting and reshaping a finished piece to lay flat.
Body: The main portion of the rug containing most design elements. Some rugs lack a border, making the body the entire image.
Border: The area surrounding the main body of the rug. Borders can visually contain the inner design and complement it. Designs may vary in width or style, including geometric motifs or stylized edges.
Burlap: A less durable, more affordable option for beginners, though it can fray over time.
Carding Strips: The sharp metal teeth in rug hooking frames that hold the backing taut, often causing rug rash.
Cat’s Paw: A basic bull’s-eye shape with a small triangle of color in the center, surrounded by concentric circular rows of different colors. Also known as millefleur.
Color Planning: The process of selecting colors for a piece, often based on color theory or specific themes.
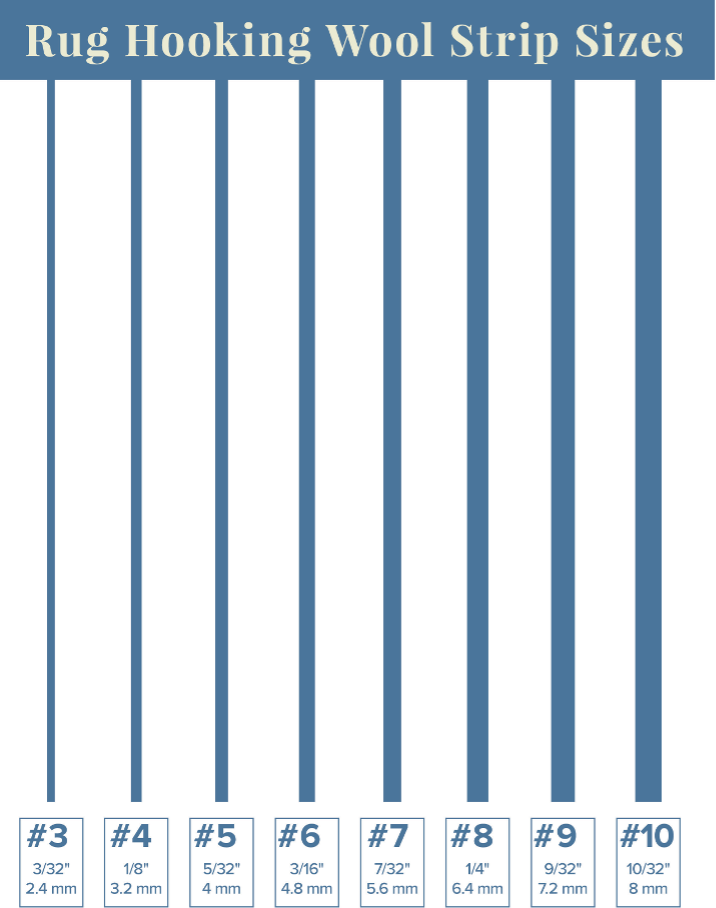
Cut: Refers to the width of a wool strip, ranging from narrow #3 cuts to wide #8 cuts.
Cut Size: The width of the fabric strip used in hooking, ranging from fine to wide cuts. For instance, #3 (fine) to #8 (wide).
Depth Setting: Adjustable settings on some punch needle tools that control the height of loops by varying the needle’s penetration depth.
Dummy Board: A solid backing cut from wood or similar material to support a hooked piece. Common subjects include people, pets, or Santa Claus.
Fine Cut: Narrower strips of fabric (like #3 or #4) used for detailed designs.
Fingering: A method of blending two or more values or colors using interlocking wool strips to create subtle transitions.
Foundation: The base fabric, often burlap or linen, onto which loops are hooked. Sometimes referred to as backing.
Frame or Hoop: A tool that holds the backing fabric taut while hooking or punching. Frames are generally used for larger pieces, while hoops work well for smaller projects.
Gauge: Refers to the thickness of the yarn or thread, impacting the texture and appearance of the project.
Holiday: An empty space in the rug, usually unintentional; a few missed holes.
Hooker: A humorous term often used to describe someone who hooks rugs.
Lamb’s Ears, Lamb’s Tongue: Decorative U-shaped flaps of wool stitched around rug edges or layered within a design.
Linen: A high-quality, durable backing fabric used in both crafts, especially rug hooking.
Loop: The shape formed by pulling yarn or thread through the backing fabric in both rug hooking and punch needle. It creates the pile of the finished piece.
Mat: Another word for a hooked rug, commonly used in Canada.
Monk’s Cloth: A popular choice for punch needle due to its durable weave, allowing for easy penetration.
Motif: An element that is the focus of the rug or repeated throughout the design, such as a flower.
Needle Felting: A craft using a barbed needle to press colored roving into a fabric backing like wool or denim.
Needle Size: Refers to the thickness of the punch needle, which varies based on the weight of the yarn or thread being used.
Noodles: Leftover cut wool strips, also called worms.
Padula, Pedula: A term for ambiguous or imaginary flower forms not based on specific flowers.
Pattern Transfer: Methods for transferring a design onto the backing fabric, such as tracing with carbon paper or using a lightbox.
Pennies: Concentric circles cut out of wool and layered atop a black wool background to create patterns.
Poison: A color that contrasts the main scheme to add visual interest and spark.
Primitive Cut: Wider strips of fabric (like #6, #8) for simpler, traditional patterns.
Proddy: A technique using wide-cut wool strips pulled or pushed from the back to create a shaggy appearance.
Punched Side vs. Looped Side: The punched side is where the needle enters the fabric, while the looped side is the front, where the design shows.
Punch Hooking: A style of rug hooking using a special tool to push yarn into a backing to form loops.
Reverse Hooking: Pulling out hooking done in error or, in Canada, hooking from the back to create special effects.
Ribbon Candy: Hooking loops that form even up-and-down lines resembling the candy of the same name. Rug Hook: A handheld tool with a hooked end used to pull yarn or fabric strips through the backing fabric. Shading: Techniques to create dimension or gradients by varying colors in adjacent loops.
Snippet: Trimmed-off ends of wool strips used as stuffing or gathered as leftovers.
Stash: The rug hooker’s supply of wool for color planning and projects.
Stripper: A machine that cuts wool into strips.
Turnovers: Hooked leaves that twist to show the front and back.
Wool Strips: Cut pieces of wool fabric commonly used in rug hooking.
Worms, Worm Bag: A collection of leftover wool strips used for small projects or hit-or-miss rugs.
Yarn: Often used for punch needle projects, although some yarns are also suitable for rug hooking.
Click Here to Download Your Printable A Beginner’s Rug Hooking Guide Now
Thank you! How do I download it???
Thank you so much for the free gift. 🙂
THANK YOU!
Thank you!!
I’ve always wanted to do this! Thank you, I feel motivated!
Thank you for the gift, a new adventure to try.
Thanks!
Thank you.
Thank you for this guide.
thanks!!!
Thank you.
Thank you for this free guide.
Thank you!
Thank you for the gift. I am looking forward to getting started!!
I appreciate the free guide. It is very helpful. Thank you for the free gift.
lookes great
Thank you.
Thank you
Lots to learn. Thanks so much.
Thank you
Thanks!
Thank you!
Thank you.