
 Give a Gift
PRIMITIVE, FOLK ART, NAÏVE. All of these terms describe the antique rugs I love to reproduce.
I am especially drawn to rugs that look like the artist used whatever she could get her hands on: rugs that were drawn out on old burlap or linen with a piece of charcoal or burnt stick from the fireplace. Rugs that look like the artist ran out of a worn-out shirt she was using and substituted the closest thing she had, with colors that weren’t quite right yet ended up being just perfect. Rugs with a simple subject that meant something to the cre ator—her farmyard, the family cat, the flowers in her garden—rugs that were designed by the rug hooker and not a stamped design sold by traveling sales-men.


I search out these old rugs and study them for hints of what the artists’ lives were like. Did she see dancing bunnies in the field yesterday? Was the running horse one of her own? I am charmed by the simplicity of the design and the obvious love of the rug makers for their surroundings.
The rug I chose for this project was pictured in the book Rags to Rugs by Patricia Herr. The rug was more than 100 years old and beyond any copyright restrictions, but since this was not my rug nor a photo I had taken of the rug, I requested and received permission from Donald and Patricia Herr, the owners of the rug. (I advise anyone who is repro-ducing an antique rug to follow copyright laws as well as common courtesy when using someone else’s rug and/or photo.)
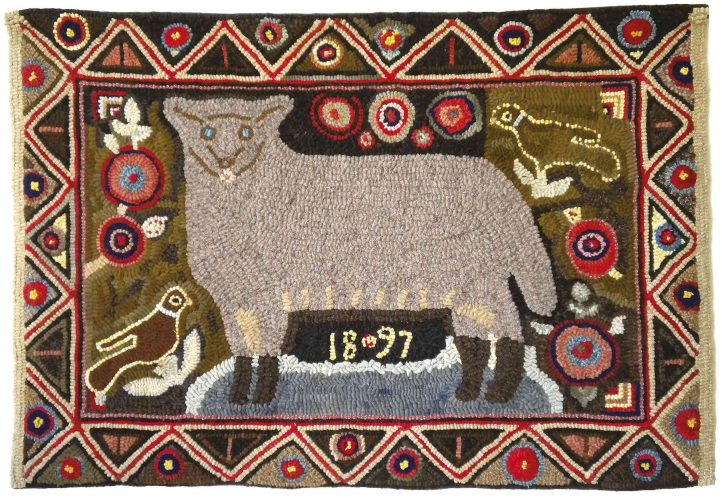
An unknown rug hooker made the 1897 Sheep rug. The rug was found in northern Lancaster County, Pennsylva-nia, and the original size is 26 by 40 inch-es. All of the information I have about this rug is from the book and seeing the rug on display at the ATHA Biennial in Lancaster, Pennsylvania.
Studying the Original
The original 1897 Sheep was hooked on a burlap backing. For this project, I used primitive linen, mainly because it is my favorite backing. Many people do not like to use burlap; it is thought that burlap does not survive as long as linen. But this rug has lasted more than 100 years; I think that if you take care of your rugs, they will last a long time, whatever the backing.
The antique rug was hooked with wo-ven wool, rags, and wool yarn, a mixture born of necessity that today adds to its beauty and charm. For my rug, I used 100 percent wool, mostly as-is wool from bolts and a few recycled wool pieces.
The central focus of the rug is the sheep. The back-ground has a slightly haphazard look, with the flowers scattered about and two birds in the corners. The use of different colors in the dark background suggests this might have been a scrap rug in which the artist used whatever she had on hand. The colorful geometric border is the star of the show and is hooked in direct contrast to the softer-look-ing center of the rug. But even this geometric border has a scrappy look to it, with a lot of movement. The viewer’s eyes are drawn around the rug by that movement.
The colors of antique rugs are soft and mellow. Some of this soft color comes from fading over time. Often, when old rugs are turned over, the back is brighter than the front, showing that the rug hooker did use bright colors that have faded. If you are trying to reproduce these soft colors, use oatmeal, tan, and gray wools to overdye. It doesn’t matter how bright the dye formula looks in your dye book; if you overdye these darker colors, you will get the mellow colors you want.
Planning the Reproduction
The 1897 Sheep rug is very colorful. It makes me think it was very well taken care of, possibly not used very much or only for special occasions. To match the original, I looked through my stash of wool for older, softer colors.
I don’t think it’s necessary to make an exact copy of an antique rug, but this rug was perfect in my eyes, so I started from there.
Sometimes searching for the right color of wool turns
up nothing that is quite right. But sometimes the not-quite- right color is even better. Use what you have in your stash whenever possible. I did very little dyeing for my rug.
I wanted to use as large a cut as possible. While the orig-inal rug appears to have been hooked in approximately a #8 cut, I like even larger cuts for a very primitive look and feel. I used a #6 and #8 cut for some of the outlining, but most of the rug was hooked in a #9 cut. Rug hookers in the 1800s cut their fabrics with scissors or tore their strips by hand. Their cuts were probably uneven and different sizes, which gave a distinct look, so I tore and cut some of my strips to mimic this look.
Enlarging a Design
The easiest way for me to enlarge a pattern is to use the directions on Cindi Gay’s website (rughookology.com). First, I copy the rug to paper using my computer. Then, I trace the main design elements of the rug to tracing paper and scan the tracing into my computer. Once it is saved in my computer, I use Cindi’s configurations to enlarge the design using my own printer.
After printing, which is often 20 or more pages, I trim the edges and tape the pattern together. From there, I transfer the enlarged pattern to Red Dot tracer and then trace the pattern on my linen backing. If you are not com-puter literate, then take your copyright-free photo to a copy center and have them enlarge it to the size you want. Then transfer it to your backing.
Hooking the Center
I hooked the sheep first, as it is the focus of the rug. The circular lips were a little unusual, but I hooked them in anyway! The bright blue eyes and pink lips add a spark to the otherwise somber-colored sheep.
Notice how the artist expertly placed her colors on the ground so the dark legs of the sheep would show. If she had hooked it all in the background colors, the legs would have disappeared into the background. It made me wonder if she had thought of this as she hooked the rug and added the ground as she went along, or did she have this figured out when she drew out the rug? I have so many questions that will go unanswered. I decided to use a mix of three or four blue-greens for the ground under the sheep.
Then came the birds. Why did the rug hooker fill in one of the birds with different colors of fabric and leave the other bird in an outline with a background fill? Did she run out of the scrap she used for the lower-left bird? Whatever the reason, her choices give a unique look to the rug.
I hooked the three rows of the inner border next, as some of the flowers run into the border. I hooked each of the three rows in a #6 cut. I tried various colors for these, but after a few attempts, I went back to the original colors.
I hooked the flowers in the center of the rug next with many reds, pinks, red-oranges, creams, peaches, blues, navies, and greens. The background is a mix of five or six olive-green, navy, and brown wools. Cut sizes varied between #6 and #9, depending on the size of the area to be hooked. Some areas of the background look like the artist ran out of one color and substituted a few others.
I switched colors throughout to try to get the same effect, even though I hadn’t run out of any colors.
Creating the Border
The border is an explosion of the colors used in the center of the rug. Not only did the artist use the reds of the flowers, but she also used the blue of the sheep’s eyes and the greens of the leaves. I think this unknown rug hooker had a marvelous sense of color. Following her example, I outlined each triangle with tan plaid and hooked rows of red and antique black. This arrange-ment gives the border a unified look even though each triangle is slightly different. In a few triangles, the rug hooker used a green or blue to outline the triangle. In one case, they were exactly opposite each other on the rug. The variety made it interesting and fun to hook.
Finishing
The original 1897 Sheep rug has fringe attached to the two short sides of the rug. The longer sides appear to be covered in some kind of material. The material was stitched close to the hooking and then turned to the back and stitched down. Since I wanted to hang this rug on the wall, I decided it would look better without the fringe.
I machine stitched two rows around the edges of the finished rug, approximately ½ and ¾ inches away from the hooking. I trimmed away the excess linen and hand sewed cotton binding tape around the edges, close to the hooking. Then I turned the tape to the back and hand stitched it down. This was a typical way of finish-ing rugs years ago, although they often just turned the edges under without attaching anything to the edges. That might be one reason why the edges of antique rugs are the first to fall apart.
My finished rug doesn’t quite have the same worn look of the original rug. Antique rugs have been subjected to light, air, heavy feet, and maybe even animals in the house. I’m sure if I put my new rug on the floor that someday it will have the same rich patina of 1897 Sheep.
I would have enjoyed meeting and talking to the artist who hooked this rug. Her color and design sense are a delight to the eye. The rug makes me smile, and I will be forever thankful for the opportunity to study and hook this rug. I hope you find a rug that will inspire you to do the same. WLRH


A photograph of the original rug in the book Rags to Rugs guided Pam as she worked on the rug.
Pam wanted older, softer colors to match the original and found most of what she wanted in her stash of wool.

Using her computer, Pam duplicated and enlarged the rug pattern. Because the pattern was much larger than one single sheet of computer paper, she had to piece it together.

Pam started with the sheep in the center of the rug. She found the sheep’s circular lips odd, but didn’t change them; she wanted to reproduce the rug as closely to the original as possible.

The border is the “star” of this rug.

A simple binding technique that was common on rugs from the 1800s finishes the rug.
Pam Upton is a certified McGown teacher who lives in southern Minnesota.